How to Print Invoices, Receipts, and Delivery Notes in WooCommerce
How to Print Invoices, Receipts, and Delivery Notes in WooCommerce


Gina Lucia


If you’re running a local store or restaurant and need a simple way to print invoices and delivery notes in WooCommerce, this guide will walk you through the process step by step.
For many WooCommerce businesses, especially those offering local delivery or pickup, printing order-related documents is a key part of the workflow. Whether you’re preparing orders in the kitchen, packing for delivery, or handing off food at the counter, having a clear, printed invoice or delivery note can help ensure nothing gets missed.
The challenge? WooCommerce doesn’t offer built-in printing for invoices or delivery notes out of the box. That’s where the WordPress plugin Orderable steps in.

With Orderable, you can print invoices, delivery notes, and receipts directly from your WooCommerce dashboard without complicated add-ons or external tools.
In this guide, we’ll cover:
- What invoices, delivery notes, and receipts/tickets are in WooCommerce?
- Why printing them is important for smooth order management.
- How to WooCommerce print invoice, delivery notes, and receipts using Orderable.
Let’s start by clarifying what each of these documents actually is.
Get Your Restaurant Business Online With Orderable
Orderable is a user-friendly WordPress plugin that adds online ordering to your restaurant website.
Add your dishes, create your online ordering menu, customize your delivery schedule, and manage orders with ease.

What are invoices, delivery notes, and receipts/tickets in WooCommerce?
Invoices, delivery notes, and receipts are essential documents for any WooCommerce store. Especially for businesses managing local deliveries, pickups, or in-house order preparation. These documents help smooth operations, minimize mistakes, and improve customer experience.
Here’s how each one works and when you might use them:
Invoices
An invoice is a billing document that provides a detailed summary of a customer’s order. It’s typically shared with the customer during or after checkout and is especially useful for record-keeping, returns, and accounting.
It usually includes:
- Invoice number.
- Order number and date.
- Billing and shipping addresses.
- Itemized list of products.
- Payment method and transaction ID.
- Business details and contact information.
Delivery notes
A delivery note is included with the package or handed over during pickup. It outlines what’s being delivered, but typically doesn’t show prices. Its main role is to confirm the contents of the order during handoff.

Common details include:
- Order number.
- List of items included.
- Special instructions (if any).
- Store contact details.
Receipts and order tickets
This is where things get more hands-on. Receipts and order tickets are crucial for both customers and staff in food service, takeaway, and local delivery businesses.
- A receipt is the customer-facing proof of purchase. It shows what was bought, when, and for how much. It often includes tax information, payment method, and order totals. This is the document customers expect when they ask, “Can I have a receipt?” whether it’s for reference, returns, or expense tracking.
- An order ticket (a kitchen or prep ticket) is used behind the scenes. It’s printed and handed to your kitchen, prep station, or fulfillment team so they can prepare the order accurately. These tickets are stripped down to show only the essentials:
- Items and quantities.
- Variations or special requests.
- Order number and time.
- Table number or customer name (if relevant).
Order tickets are often formatted for quick readability, helping your team stay efficient and avoid missing items or customizations.
If you’re managing a high volume of orders, especially for takeaway or local delivery, having a reliable way to print receipts and tickets directly from WooCommerce can save time and reduce confusion across your team.
Real-world examples: How businesses use printed receipts and tickets
Different types of WooCommerce stores benefit from printing in different ways. Here’s how some businesses are using printed documents to improve day-to-day fulfillment:
- Bakeries and coffee shops. Print kitchen tickets for staff and customer receipts for collection.
- Restaurants offering local delivery. Use driver tickets with special instructions, contact info, and item lists to streamline deliveries.
- Retail stores with pickup. Provide printed invoices or packing slips with orders to confirm contents at handoff.
- Meal prep or subscription box businesses. Use packing slips for fulfillment and customer receipts for reference.
With tools like Orderable’s built-in printing feature, you can generate both receipts and internal tickets, assign different layouts for different use cases (e.g., one for customers, another for kitchen staff), and send them straight to your local printer.

Why you might want to print them
Printing invoices, delivery notes, and receipts plays a key role in keeping order fulfilment accurate and customer communication clear, especially for WooCommerce stores offering local pickup or delivery.
Here’s why printing these documents matters:
- Customer convenience. A printed invoice or receipt gives customers a clear, physical summary of their purchase. It’s helpful for reference, returns, or proof of payment.
- Efficient order processing. Printed kitchen or packing lists help your team track and prepare orders more quickly, without relying on screens or handwritten notes.
- Delivery accuracy. Packing slips and delivery notes reduce errors by clearly listing what’s inside each order and where it’s going.
Printing these documents can help you save time, reduce mistakes, and keep everything running smoothly from checkout to handoff.
Next, use Orderable to walk through how to print receipts/tickets, delivery notes, and invoices in WooCommerce.

How to print receipts/tickets, delivery notes, and invoices in WooCommerce
If you’re looking for a quick and reliable way to print custom invoices, delivery notes, and receipts in WooCommerce, Orderable has you covered. Its built-in receipt and ticket printing feature lets you generate and print fully customized documents directly from your WooCommerce dashboard.
Whether you need a kitchen ticket for staff, a delivery note for couriers, or a branded invoice for customers, you can create layouts that suit your business and print them with just a few clicks.
Using Orderable to print tickets and delivery notes
With Orderable, you can:
- Design your own receipt and ticket layouts using the WordPress block editor.
- Choose from ready-made templates or build layouts from scratch.
- Include important details like order numbers, customer info, special instructions, and more.
- Assign a default layout for fast one-click printing from the WooCommerce Orders screen or Live Order View.
- Print directly to any local printer connected to your device. No extra plugins are required.
You’re in full control of what your printed documents look like, and printing them fits right into your existing order workflow.
Next, let’s walk through the steps to set it up and start printing.
Get Your Restaurant Business Online With Orderable
Orderable is a user-friendly WordPress plugin that adds online ordering to your restaurant website.
Add your dishes, create your online ordering menu, customize your delivery schedule, and manage orders with ease.
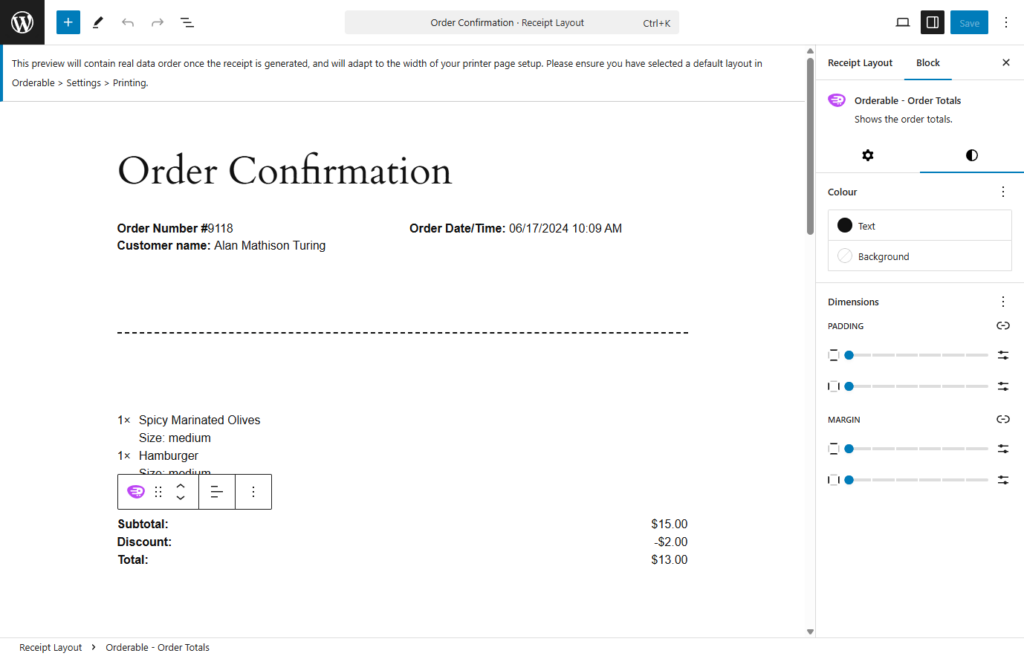
Step 1: Set up receipt layouts in Orderable
Before printing, you’ll need to set up your receipt layouts in Orderable. You can either use one of the pre-built templates or create your own from scratch using the WordPress block editor.
- From your WordPress dashboard, go to Orderable > Receipt Layouts.
- Click Add New Receipt Layout to start building your layout.
- Use the block editor to design your receipt, ticket, or invoice.
- Add key elements like:
- Business logo and contact details.
- Order number, payment method, and transaction ID.
- Billing/shipping addresses, line items, and totals.
- Choose a layout style by:
- Starting from scratch, or
- Clicking the black plus icon, then Browse all > Patterns > Orderable Receipt Layouts to use one of four templates:
- Kitchen Ticket.
- Delivery Driver Ticket.
- Packing Slip.
- Order Confirmation.
- When you’re done editing, click Publish to save the layout.
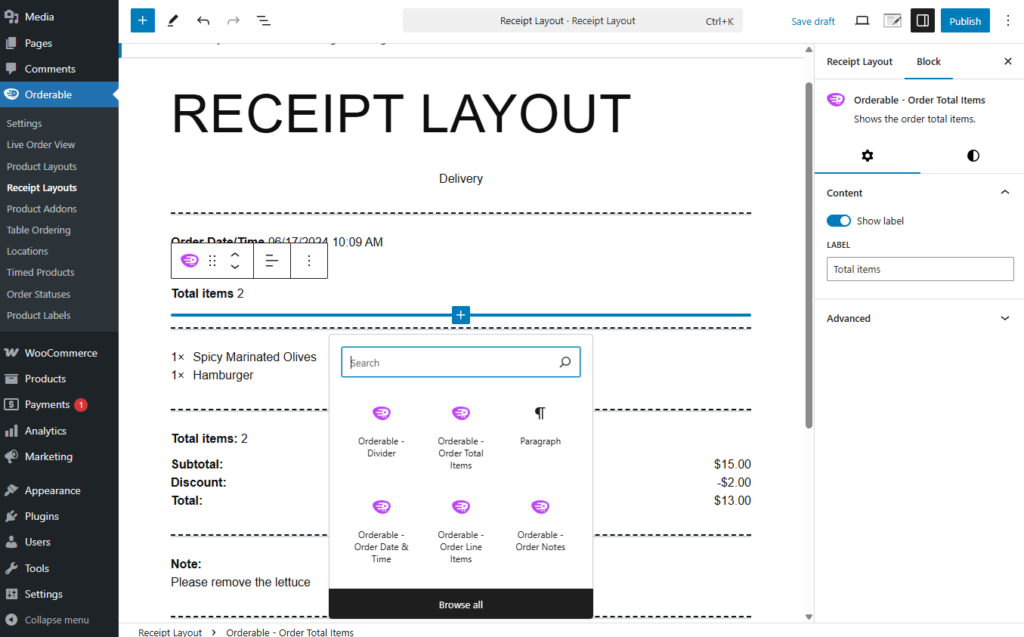
Step 2: Customize your ticket or invoice layout
To fine-tune your layout, Orderable gives you full control over block styling and content via the block editor.
- Click the Settings icon in the top toolbar to reveal more design options.
- Modify block-level settings like:
- Showing/hiding labels.
- Editing label text.
- Changing fonts, colors, padding, and margins.

- To add more details, such as order notes, table numbers, or meta fields:
- Click the black plus icon, then Browse all.
- Search for “Orderable” to view available layout blocks.
- Click any block to add it to your receipt layout.
- Rearrange elements using drag-and-drop or the up/down arrows in the block toolbar.
Step 3: Set your default print layout
Setting a default layout lets you print receipts or tickets with one click from the Live Order View or WooCommerce Orders screen.
- Go to Orderable > Settings, then click the Printing tab.
- Select your preferred default layout from the dropdown.
- Click Save Changes to apply it across your order views.

Step 4: Quick print from the live order view
Once your default layout is set, you can quickly print receipts or tickets without opening the order.
- Go to Orderable > Live Order View or WooCommerce > Orders.
- You’ll see each order’s details like the order status, delivery/pickup times, and more. Click the print icon next to any order.
- A print-friendly version of your default layout will appear, and your browser’s print dialog will automatically open.

Step 5: Print using a different layout
Need to print something other than your default? You can select alternate layouts directly from the order screen.
- Click on the order number to open the Edit Order page.
- At the top, click the Print Order button.
- Use the dropdown arrow next to the button to choose a different saved layout.
- Your chosen layout will open in a print-ready window.

Best practices for creating print-friendly layouts
Creating a polished, readable layout for your receipts, delivery notes, and order tickets directly impacts how smoothly your team can process orders and how confident your customers feel at handoff.
Here are some proven tips to help you get the most out of Orderable’s layout builder:
1. Keep kitchen tickets focused
When creating layouts for kitchen use, less is more.
- Only include essential information like product names, quantities, and modifiers (e.g. no onions, extra cheese).
- Remove anything unnecessary, like pricing or customer contact info. It’s not relevant in a kitchen prep environment and can add visual clutter.
- Use larger font sizes for item names so they stand out instantly.
The goal: Make it easy for your staff to scan the ticket and start prepping without second-guessing.
2. Use bold headers, line breaks, and spacing
A well-structured layout makes all the difference during a busy service.
- Add bold headings (like “Order Total” or “Customer Notes”) to make key sections easy to find.
- Insert line breaks or padding between information groups. This avoids visual crowding.
- Use consistent spacing to separate customer info, item lists, and totals.
Good formatting isn’t just aesthetic, it directly improves efficiency and reduces errors.
3. Group customer details together
Don’t make your team search the entire ticket for a phone number or name.
- Keep customer-related info (name, contact details, pickup/delivery time) in one section, typically at the top or bottom of the ticket.
- If using delivery tickets, consider including address labels in a larger font so they’re easy to spot when organizing delivery routes.
- For dine-in or collection, including the order number and customer name in a bold, central location helps with quick handoff.

4. Add special instructions where they stand out
Orderable lets you include order notes, meta fields, or even custom blocks. Use this to your advantage.
- Highlight fields like ‘Allergies’ or ‘Special Requests’ using bold or colored text.
- Avoid burying important prep details in the middle of an item list – give them their own section or spacing.
- For delivery teams, you might include notes like “Leave at front door” or “Call on arrival.”
Making instructions visible reduces errors and saves time clarifying them with the customer.
5. Test your layout on your actual printer
Even the best-designed layout might need tweaks once you hit print.
- Print a few test orders to check margins, font sizes, and line breaks.
- Check how your layout performs on your actual printer. thermal printers, especially, can vary in width and resolution.
- Make sure nothing is being cut off or spaced awkwardly. Minor tweaks in the block editor (like adjusting padding or font size) can go a long way.

6. Create different layouts for different teams
One layout doesn’t have to serve everyone.
- Use a simplified layout for kitchen staff and your support teams that strips out pricing and customer details.
- Create a separate, branded invoice for customers that includes tax details, totals, and your logo.
- For delivery teams, include a layout with delivery instructions, phone numbers, and condensed order summaries.
Orderable makes it easy to assign and print the right layout for the right purpose – so take advantage of that flexibility.
Get started with printing invoices and delivery notes today
Printing documents like invoices, delivery notes, and order tickets doesn’t have to be complicated. With Orderable’s built-in printing feature, you can quickly create, customize, and print exactly what your business needs, right from your WooCommerce dashboard.
Whether you’re handing off takeout orders, prepping for deliveries, or providing receipts to customers, Orderable gives you the tools to create professional, branded layouts that suit your workflow. Using the WordPress block editor, you can fully tailor each layout, from fonts and colors to the specific order details you want to include.
You can start using Orderable’s built-in printing tools today with the free plugin version – no extra plugins or costs required.
Want help setting up your first layout? Check out the full documentation →
Print professional invoices and delivery notes with Orderable today and enhance your order processing experience.
Get Your Restaurant Business Online With Orderable
Orderable is a user-friendly WordPress plugin that adds online ordering to your restaurant website.
Add your dishes, create your online ordering menu, customize your delivery schedule, and manage orders with ease.
Gina Lucia is our in-house Content Manager at Orderable. She writes articles, user guides, technical documentation, and creates videos on everything WooCommerce and Orderable.
Gina has been working in the WordPress/WooCommerce space since 2012 when she developed WordPress websites for clients large and small.
For the past 8 years, she’s been writing about everything WordPress and WooCommerce, becoming an expert in what makes a WooCommerce store succeed.
When not writing, Gina loves to tend to her vegetable garden, read, or travel to mainland Europe.
Don’t miss out on the latest Orderable news!
Sign up for our newsletter to receive the latest news from the blog, you’ll get pinged every week with a digest of the latest updates.
[fluentform id=”6″]

Related Articles
How to Increase Restaurant Sales in 2026
Local SEO for Restaurants: How to Improve in 2026

How to Convince Skeptical Diners to Order Online for the First Time
Get Your Restaurant Online With Orderable
The WooCommerce plugin designed to help restaurants take orders online – with no added fees!
View Pricing
