How to Create a WooCommerce Custom Order Status
How to Create a WooCommerce Custom Order Status

Gina Lucia


If you’re looking to create WooCommerce custom order statuses for your online store, this guide is for you.
In this guide, we’ll walk you through how to create a custom order status in WooCommerce. As a bonus, we’ll teach you how to edit the existing order statuses and create email notifications once that status is reached.

All of this we’ll do with the WooCommerce plugin, Orderable. Which means no custom code is needed.
Get Your Restaurant Business Online With Orderable
Orderable is a user-friendly WordPress plugin that adds online ordering to your restaurant website.
Add your dishes, create your online ordering menu, customize your delivery schedule, and manage orders with ease.

But first things first, let’s address what an order status is before we get to creating new ones.
What is a WooCommerce order status?
An order status is a tool/feature in WooCommerce to manage orders as they come into your store.
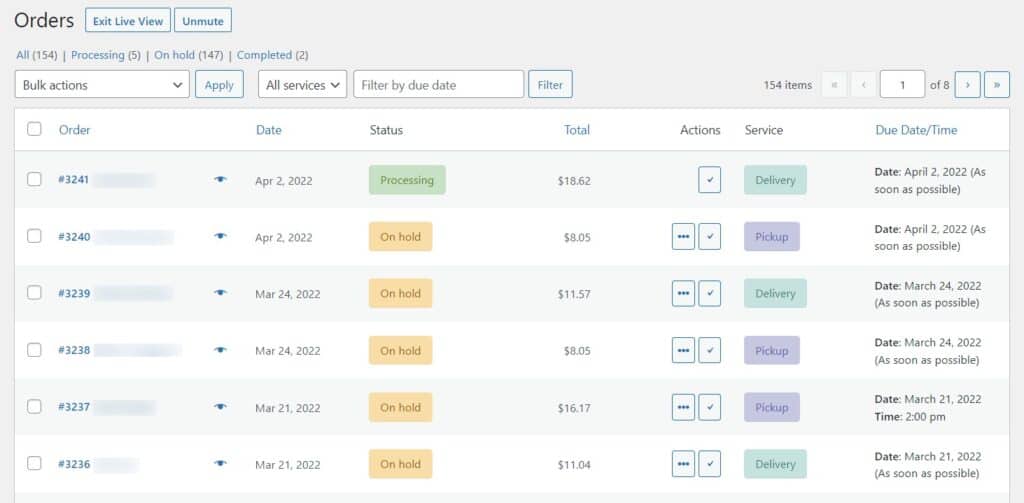
These order statuses allow you to mark your orders’ stage, so you can apply the correct order actions to them. These order statuses appear on the Orders page, Order details page, Order list, and Edit orders page.
By default, WooCommerce has the following order statuses:
- Pending payment – The order has been received, but you’re awaiting payment.
- Failed – The payment failed, was declined, or requires authentication.
- Processing– The payment has been received, and your stock has been reduced. It’s awaiting delivery.
- Completed – The order is complete and requires no further action.
- On hold – The order is awaiting payment. Your store’s stock has been reduced, but you need to confirm the payment.
- Canceled – The order has been canceled.
- Refunded – The order has been refunded.
- Authentication required – The order is awaiting action by the customer to authenticate the transaction on their end.
By default, each order status leads to another (unless it’s Completed, Canceled, or Refunded). This is an order status change. For example, Pending leads to Processing if the order goes through without a hitch.
There may be a few reasons why these default order statuses don’t quite work for you. We’ll explore these below.
Why you might want to create a custom order status in WooCommerce
The order statuses that come with WooCommerce work well for standard WooCommerce stores. But for some, they don’t offer the flexibility you need.
You might be looking for custom WooCommerce order statuses if you’re:
A food business or restaurant
If you run some kind of food business, no matter if it’s a takeaway, restaurant, or bakery, you may need to create more flexible order statuses that work for you.
In this case, you might need to create new order statuses to manage food prep (Preparing). Or specific food statuses for delivery drivers (Ready to be delivered). Or even specific statuses for local pickup (Ready for pickup).
You take pre-orders or special orders
If your online store takes a lot of pre-orders for products, you might need to create some custom order statuses to fit this need.
You might need a specific Pre-ordered status to separate these orders from your main ones. You also might need a custom Pre-order delivery status to inform customers that their pre-ordered product is on its way.
You create custom products
If you create custom or bespoke products, you may well need to create custom order statuses for your WooCommerce store that allow you to manage these better.
For example, if you’ve taken payment for an order but it’s in production, or you’re building/creating it, you might need an order status to indicate this. This would be especially useful if you want to keep customers in the loop by also sending them an email notification once you’ve reached this stage.
If you’re looking to add these sorts of order statuses to your WordPress store, you can’t with the default WooCommerce setup. To add new custom order statuses and edit existing ones, you’ll need the help of a plugin.
Introducing the WooCommerce plugin, Orderable
Orderable is a WooCommerce plugin that allows you to manage your orders much more effectively.
Orderable helps you to create new custom order statuses for your WooCommerce store and add email notifications for them. It also allows you to edit existing or core order statuses, all so you can take care of your orders without the hassle.
With Orderable, if you want to create a new order status called ‘Preparing,’ you can. You could name it, give it an icon, and decide which order status would come after it. This would then appear on the WooCommerce orders page, or Live Order View for you to use.
You can also set up email notifications once you change status. So, if you wanted to send customers (or delivery drivers) a message when their order is being prepared, you can do so. You’ll be able to customize everything from who sends it to the subject line, message, and more.
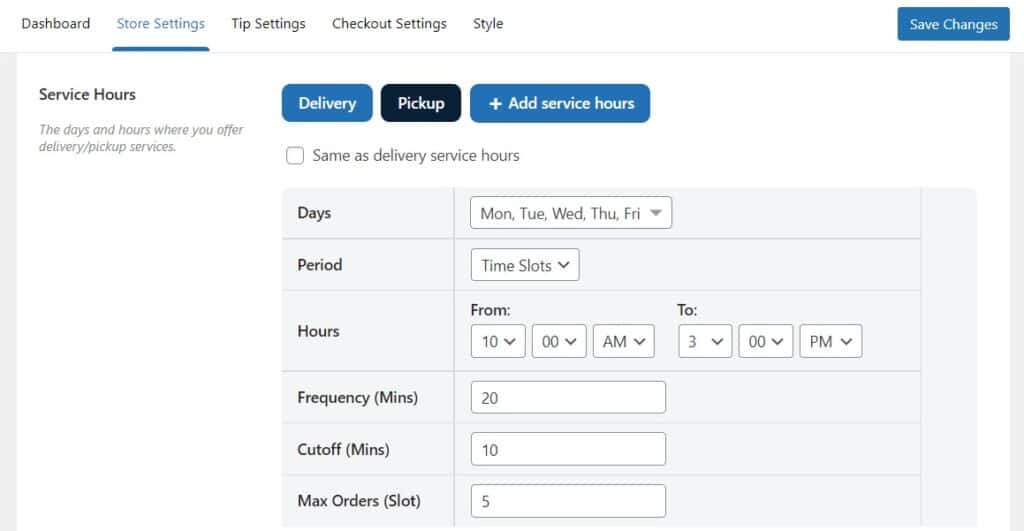
As a bonus, Orderable also allows you to completely customize your delivery and pickup schedule. Allowing customers to select their own date (and time if you need it), for their delivery.
So now we know what Orderable can do, let’s use it to create some custom order statuses for WooCommerce.
How to add a WooCommerce custom order status
The following tutorial will walk you through how to add a custom order status to WooCommerce using Orderable.
Step 1: Get Orderable
Start by purchasing Orderable Pro from the Orderable Website. After you complete the purchase, two files will be downloaded: Orderable and Orderable Pro, which you need to add to your WordPress website.
Follow these simple steps to add Orderable to your WordPress website:
- From your WordPress dashboard, hover over Plugins and click Add New.
- Click Upload Plugin at the top and upload the Orderable zip file you downloaded earlier.
- Click Install Now > Activate.
Repeat the above steps for the Orderable Pro zip file.
The next page will ask you to enter your business information, for example, address lines, name, location, etc.
Once done, we can move on to creating your custom order statuses.
Step 2: Create a new custom order status
To create a new custom order status, take the following steps:
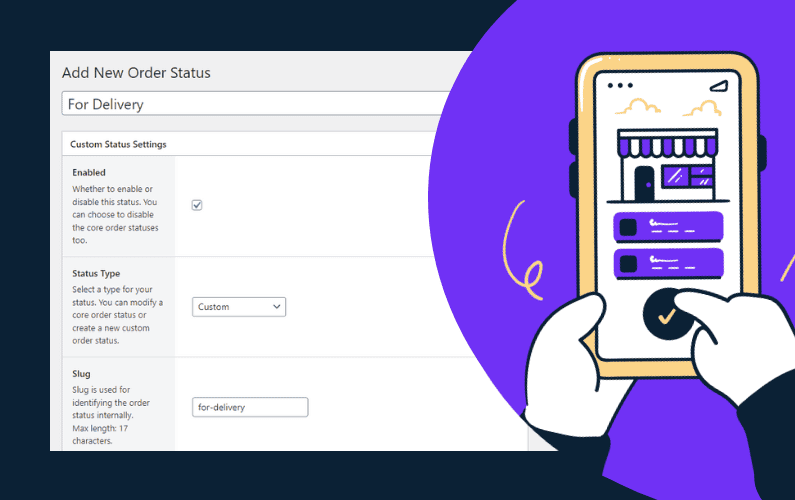
- When on your WordPress dashboard, go to Orderable > Custom Order Status and click the Add New button at the top of the page.
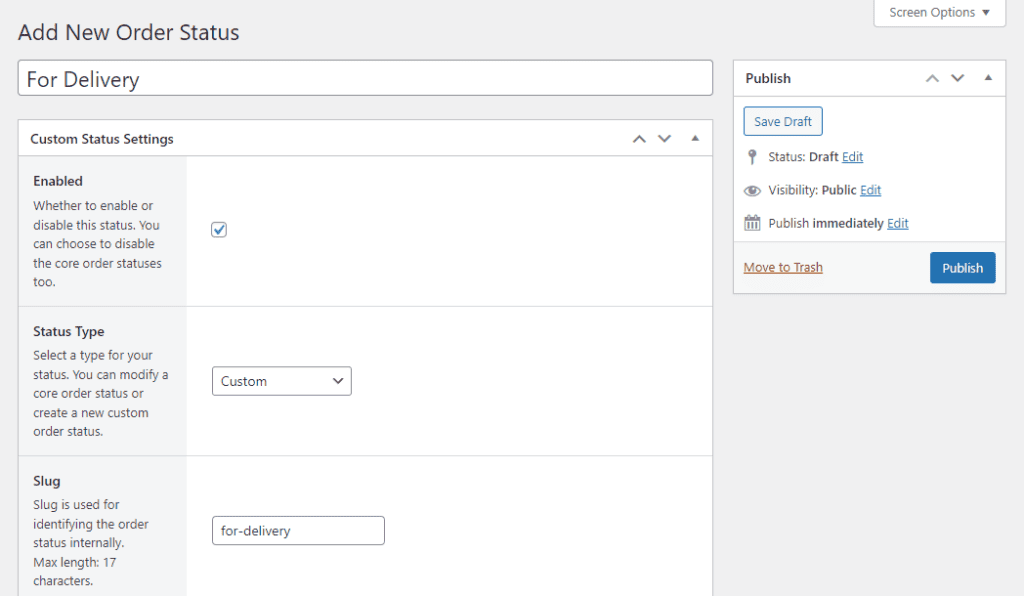
- While on the Edit Custom Order Status page, give your new order status a status name.
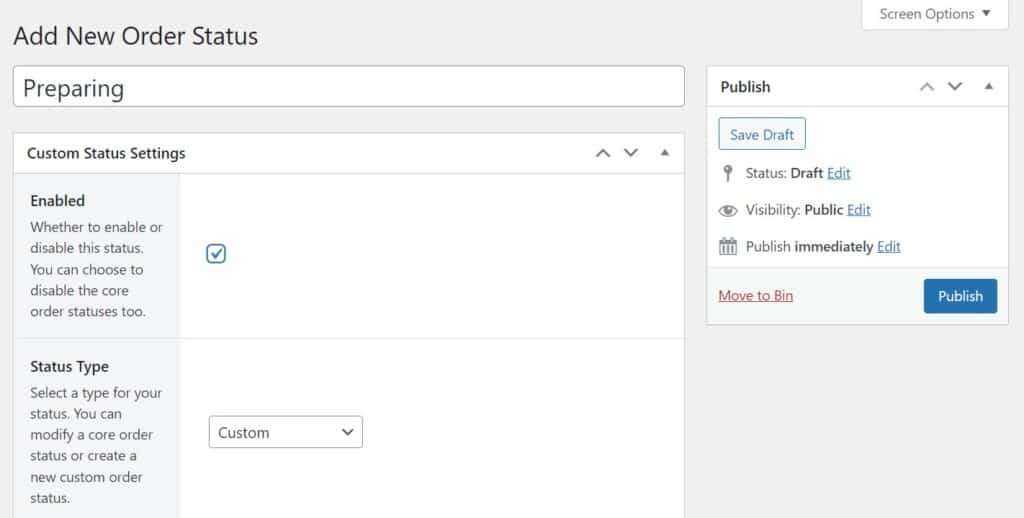
- Then, click the checkbox next to Enabled, to have this order status appear on the Orders page.
- Underneath this, you’ll be able to select the Status Type.
- Pick between a default order status, or create a new one (Custom). If you pick a default order status (one of the ones we listed earlier in the article), it will override it.
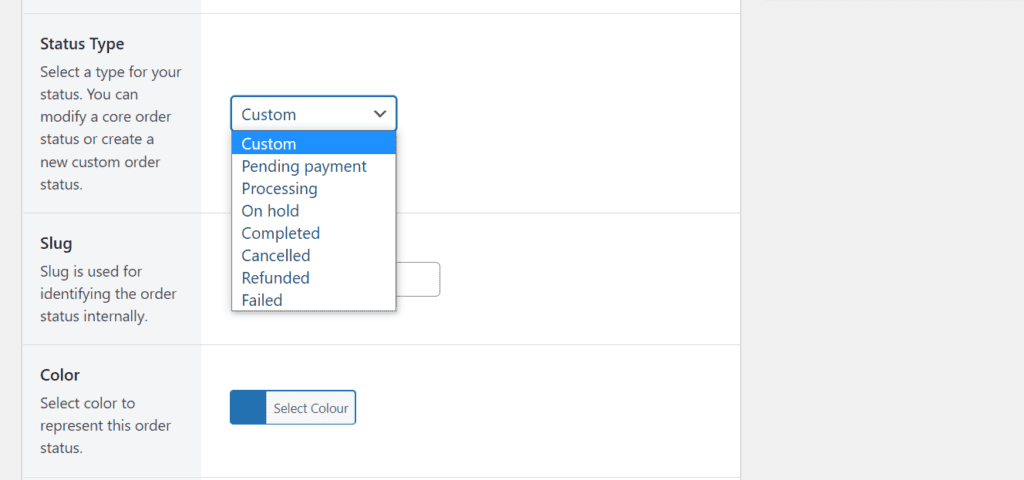
- Next, add a status slug in the Slug section.
- After this, you can pick the order status color using the color picker.
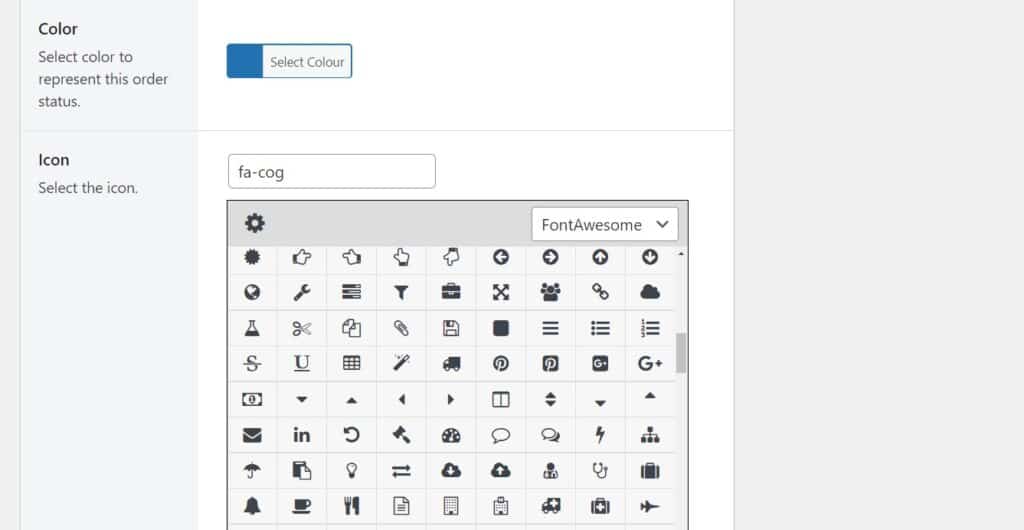
- Style allows you to decide if you want the order status to be a status icon or text on the Orders page (as action buttons).
- Next steps allows you to decide which order statuses will be displayed in the Actions column of the Orders page. This will determine your order management workflow.
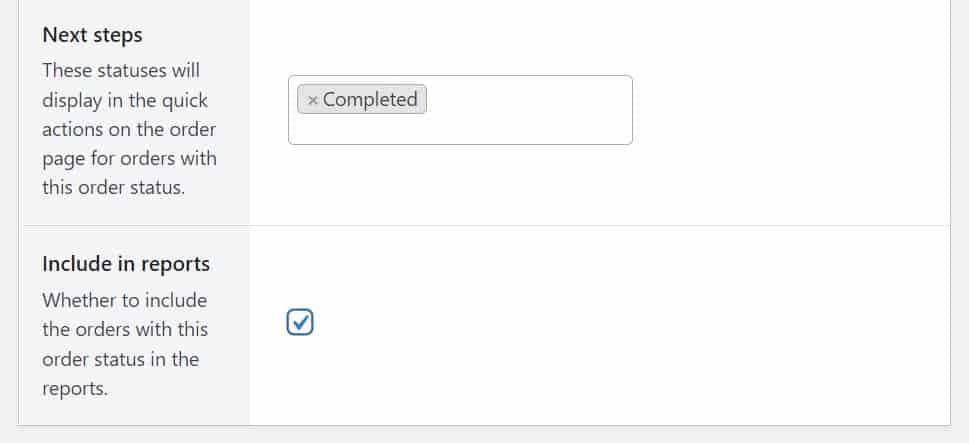
- Lastly, select the checkbox next to Include in reports, to add this order status to your store’s reports.
Next, we’ll need to customize the notifications or order emails that get sent when one of your custom order statuses is selected.
Step 3: Create your order status notifications
With Orderable, you can add custom order status that sends an email, SMS, or WhatsApp message. For this purposes of this guide, we’ll set up a WooCommerce email order status notification.
To add a notification, or custom email to an order status, take the following steps:
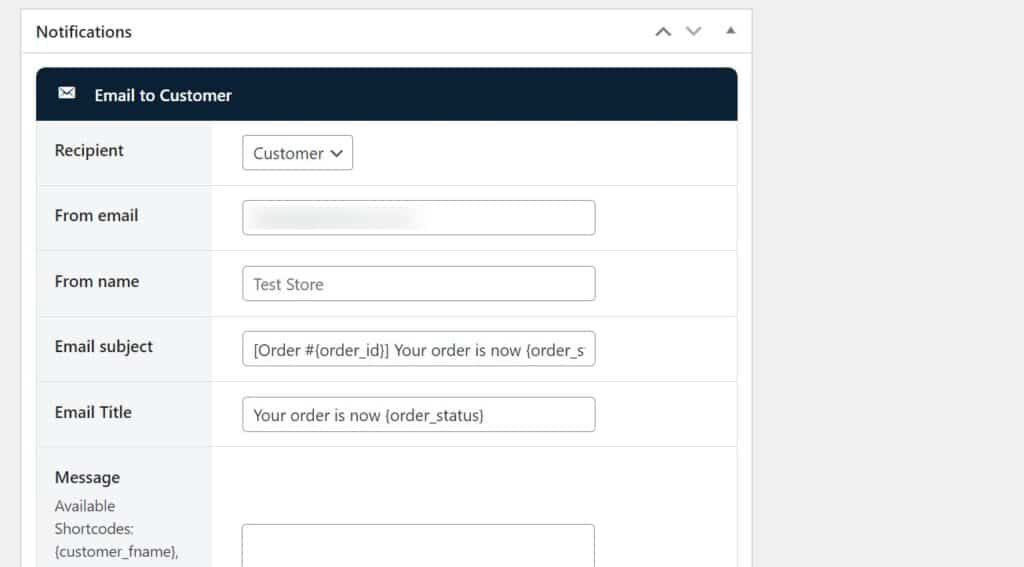
- Scroll down to the Notifications section and click the Add Notification button.
- This will open an email notification editor. Select who you would like the email sent to (either Customer, Admin, or Custom).
- These options allow you to send notifications to in-house members of staff (like the store owner or kitchen staff), the customer, or external staff such as delivery drivers.
- You’ll be able to customize everything from the From email to the From name, Email subject, Email title, and more.
- Then, edit the new email content in the Message section.
- You can add anything you like here. Keep it simple with the order ID and checkout information. Or customize it more with coupons for future purchases.
- The next two checkboxes enable you to include the order table and include customer information should you want to.
- Once you’re happy with all your changes, click Publish.
Add as many of these notifications as you like. If you need to notify customers and a delivery driver, you can customize different messages for both.
Add a custom order status to your WordPress site today
That’s it. You’ve now created a set of custom order statuses with notifications for your ecommerce store with the WordPress plugin, Orderable.
By doing this, you’ll be able to manage your store’s order tracking and order management much easier. Without the need for a full WooCommerce Order status manager.
Get Your Restaurant Business Online With Orderable
Orderable is a user-friendly WordPress plugin that adds online ordering to your restaurant website.
Add your dishes, create your online ordering menu, customize your delivery schedule, and manage orders with ease.
Gina Lucia is our in-house Content Manager at Orderable. She writes articles, user guides, technical documentation, and creates videos on everything WooCommerce and Orderable.
Gina has been working in the WordPress/WooCommerce space since 2012 when she developed WordPress websites for clients large and small.
For the past 8 years, she’s been writing about everything WordPress and WooCommerce, becoming an expert in what makes a WooCommerce store succeed.
When not writing, Gina loves to tend to her vegetable garden, read, or travel to mainland Europe.
Don’t miss out on the latest Orderable news!
Sign up for our newsletter to receive the latest news from the blog, you’ll get pinged every week with a digest of the latest updates.
[fluentform id=”6″]

Related Articles
Why Customers Struggle With Your Online Food Ordering System

10 Small Restaurant Menu Items to Add in 2026 (To Increase Sales)

How to Add Table Ordering to Your Restaurant Website
Get Your Restaurant Online With Orderable
The WooCommerce plugin designed to help restaurants take orders online – with no added fees!
View Pricing
