How to Add WooCommerce Delivery Time to the Checkout
How to Add WooCommerce Delivery Time to the Checkout

Gina Lucia


If you want to add delivery time to your WooCommerce website, you’ve come to the right place.
Customers today have very busy lifestyles, and as a result, they prioritize convenience when shopping online. One of the best ways to match their busy schedules is by adding delivery dates and times to your WooCommerce store.

Adding delivery time to your WooCommerce store will allow your customers to receive their orders conveniently. You will also have complete control over your delivery schedule and better manage your staff.
👋 In this article, we’ll walk you through a step-by-step guide on adding delivery time and date to your WooCommerce store easily. Plus, we’ll do it with the help of the WooCommerce plugin Orderable.
Get Your Restaurant Business Online With Orderable
Orderable is a user-friendly WordPress plugin that adds online ordering to your restaurant website.
Add your dishes, create your online ordering menu, customize your delivery schedule, and manage orders with ease.

But before we get into it, let us first discuss why adding WooCommerce delivery dates and time slots to your ecommerce shop is important.
Why add delivery dates and time slots to WooCommerce
Delivery dates allow you to show your customers the days of the week you are available to deliver their orders. On the other hand, delivery time slots allow customers to pick the time of day they would prefer to receive what they’ve ordered during checkout.
Both are beneficial to you and your customers because of the following reasons.
Time slots help to improve customer satisfaction
With time slots enabled in your ecommerce shop, customers can select when it is most convenient for them to receive their deliveries or pick up their orders. This means they won’t have to disrupt their plans to wait for delivery.
📈 Convenience plays a key role in customer satisfaction. In a study conducted by Deloitte, 70% of the respondents cited convenience as one of the main reasons why they would shop from a given online store.
This is especially important in the food business, where you deal with perishable products.
Customers want to predict when they will receive these products since they need to be consumed on the same day. As customers get more convenience from your business, they will be more satisfied with your service, which could encourage them to buy from you again.
Delivery dates and time slots help to manage your deliveries
Adding delivery dates and time slots to your WooCommerce store lets you control your schedule. You can create a delivery/local pick-up schedule that corresponds with your working days and available staff.
You can also choose the number of orders you can deliver over a given period and give your staff breaks. All of this helps you to manage your orders better and ensure that you’re not understaffed or overworking your available staff.
Time slots allow you to secure deliveries
With time slots, customers can select when exactly they are available to sign for their orders from the delivery personnel on the order delivery date. This adds an extra layer of security since the delivery staff won’t have to leave their orders at the doorstep.
Adding delivery dates and time slots can’t be done in the default WooCommerce setup. To do this, you will need the help of the WooCommerce plugin, Orderable.
How Orderable works for setting up time slots
Orderable is a robust WordPress plugin built to handle all your online ordering needs. It covers everything from creating menus, managing orders, an improved checkout, offering delivery, local pickup services, sending customer order update notifications, and more.
With Orderable, you can give your customers various choices at checkout. This includes selecting between delivery or local pickup. And after they do so, you can go a step further to allow them to select the time of day they prefer to receive their orders using Orderable’s time slots feature.
Let’s look at how Orderable’s date and time slots work on your WordPress website. From both the customer’s and store owner’s perspectives.
From the customers’ perspective
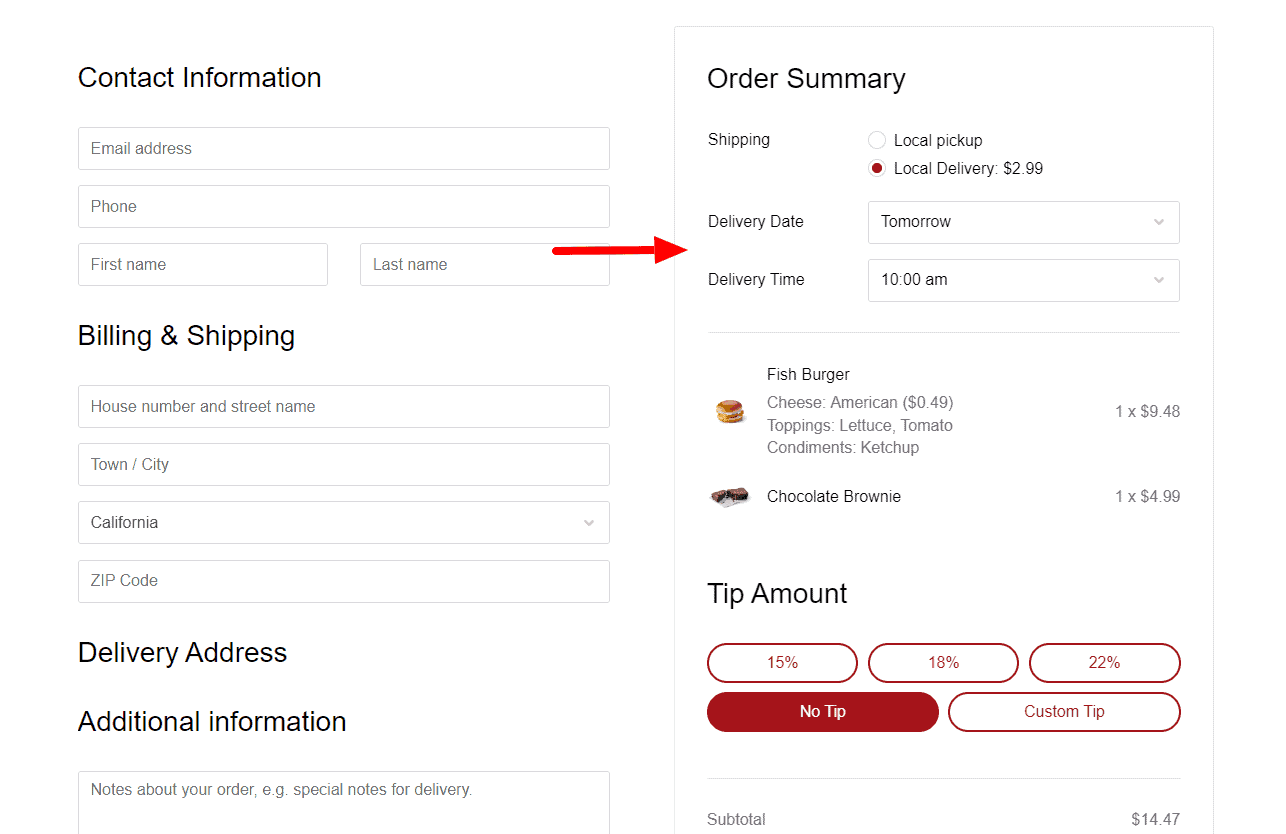
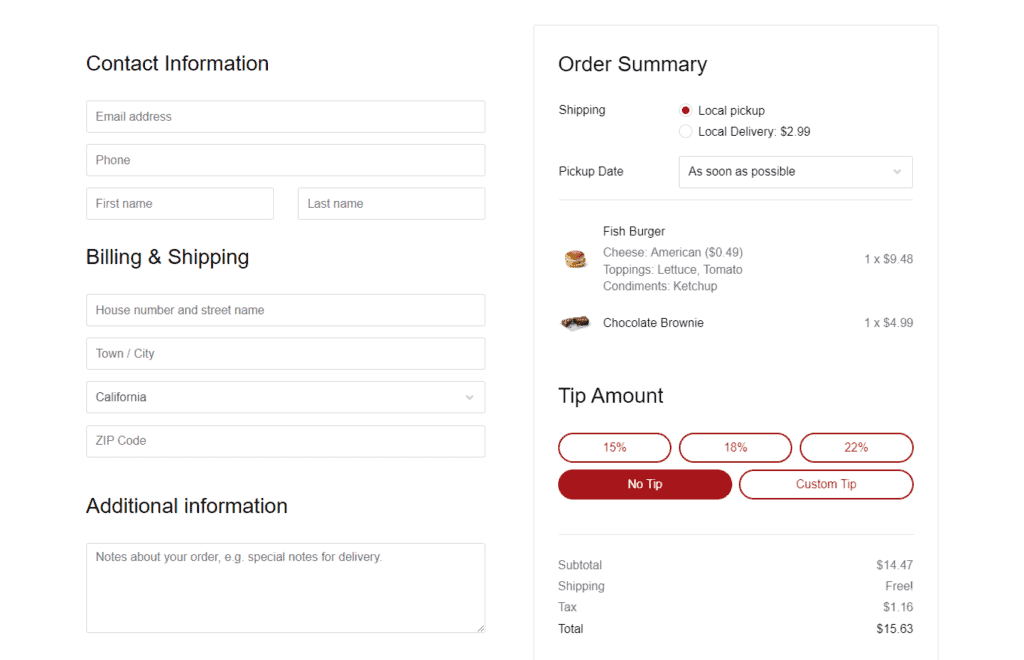
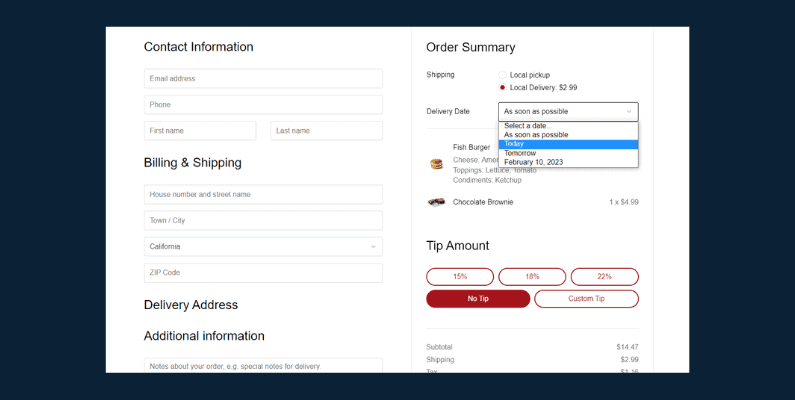
When customers leave the cart page to proceed to the checkout page, they can pick a time and date slot in the Order Summary section. First, they can choose between delivery and local pickup if they are within your shipping zone or close to your premises.
NOTE: Orderable also allows you to set delivery fees directly from your WordPress dashboard, which will be displayed next to the delivery option. Orderable gives you the flexibility to choose how you charge your delivery fees. You can set a flat rate, base it on the weight of items, or use table rate shipping.
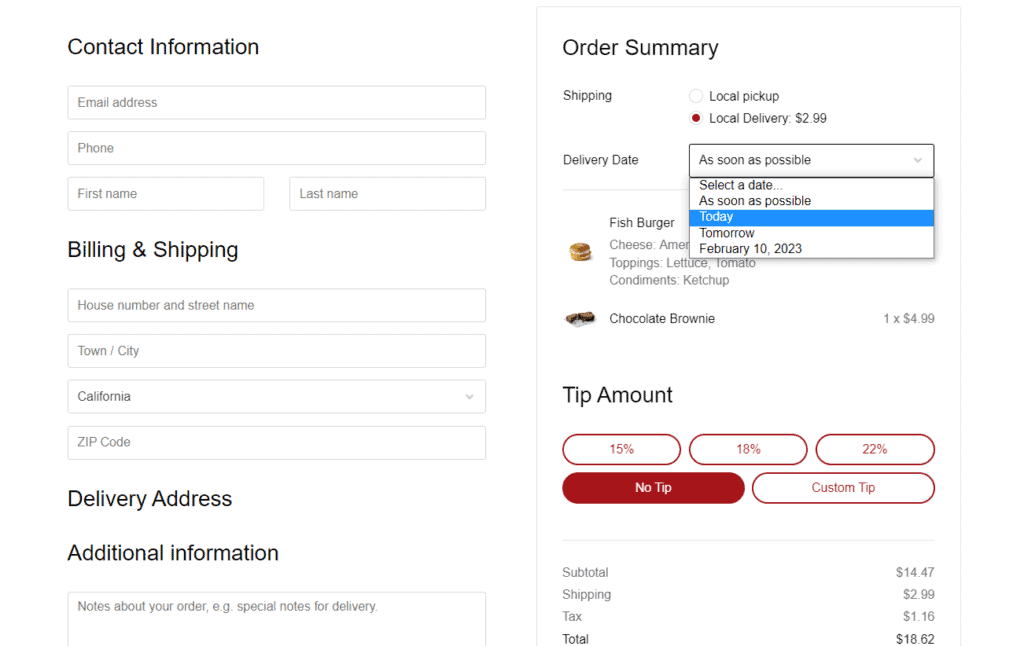
After selecting a shipping method, customers can then choose a delivery date under the delivery/pickup date section. Clicking this dropdown will open a date picker from which they can select a specific date for the delivery/pick up.
This can be ‘Today’ (same-day delivery), ‘Tomorrow’ (next-day delivery), or as soon as possible.
Just below the delivery/pickup date section is the time slots section. Here they can click a dropdown and select a specific time from the time slots you have provided.
NOTE: Once a customer places an Order, you can set up your WooCommerce store to send them notifications on the shipping date and the product delivery date.
From the store owner’s perspective
As the store owner, Orderable gives you total control over your delivery/pickup schedule. By adding the time slots and delivery dates functionality to your WooCommerce store, you’ll be able to:
- Choose which days you’re available to deliver orders.
- Set when you want to start deliveries and when you want to stop.
- Set how frequently you want to offer delivery slots for your orders.
- Set the maximum number of orders you’ll take for each time slot.
- Give your staff breaks from your delivery schedule.
That being said, let’s see how you can add delivery time to the checkout page on your WooCommerce store.
How to add a WooCommerce delivery time to the checkout page
In this section, we’ll walk you through a step-by-step tutorial on how to add delivery dates and times to the checkout page of your WooCommerce shop.
To get started, you will need to purchase Orderable Pro from the Orderable website: orderable.com.
Get Your Restaurant Business Online With Orderable
Orderable is a user-friendly WordPress plugin that adds online ordering to your restaurant website.
Add your dishes, create your online ordering menu, customize your delivery schedule, and manage orders with ease.
You will then be sent two plugins in your email, Orderable, and Orderable Pro.
Step 1: Install Orderable (Free and Pro versions)
Follow these steps to install the free version of Orderable:
- Go to Plugins > Add New on your WordPress dashboard.
- Click on the Upload Plugin button at the top of the page and upload the .zip file you were sent containing Orderable (the free version).
- Click Install Now, and when the installation is complete, click Activate Plugin on the next page.
- Repeat the above steps to install Orderable Pro.
Once you’ve activated the Orderable plugin, you’ll be directed to the plugin’s settings page, where you can adjust your store settings.
Step 2: Adjust your store’s settings
The first thing you’ll want to do is to set the time when your store is open throughout the week.
You can take the following steps to change your store settings:
- From your WordPress dashboard, go to Orderable > Settings to open your plugin’s settings page.
- Click on the Store settings tab. In the Open Hours section, you can set the hours of the day and the number of days in which your store will be operating.

- You can also update your store’s current timezone when you click the Update Timezone button.
- Also, on the settings page, you will find more settings on tipping, checkout, and notifications which you can handle later.
- When you’re done, click on the Save Changes button.
Step 3: Set up date and time slots
While we’re still on the settings page, you can set up a delivery calendar with specific dates and times that your customers can pick. To do this:
- Go to Orderable > Settings on your WordPress dashboard and click on the Store Settings tab.
- Scroll down and check the Delivery and Pickup in the Services section of this page.
- Below, you’ll find the Service Hours section. You’ll see options for both Delivery and Pickup. Select the Delivery button to set up both the date and time slots for your store.
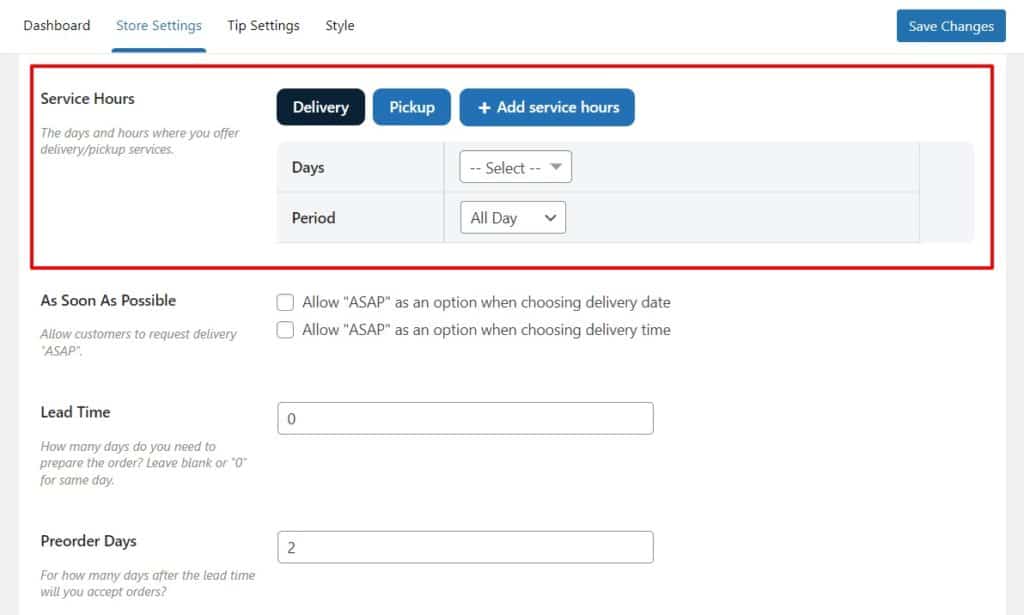
- Both the Delivery and Pickup sections have the same settings, and you can move between the two by clicking the Delivery or Pickup buttons.
- You can choose to keep the same date and time slot settings for Pickup by leaving the Same delivery service hours checked on the Pickup section. Or, create two completely different schedules.
- We’ll go through each setting at a time:
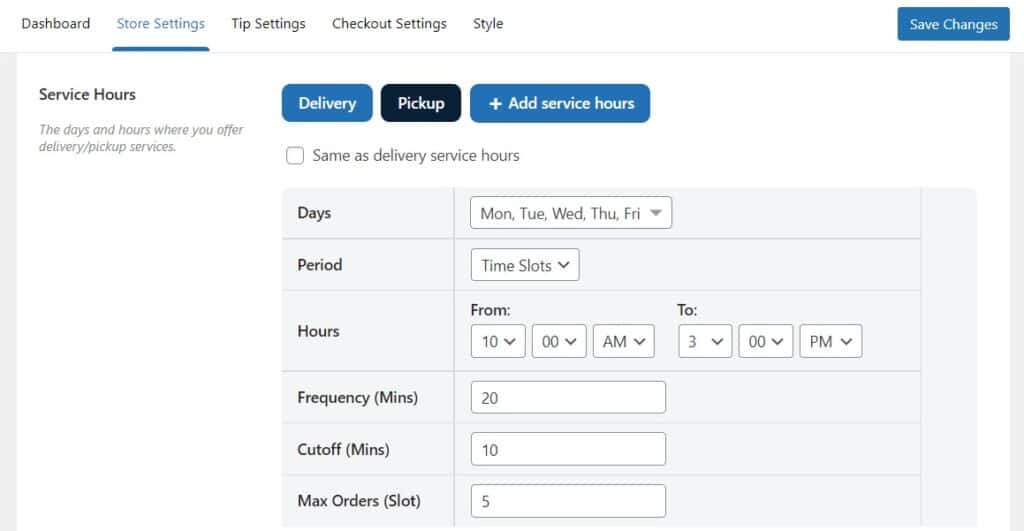
- Days – You can click the dropdown icon for days you’d like to provide delivery services. For example, select Monday to Friday if those are the days you can deliver orders.
- Period – You’ll have two options here. If you leave the settings to All Day, you will offer delivery/pickup as long as your store is open. If you select Time Slots, more settings will appear, and you can set specific product delivery dates and times.
- Hours – In this section, you’ll determine when you want to start offering delivery/pickup and when you want to stop. You can also adjust the Hour section to add additional time slots. You can do this when you click the + Add service hours button and repeat this for the other days of the week.
- Frequency (Mins) – The frequency is how often you have a time slot available for delivery or pickup.For example, if you want to offer slots every 30 minutes, you’ll put 30 here.
- Cutoff (Mins) – The cutoff time is the limit for choosing a time slot for delivery. If the cutoff time is set to 30 minutes, a customer can’t select a time slot that starts in less than 30 minutes from the current time.
- Max Orders (per time slot) – Finally, you’ll be able to set the maximum number of orders you’ll take for each individual time slot.So, if you’ve set your time slots to be every 30 minutes, you can set the maximum number of orders you’ll take in each 30-minute slot.
- Once you’re happy with all your slots, scroll down the page and click the Save Changes button. Your time slots will now be available from the front end of your website for customers to select.
Add time and date slots to your WooCommerce store today
That’s it! You’ve just added time and date slots to your WooCommerce store.
With these features, your customers can know the estimated delivery date and the time frame for their orders.
As a store owner, Orderable is the best tool to help you achieve customer satisfaction through convenient deliveries and much more. In addition, you’ll be able to manage your resources better and run your operations smoothly.
Get Your Restaurant Business Online With Orderable
Orderable is a user-friendly WordPress plugin that adds online ordering to your restaurant website.
Add your dishes, create your online ordering menu, customize your delivery schedule, and manage orders with ease.
Gina Lucia is our in-house Content Manager at Orderable. She writes articles, user guides, technical documentation, and creates videos on everything WooCommerce and Orderable.
Gina has been working in the WordPress/WooCommerce space since 2012 when she developed WordPress websites for clients large and small.
For the past 8 years, she’s been writing about everything WordPress and WooCommerce, becoming an expert in what makes a WooCommerce store succeed.
When not writing, Gina loves to tend to her vegetable garden, read, or travel to mainland Europe.
Don’t miss out on the latest Orderable news!
Sign up for our newsletter to receive the latest news from the blog, you’ll get pinged every week with a digest of the latest updates.
[fluentform id=”6″]

Related Articles

8 Restaurant Grand Opening Ideas for 2026
How to Add a WooCommerce Delivery Date in 2026
How to Create a Restaurant Website (Step-by-Step Guide)
Get Your Restaurant Online With Orderable
The WooCommerce plugin designed to help restaurants take orders online – with no added fees!
View Pricing
