How to Easily Create an Online Ordering System for Takeaway
How to Easily Create an Online Ordering System for Takeaway

Gina Lucia


Looking to set up an online ordering system for takeaway? This guide is for you.
Setting up an online ordering system for your takeaway business can seem like a huge task. After all, you might not know where to start, what you need to look out for, or how to get it done in the easiest way possible.
Well, we’re here to help. In this guide, we’ll show you how to create an online ordering system for takeaway and add it to your website in just a few steps using the WordPress digital ordering plugin, Orderable.
Get Your Takout Business Online With Orderable
Create your takeout website quickly and easily with the takeaway ordering system for WordPress, Orderable.
Orderable is reliable, easy to set up, and simple to use. All you have to do is customize it to suit your takeout business and watch orders come in.
But before we get into the how, first, we’ll explain why we think you should use WordPress for your restaurant’s online ordering system.
Why use WordPress for your restaurant’s online ordering system?
First, we’ll explain what WordPress is, just so we’re on the same page.
What is WordPress?
WordPress is a tool that helps you build and manage a website. It’s known for its simplicity and flexibility, making it suitable for beginners as well as professional web developers.
If you have a WordPress website, you can use it not only to host your restaurant’s takeaway menu but also as your online food ordering system.
So now we know what WordPress is, let’s take a quick look at why it’s the perfect option for your online ordering system for takeaway.
WordPress is flexible
By having your restaurant or takeaway website on WordPress, you’ll have full control and flexibility over your food operation.
This is because with WordPress, you can use plugins or addons to customize your website and add online ordering.
The two plugins we’ll walk you through in this guide are WooCommerce (which allows you to take payments and add products/dishes), and Orderable (which allows you to create an online menu, set delivery schedules, and so much more).
With these three together, you’ll be able to:
- Take orders online without any additional fees with an online store.
- Manage incoming orders independently – without having to use an expensive third-party app or software (like Doordash, Uber Eats, Grubhub, or Deliveroo).
- Have an online menu for takeaway orders or food delivery.
- Offer as many delivery options as you’d like.
- Have full control over the ordering experience so you can increase customer loyalty.
With these, you don’t need to sign up for expensive third-party online ordering software, ordering apps, or custom restaurant POS systems. You can just customize your WordPress website and have your restaurant’s ordering system all in one place without a monthly fee. In other words, it’s commission-free
You’ll keep the experience in-house
With WordPress, you won’t have to outsource the ordering process to a third-party service provider. This means you’ll have full control of the entire online ordering process, enabling you to create the best customer experience possible. This will enable you to retain customers, boost sales, and subsequently increase your revenue.

You’ll also save on the cost of paying for the services of a third-party mobile app, allowing you to increase your profit margin.
By having your own online ordering system, you will avoid sharing the risks that the third-party provider incurs, such as system failures. You’ll also get to keep your profits to yourself and keep all your customer data too.
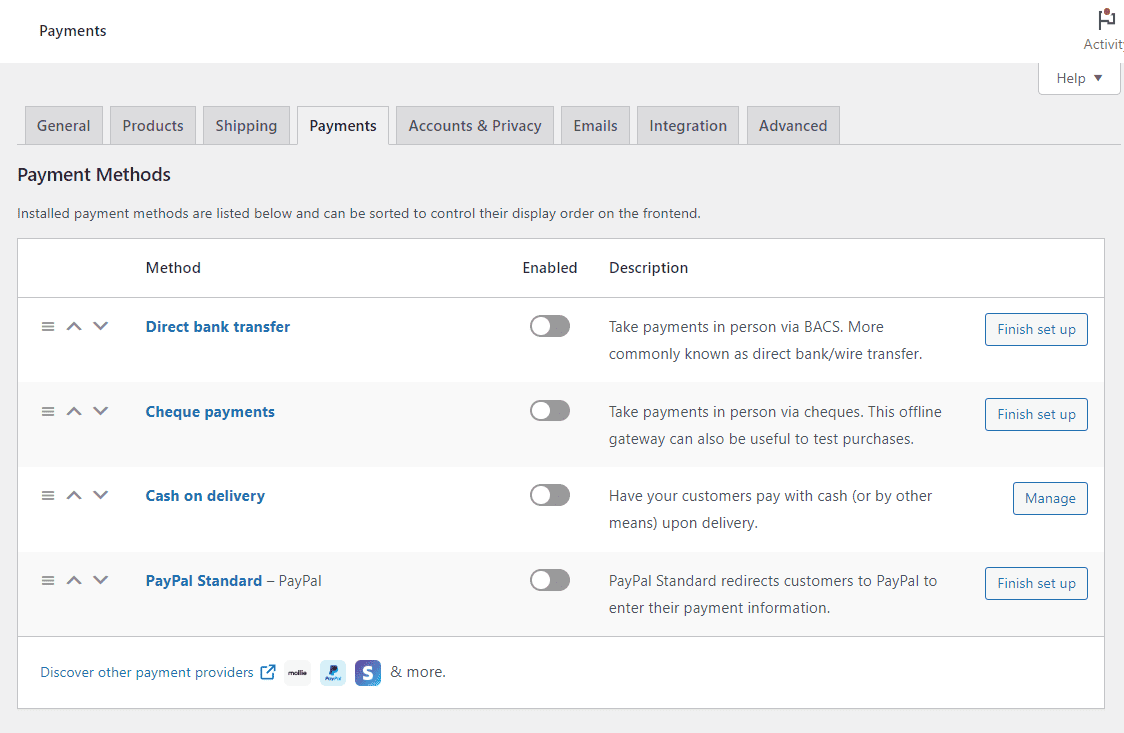
You’ll have control over the payment options
Since you’ll be using your own website, you can choose to integrate as many payment gateways/payment processing options as you like, depending on your customer’s preferences.
With WooCommerce (the ecommerce part of your takeaway website) this can include:
- Credit cards.
- Apple pay/Android pay.
- Stripe.
- PayPal.
- Gift cards.
- Amazon Pay, and so on.
Using these, you’ll maximize your new customers’ payments and not miss out because their preferred payment option is not available.
You’ll keep all ordering options in one place
Using WordPress for your online ordering solution will enable you to manage everything in one place.
Whether you want to offer local curbside pickup, takeout, and/or delivery for your order, you’ll do this in an organized fashion because you’ll keep it all in a single place.

Keeping it in a single location, back of house, will enable you to have a clear overview of the orders, their status, and other details, enabling you to manage your orders easily.
This prevents confusion you might get if there’s a lapse in communication between you and a third-party provider.
You’ll be able to add more information
Having your own ordering system allows customers to have access to more information. They can click on menu items and see nutritional information, longer descriptions, add-ons, and more.
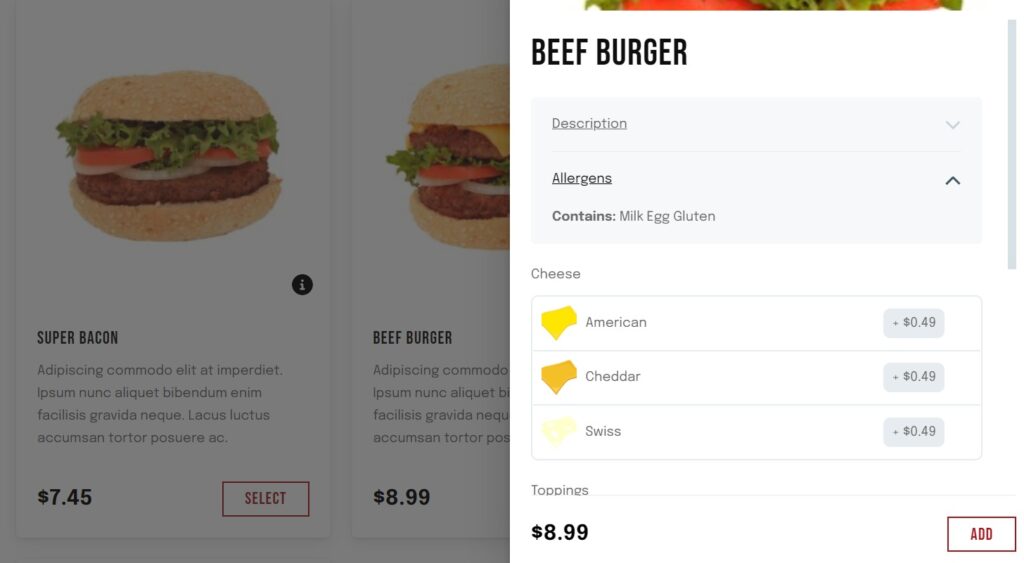
With a third-party application, you won’t have the same freedom, and you’ll be limited to what they offer. You can also leverage this to upsell or cross-sell to your customers to boost sales and increase your average order value. For example, offering fries or soda when they add burgers to their carts.
This is just a subset of the benefits you can enjoy if you use your WordPress site (with WooCommerce and Orderable) for your online ordering system.
Next, let’s actually get it done and see how you can add an online ordering system for takeaway to your WordPress site.
How to add an online ordering system for takeaway to WordPress
In this section, we’ll walk you through the steps you need to take to add an online ordering system for takeaway to your WordPress website. First, let’s have a look at what you’ll need.
What you’ll need
- A WordPress website – you probably already have a basic website set up for your restaurant. If not, you’ll need to set one up – the good news is, it’s free.
- Orderable – WordPress covers the basic website setup, but to add the online ordering system, you’ll need the help of the plugin, Orderable.
Introducing the best online ordering system plugin, Orderable
Orderable is an online ordering platform for WordPress that allows restaurant owners to set up an efficient online ordering system for their WordPress website.
Get Your Takout Business Online With Orderable
Create your takeout website quickly and easily with the takeaway ordering system for WordPress, Orderable.
Orderable is reliable, easy to set up, and simple to use. All you have to do is customize it to suit your takeout business and watch orders come in.
With Orderable, all you’ll have to do is add menu items, take orders, process, and complete them. It takes care of everything else.
Because it uses WooCommerce for checkout, it can install WooCommerce on your WordPress website for you if you haven’t done that already.

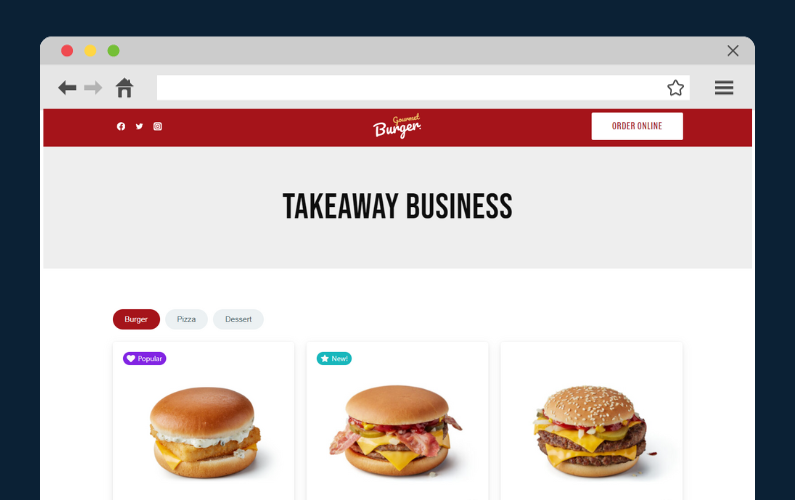
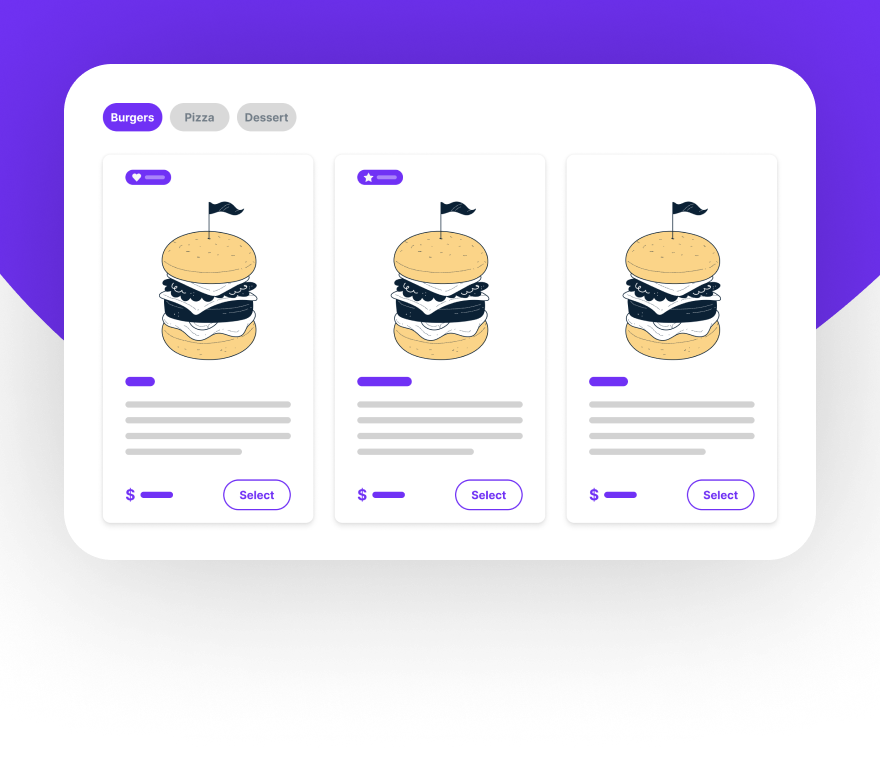
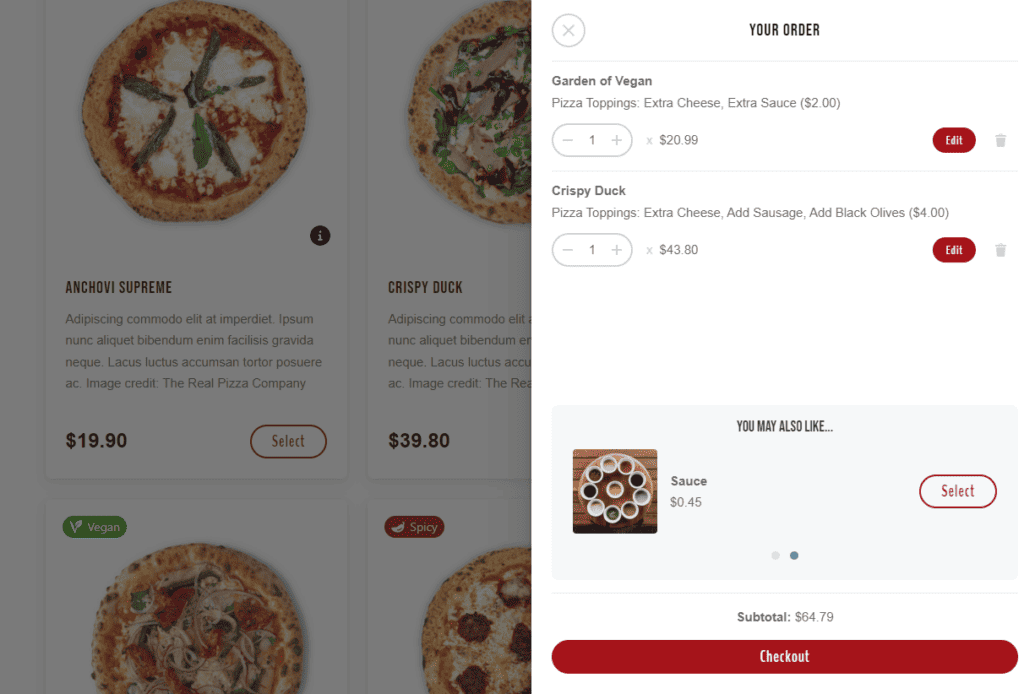
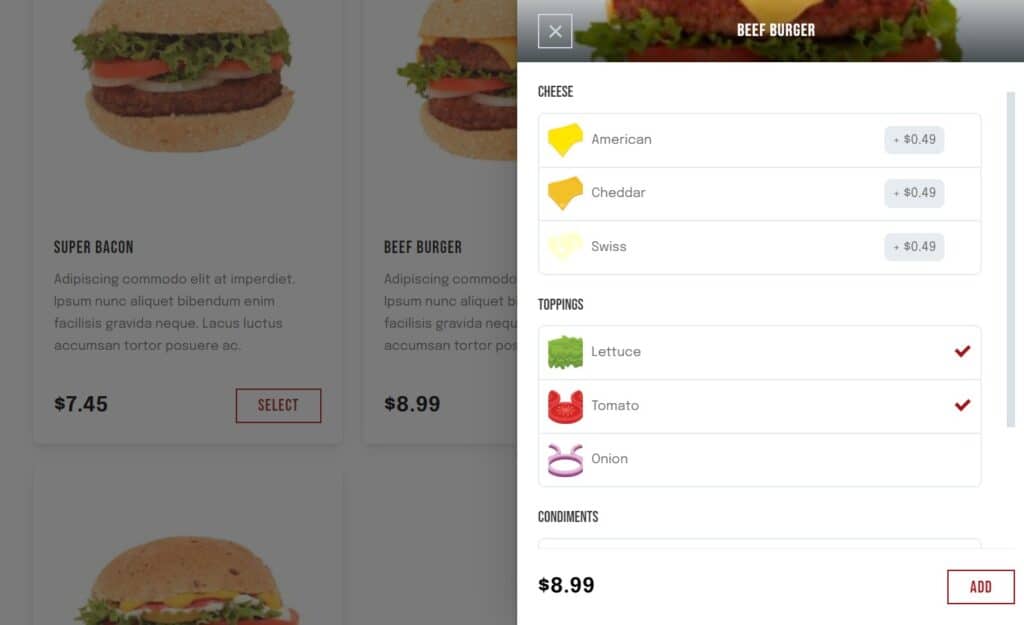
You can offer a smooth ordering experience for your customers with Orderable’s app-like design. They can make customer orders from great-looking menus using Orderable’s flexible layout templates. With features such as product add-ons, you get to improve customer experience by allowing them to add toppings, make a dish vegan, or add a dish on the side.
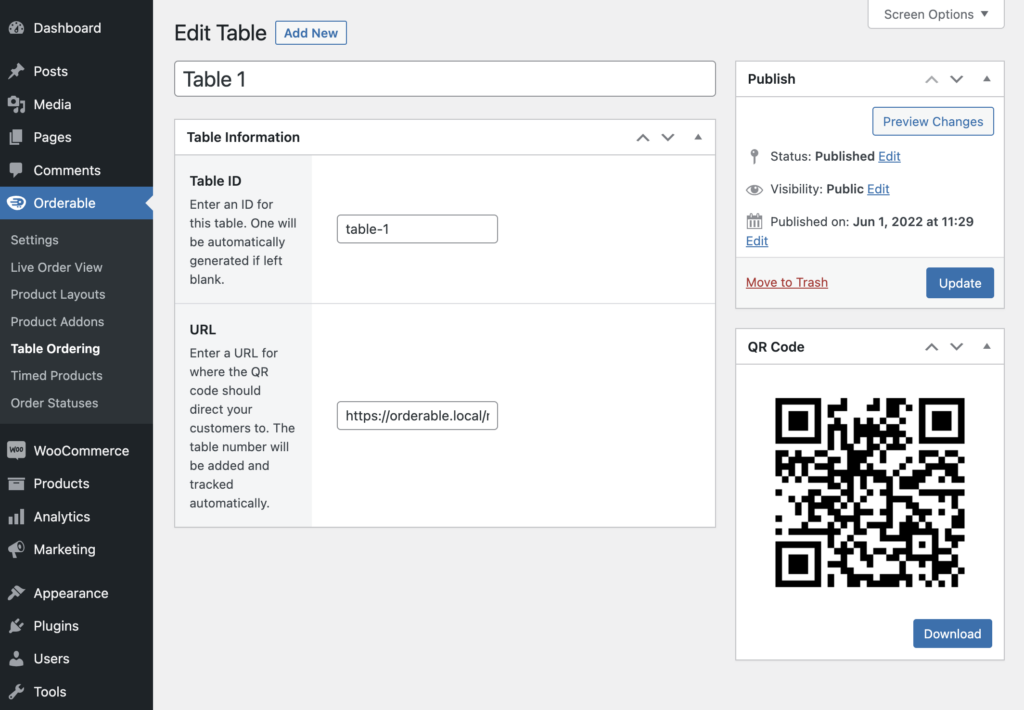
Orderable also enables you to manage your orders easily, choose when food categories are displayed on your menus (lunchtime vs. dinner menus), and use QR codes for table ordering to save time.
The best part is that you’ll get to keep all your revenue since Orderable doesn’t add charges to your transactions.
For takeaway orders, Orderable enables you to do the following
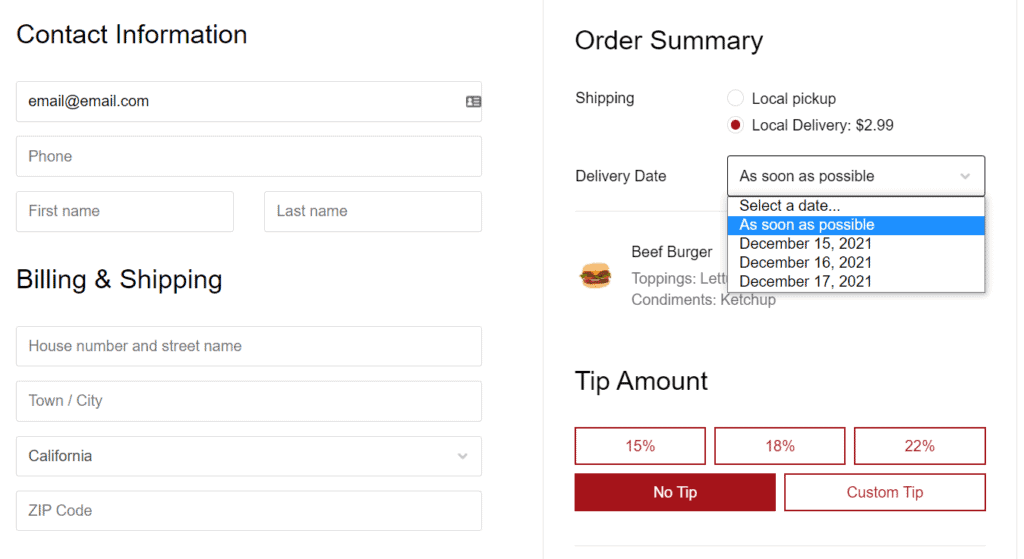
Offer delivery or local pick up
Orderable gives you full checkout control, and you can place options for local pick-up for customers who are near your restaurant or deliveries.
Reserve time slots for orders and deliveries
You get to control your schedule and determine when you can take orders, deliver them, or have them ready for pick up via time slots.
Receive payment from different gateways
Let customers pay at their convenience by availing multiple payment gateways, including credit cards, PayPal, and more.
Offer a mobile-friendly design
Allow customers to order on a device of their choice, whether a laptop, tablet or mobile phone.
Through this, you ensure that customers have nearly the same experience across different devices and that you won’t lose customers because they use a device that doesn’t support your design.
This is a general overview of what you’ll be getting with Orderable. But there’s still a lot more in store, so let’s set it up on your WordPress website.
Step 1: Install Orderable
To set up Orderable on your WordPress website, you’ll first need to install Orderable. In this tutorial, we’ll do this for the Pro version.
The Pro version gives access to Orderable’s best features, such as time slots, product add-ons, tips at checkout, and many more.
First, purchase Orderable Pro from the Orderable website: orderable.com
Get Your Takout Business Online With Orderable
Create your takeout website quickly and easily with the takeaway ordering system for WordPress, Orderable.
Orderable is reliable, easy to set up, and simple to use. All you have to do is customize it to suit your takeout business and watch orders come in.
After completing the purchase, two plugins in a .zip file will be sent to the email you provided at checkout. Download them and set them up on your WordPress website in the following steps:
- Go to Plugins > Add New on your WordPress dashboard.
- Click on the Upload Plugin button at the top of the page.
- Select the .zip file containing Orderable (free) that you previously downloaded and click Install Now. Next, click Activate plugin.
- Repeat the previous step for Orderable Pro.
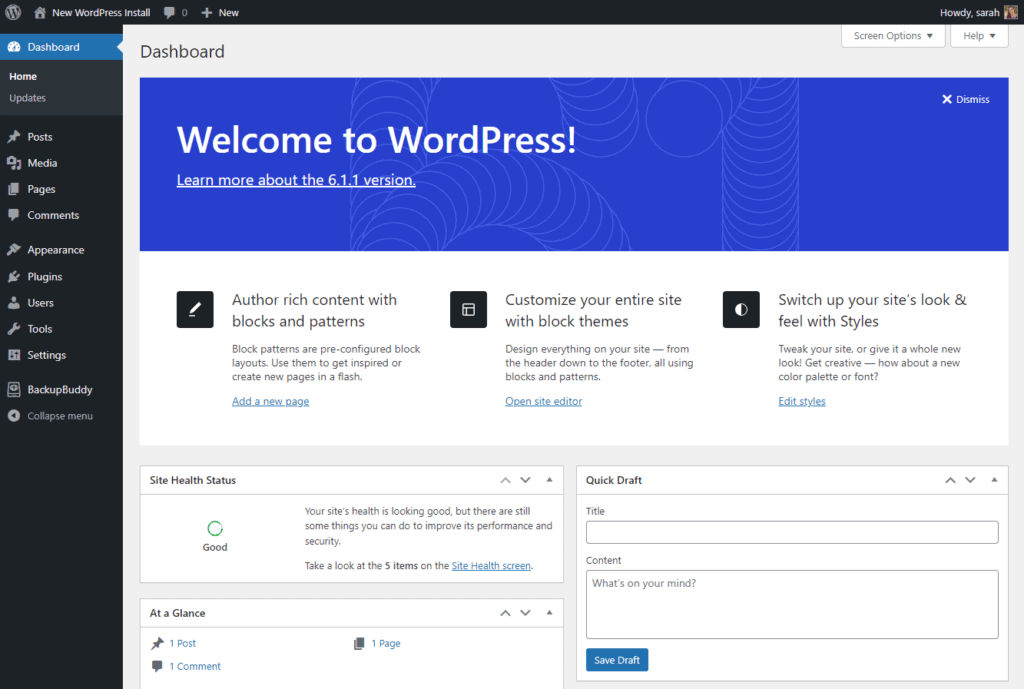
When the installation is complete, go back to your WordPress dashboard and click on Orderable from the left sidebar. You will be directed to the setup page where you can get started.
Click on the Begin button. If you don’t have WooCommerce installed already, Orderable will do this for you as soon as you click the button. This relieves you from the additional step you have to take to install WooCommerce.
With WooCommerce installed and active, you can proceed to enter your restaurant’s information.
Step 2: Enter your restaurant information
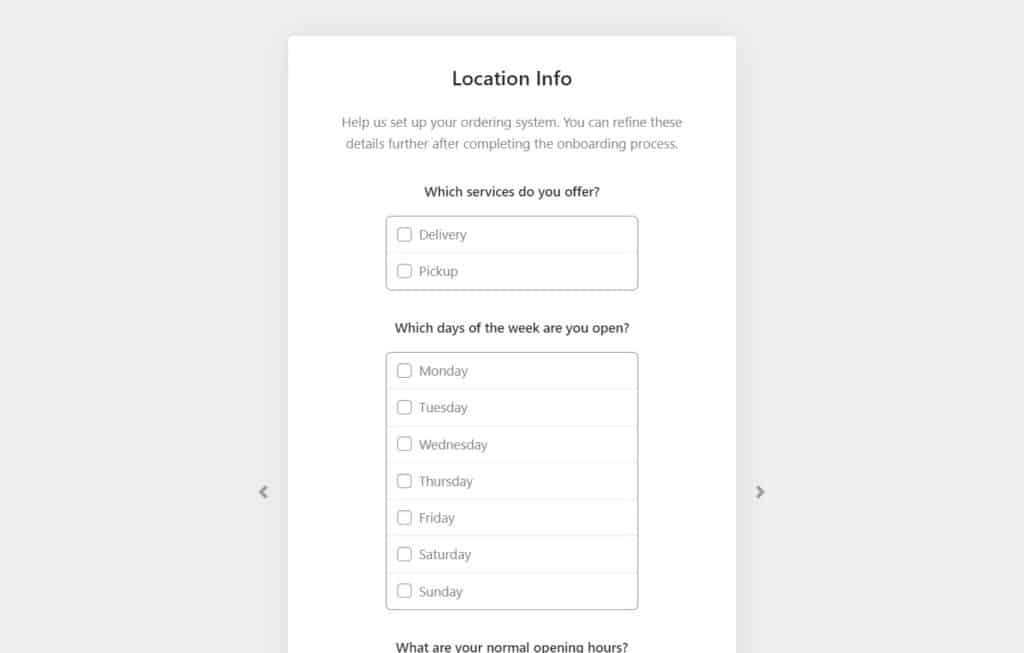
In this step, you will need to provide Orderable with your restaurant’s basic information, including the name, physical address, and email.
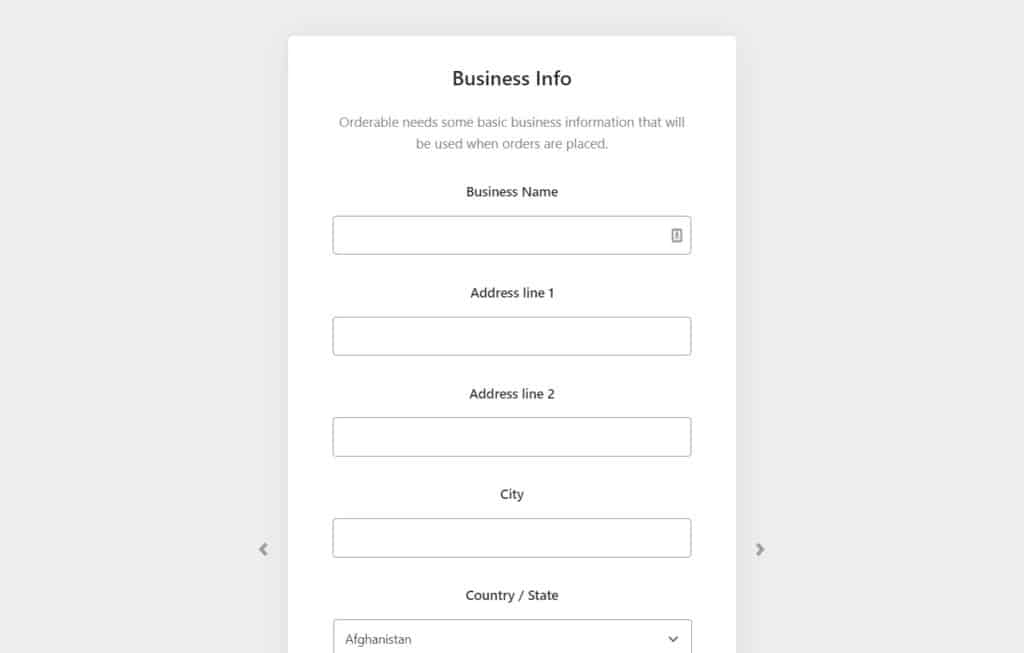
After providing business information, you’ll be asked whether you’ll offer delivery, pick up, or both. You can also set the days you operate during the week here, but you can change this later.
This is just a summary of these steps. To get a detailed walk-through, check out our video guide here.
When you’re done with these changes, click Save and Finish to close the setup.
Step 3: Add your food/menu items
Now that you’ve set up the basics, you can move to add the food items you want to sell. Follow the steps below to do this.
- Hover on Products and click on Add New on your WordPress dashboard.
- You will be taken to the edit product page, where you’ll:
- Name your food item (for example, pizza).
- Add the image of your dish by clicking on the Set product image link at the bottom of the right sidebar.
- Set the price in the Product data section.
- Create a category to which this dish belongs and check the box to add it (for example, seafood, desert, etc.).
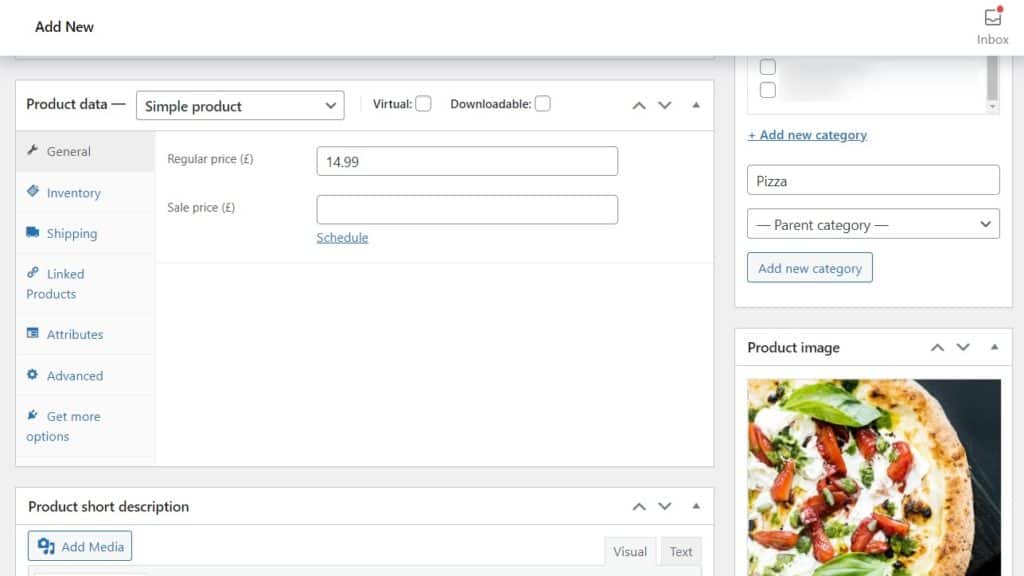
- After completing these settings, click on Publish.
(Optional) Include product add-ons
Product add-ons such as toppings, special sauces, appetizers, etc., help to improve customer satisfaction.
If you want to create them, follow these steps:
- Go to Orderable > Product Addons > Add New from your WordPress dashboard.
- Next, name your add-ons, Pizza Addons, in this case, since we’re creating add-ons to be included in all Pizzas.

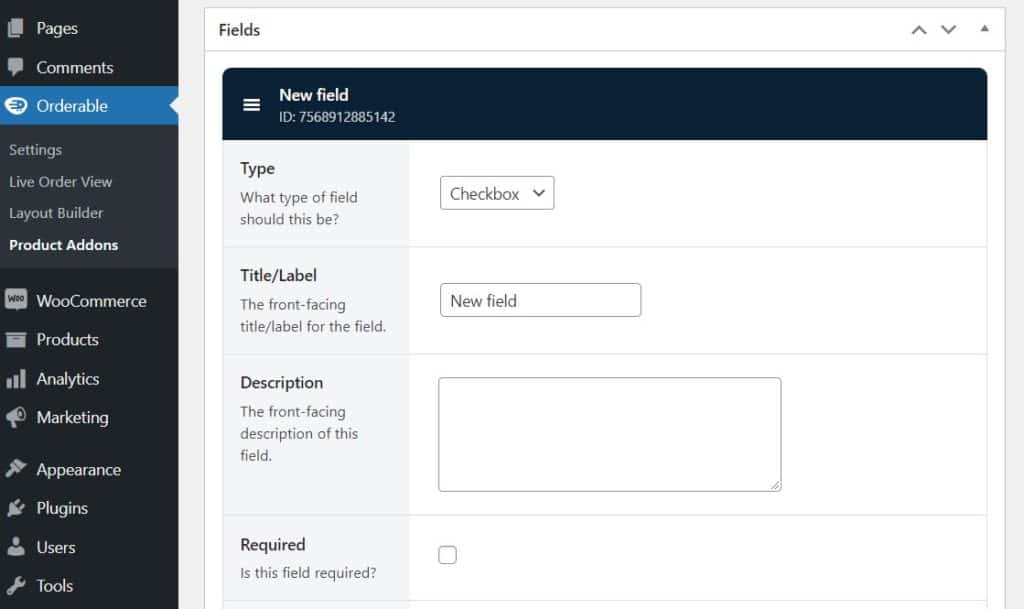
- To create an add-on, click on the Add Your First Field button. Once the field has been opened, you can customize your add-on.
- First, you need to name it (for example, pepperoni, BBQ sauce, etc.), then you can choose how it will be displayed, for example, as a checkbox. You can also add a description and decide if it will be required to complete the purchase.
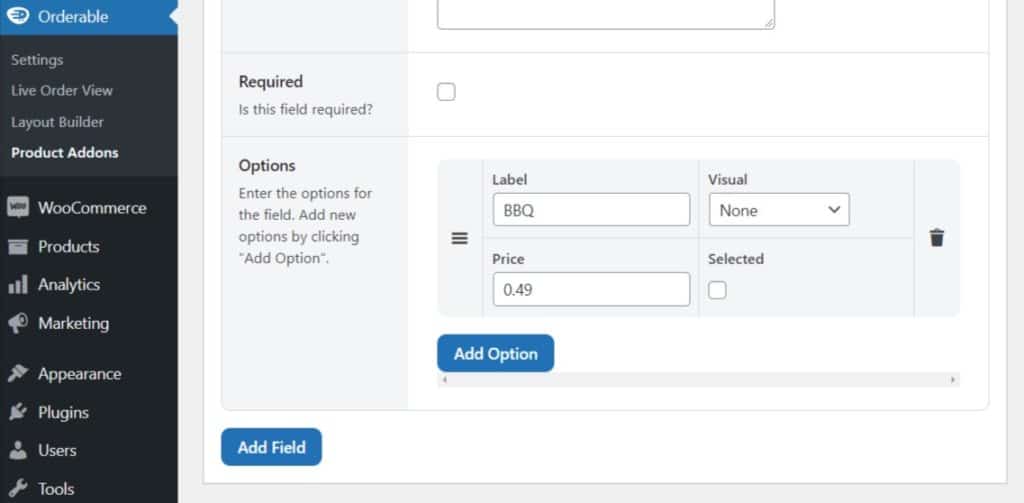
- Now you need to add the options. Click on the Add Option button and add a name and price for this option. You can also add a color visual or an image in the visual section. Repeat this step for additional options.
- To select the products and categories you want to add these options to:
- Click on the Add Your First Rule button.
- There are many rules to set in this section, including specifying if you want your product add-ons to show on individual products by searching for them by name or by set category.
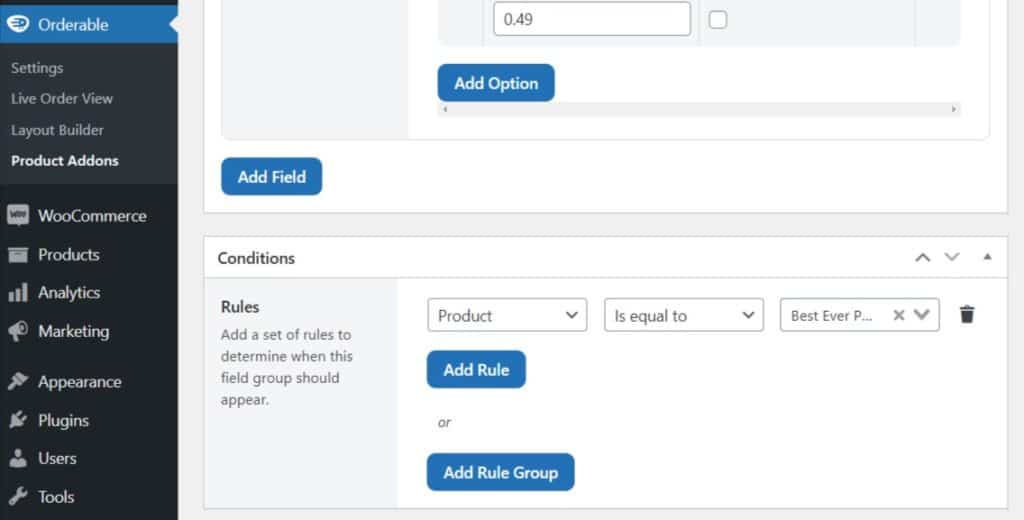
- Once you’re satisfied with your changes, click Publish.
Step 4: Create your online takeaway menu
You have your food items and add-ons ready. Let’s now create the menu from which your customers will order. We’ll start with creating a layout for it.
- While still on your WordPress dashboard, go to Orderable > Layout Builder > Add New.
- Enter a title for this layout and select the categories you want to include and the display type (Grid/List). A live preview will be available at the bottom of the page.
- You can also determine how categories will be displayed by clicking on the dropdown under Sections.
- You can also allow images to be displayed or choose to make either the whole menu item clickable or just the button.
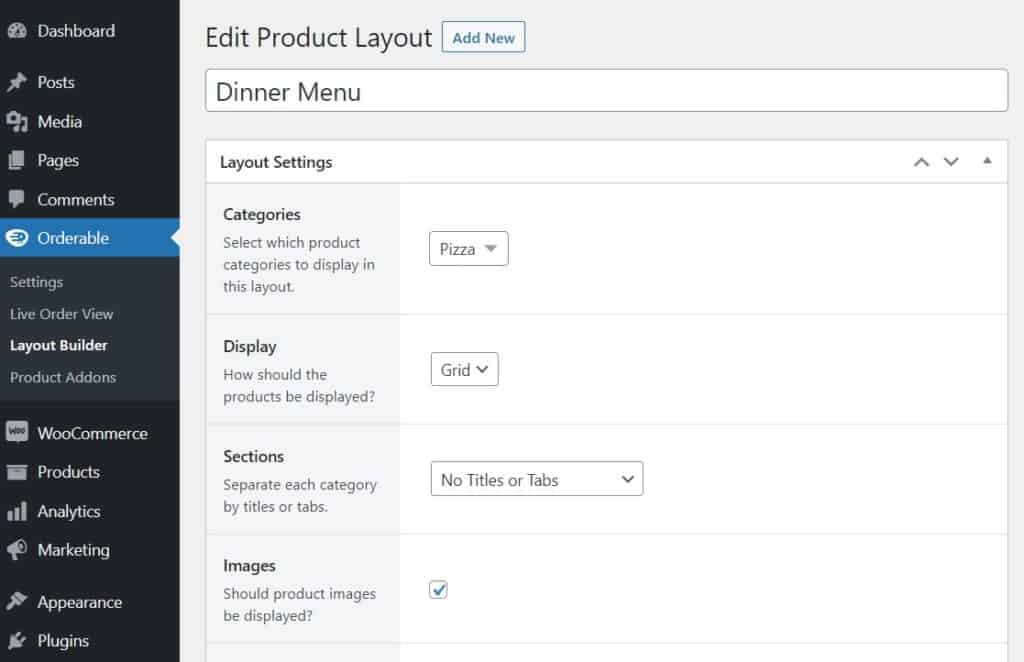
- Click Publish to finish.
Remember, you’ve just created the layout. If you the menu to be displayed, you’ll have to add it to your page. You can do this quickly and easily.
- While still on your WordPress dashboard, go to Pages > Add New.
- This new page will be your restaurant’s online menu. Name it, Menu in this case.
- Click on the plus(+) button to add a new block and search for ‘Orderable’ and click on the Orderable: Product Layout block when it pops up. A generic product grid/list will be imported on this page.
- Click on the dropdown in the Layout section on the right sidebar and select the layout you created in the previous section.
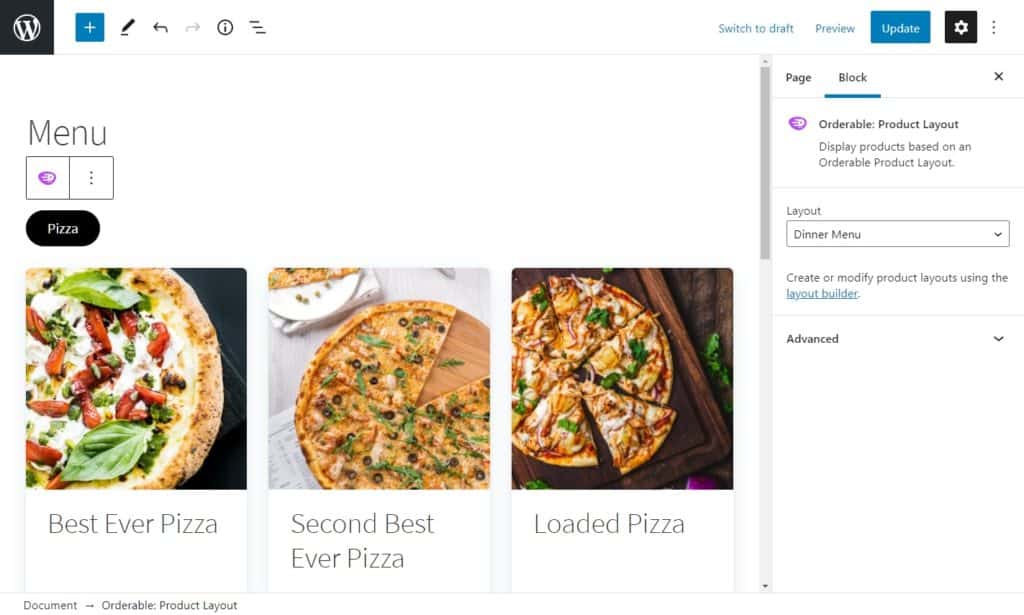
- Click Publish to finish.
Your menu is all set up. You can now add takeaway options.
Step 5: Add local pickup/takeaway options
With Orderable, you can create delivery and pickup for your takeaway business.
Follow these steps to set up your store for collection/local pickup:
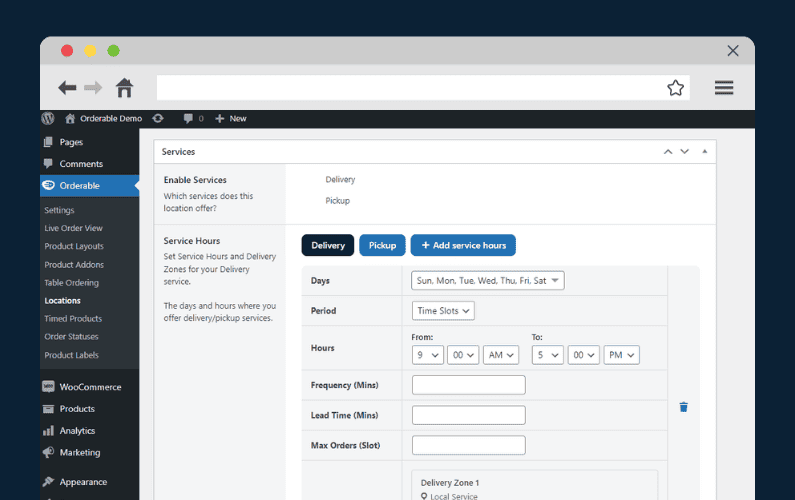
- From your WordPress dashboard, hover on Orderable and click on Locations.
- Select the location you want to add pickup/takeaway options to.
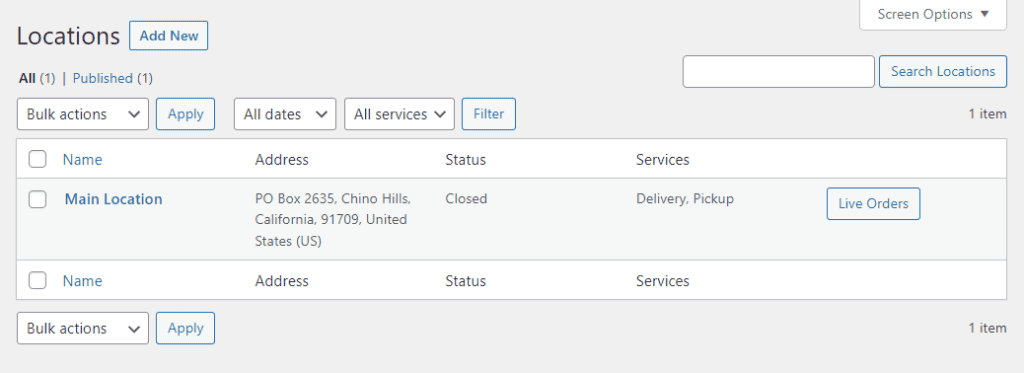
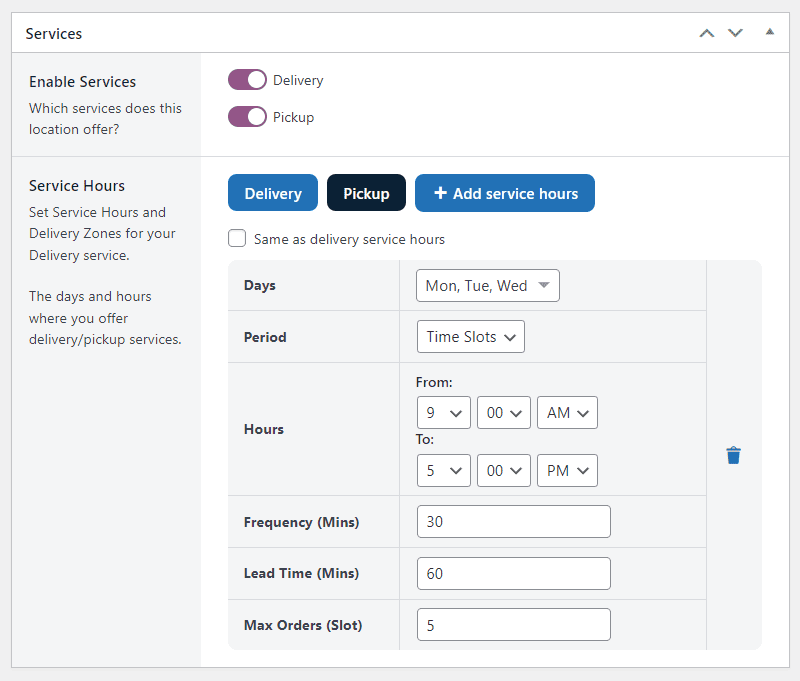
- Scroll to the Services section and select whether you want to offer local pickup and/or deliveries.
- Below this, you can set which days of the week you want to add these services, then customize further by adding time slots, lead time, and maximum orders.
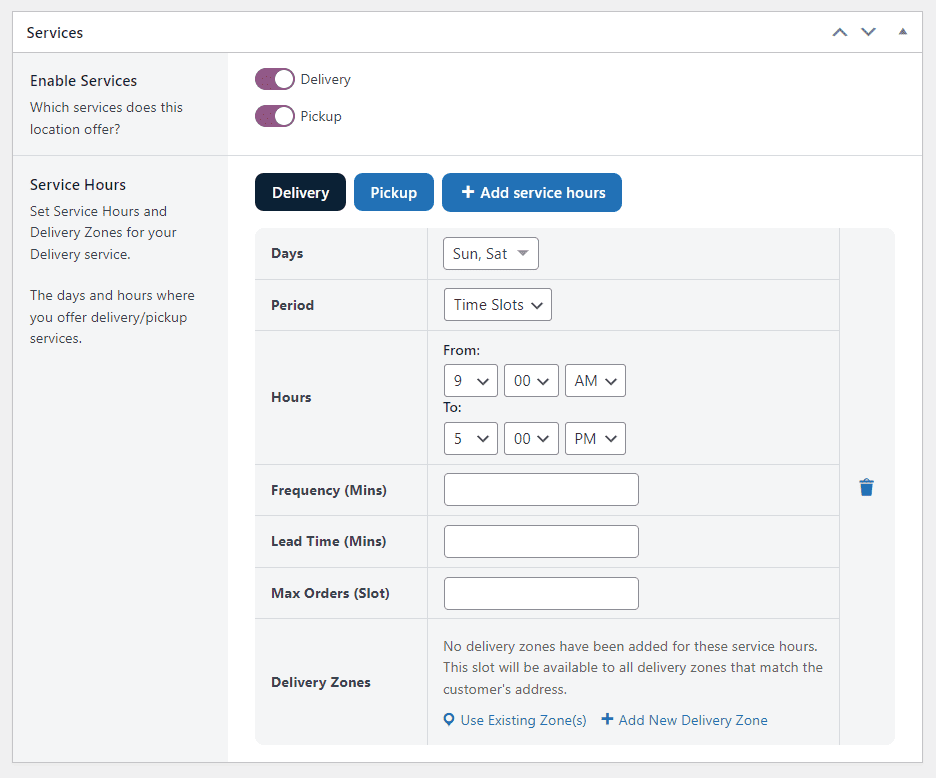
- Once you’re done, scroll to the bottom and click Save Changes.
Note: For each of these services, make sure you have your shipping zones and methods set up in WooCommerce. You can create these settings by going to WooCommerce > Settings > Shipping. In the Delivery Zones section, you can also add custom delivery zones to each.
With this set up, customers can now place takeaway orders for collection or delivery services in your store.
Next, let’s take a look at how, as a store owner, you can use restaurant management by using Orderable’s user-friendly order management and workflow.
Manage your restaurant website’s takeaway orders
With Orderable and WordPress, you don’t need anything fancy like a custom point of sale system or mobile ordering app. All you need is a computer or tablet hooked up to the internet, and you’ll be able to see orders coming in real-time.
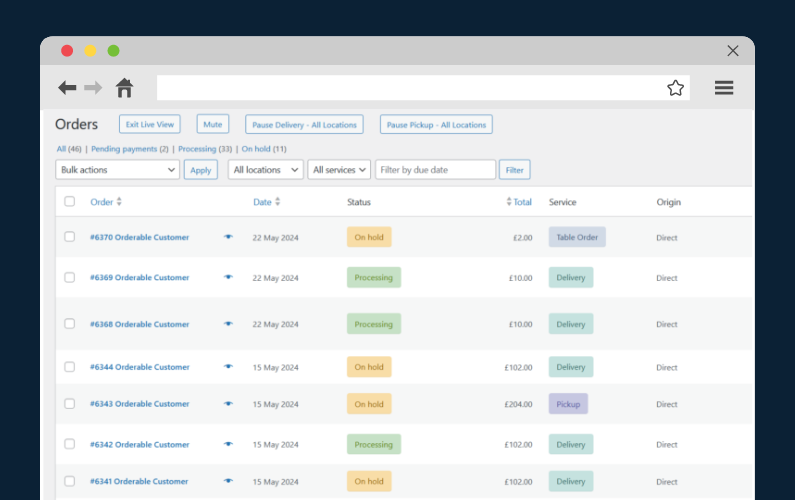
Live order screen
To view your orders, all you have to do is go to Orderable > Live Order View.
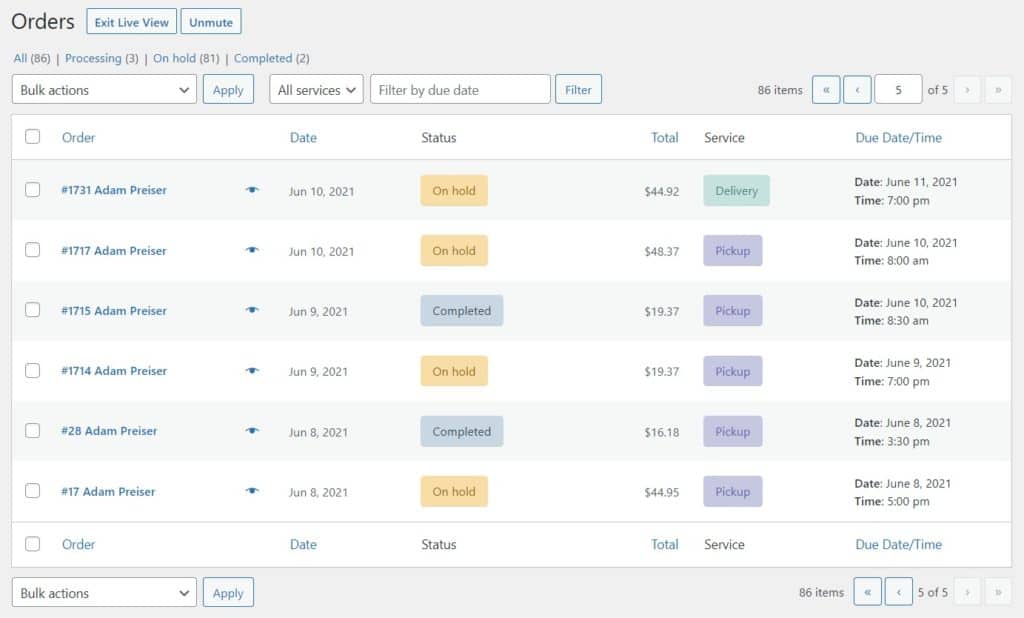
On this page, you’ll see the following:
- The customer’s name.
- The date the order was placed, the status, and the due date/time.
- Whether the order is to be delivered or picked up by the customer.
- Any actions you need to take (changing the order status from processing to complete, as an example).
If you want to see the food items ordered, click on the eye icon, and a detailed view of the order will pop up. You can also mark this order as processing or completed in this window.
All orders coming in are automatically marked on hold. When you click on processing, an email notification will be sent to the customer indicating the status of their order. The same happens when you complete it.
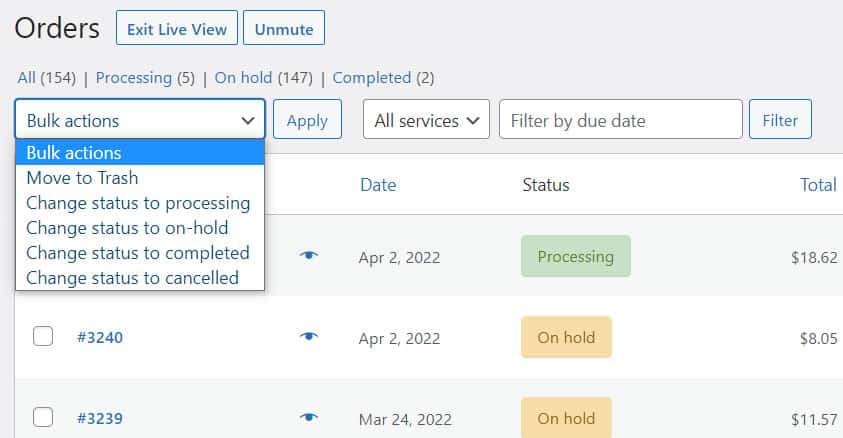
You can also filter the orders to be displayed by the due date so that you can focus on completing the urgent orders.
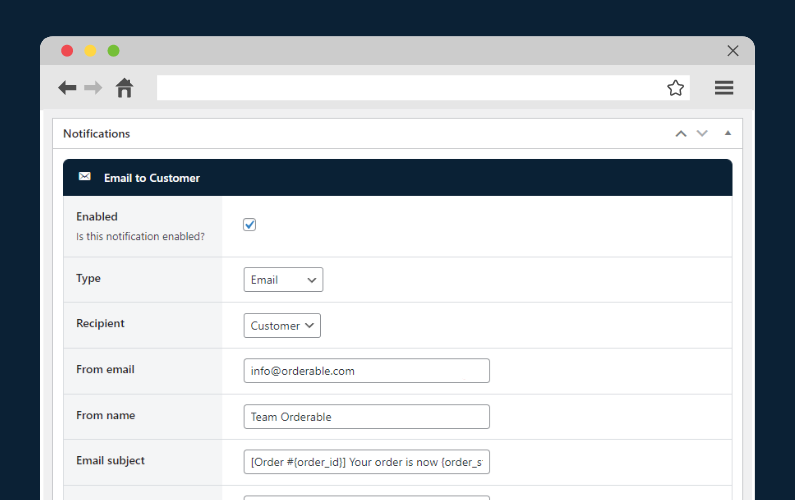
Custom order statuses and notifications
With Orderable, you can also create custom order statuses to tailor it to your takeaway business. For example, you could create a ‘Prepping’ order status that could then move to ‘Ready for Deivery’.
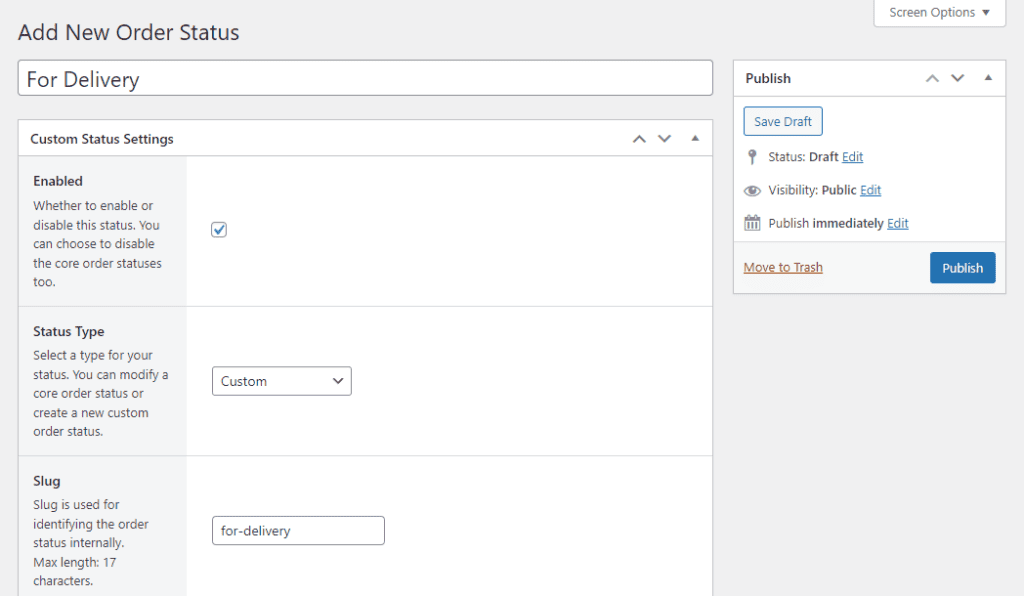
These give you greater control over your online ordering system for takeaway and even give you the ability to send order notifications via email, SMS, or WhatsApp so customers, staff, and delivery drivers are kept in the loop.
Add an online ordering system for takeaway today
Your WordPress website can be used for more than just displaying your restaurant business’ menu online. You can also use it to create an ordering system for takeaway.
However, this can’t be achieved in the default WordPress install. You will need the plugin Orderable. With Orderable and WordPress, you’ll be able to create your restaurant’s menu, add food items to it, allow customers to make orders, and manage these orders.
You’ll also get to allow customers to select whether their orders are for delivery or local pickup and have control over this schedule.
Get Your Takout Business Online With Orderable
Create your takeout website quickly and easily with the takeaway ordering system for WordPress, Orderable.
Orderable is reliable, easy to set up, and simple to use. All you have to do is customize it to suit your takeout business and watch orders come in.
Gina Lucia is our in-house Content Manager at Orderable. She writes articles, user guides, technical documentation, and creates videos on everything WooCommerce and Orderable.
Gina has been working in the WordPress/WooCommerce space since 2012 when she developed WordPress websites for clients large and small.
For the past 8 years, she’s been writing about everything WordPress and WooCommerce, becoming an expert in what makes a WooCommerce store succeed.
When not writing, Gina loves to tend to her vegetable garden, read, or travel to mainland Europe.
Don’t miss out on the latest Orderable news!
Sign up for our newsletter to receive the latest news from the blog, you’ll get pinged every week with a digest of the latest updates.
[fluentform id=”6″]

Related Articles
New to Orderable: Updates for June 2024

How to Reduce Restaurant Food Waste in 2026

What is a Quick Service Restaurant in 2026?
Get Your Restaurant Online With Orderable
The WooCommerce plugin designed to help restaurants take orders online – with no added fees!
View Pricing
