How to Create a Restaurant Website (Step-by-Step Guide)
How to Create a Restaurant Website (Step-by-Step Guide)

Gina Lucia


If you’re looking to create a restaurant website in the most straightforward way possible, we’ve got your back.
In this guide, we’ll provide step-by-step instructions on designing, building, and launching your own restaurant site in just a few steps.

Building a custom website can be a daunting task without the right guidance. There are so many options and plugins to choose from. This is why we’ve put this guide together so that you can create a restaurant website with a helping hand.
We’ll discuss everything from hosting, setting up your website with WordPress, what themes to use, and the plugins you can use to create a restaurant website. You don’t need any coding knowledge to create your first online presence for your restaurant. By the end of this guide, you’ll have the confidence, tools, and guidance to get started.
We’ll walk you through every step, but first, let’s look at the benefits of owning a restaurant website.
Get Your Restaurant Business Online With Orderable
Orderable is a user-friendly WordPress plugin that adds online ordering to your restaurant website.
Add your dishes, create your online ordering menu, customize your delivery schedule, and manage orders with ease.

What are the benefits of creating a restaurant website?
Today, it is unusual for a business to lack an online presence via a website, and a restaurant is no exception. Owning your restaurant’s website has following benefits:
- A direct source of income that you control – by allowing customers to make orders online, not just while they’re at the location, you’ll have an additional income stream. You’ll also have control over everything, including payment methods (so customers can use more than just their credit card), and there will be no hidden fees.
- Increased exposure for you and your restaurant – when a potential customer searches for places to eat in your area, they’ll be more likely to visit if you already have a professional website setup. With your own website, you’ll have full control over your own search engine optimization, and you’ll be able to add your own SEO tools as you see fit.
- Table bookings and online reservations – If you have your own restaurant website, you’ll have the ability for customers to book tables and make reservations. Making your dining schedule much easier to manage.
- Restaurant marketing to new customers and existing patrons – with a website, you’ll be able to expand it to collect customer email addresses and contact information to keep them up to date with restaurant news via an email marketing strategy.
The last reason is especially valid if you plan to expand your business by opening another location or franchising. If a customer orders via your online ordering site, it reduces their likelihood of leaving the current location to find another one later.
Of course, these are just a few reasons why having your own restaurant website is beneficial. For you, the reasons might be slightly different. So that being said, let’s walk you through how to create a restaurant website in just four easy steps.
How to create a restaurant website in four easy steps
If you own a restaurant or are part of a catering company, you’ll want to take advantage of the increasing trend toward online ordering by having your own website and restaurant menu online. It’s a great way to make life easier for your customers by allowing them to place orders from the comfort of their homes. You can also use it to upsell and grow your customer base.
The best part is that it doesn’t even have to be all that complicated. This step-by-step tutorial will show you how to create a restaurant website in the most straightforward way possible.
We’ll walk through the entire process, including setting up your domain name, hosting service, and ecommerce functionality with WordPress and WooCommerce. Let’s get started!
Step 1: Pick your website’s hosting
To set up your restaurant website, you’ll need to bring two components together:
- A domain name – this is the address that your customers will use to find your restaurant website from their browsers, for example, mcdonalds.com, tacobell.com, etc. (likely your restaurant name).
- A web hosting service – this is where your website’s files will be stored and made available to users.
These two things are necessary for anyone who wants to create a restaurant website.
When choosing a hosting service, you should consider the following features:
- High availability – so that your website is available whenever users need it.
- High bandwidth (speed of transferring data) – to ensure your site speed is high.
- Sufficient storage space – to allow enough space to store your site’s files.
- Adequate customer support – to help you to set it up or fix issues if they arise.
When selecting your hosting provider, there are plenty online to choose from. But in this case, we recommend managed WordPress hosting with Nexcess.
Nexcess hosting provides all this and much more. It’s a high-performing hosting solution, guaranteed to get your website up and running in no time. It has dedicated hosting plans for popular content management systems such as WordPress.
This means that these hosting plans are specifically tailored for WordPress, and all the resources have been optimized to provide the best experience possible for WordPress websites. This includes an easy and secure setup, which is good news for beginners.
Keeping that in mind, let us walk you through how to get your site’s domain name and hosting with Nexcess.
Register for a domain name
The first thing we recommend you do is to buy your domain name. You can do this via the Nexcess website: nexcess.net/domain-registration
- Type the name of your restaurant, or the website URL you’d like to have into the field on that page, then click search.
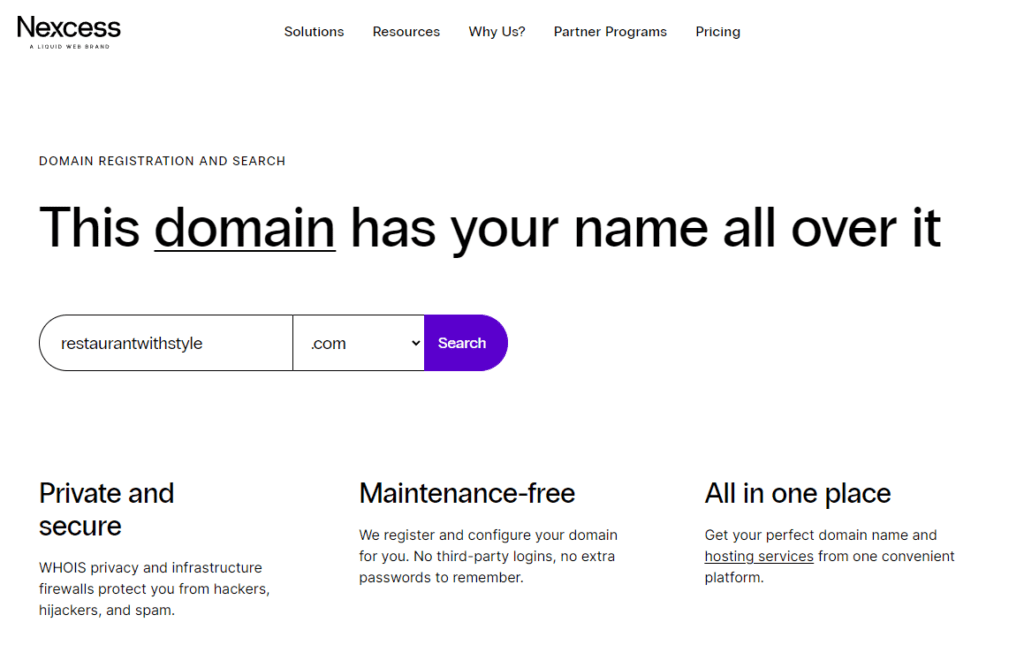
- A new page will appear, listing a few available options with prices. Select the cart icon next to the domain you’d like, and it will be added to your cart.
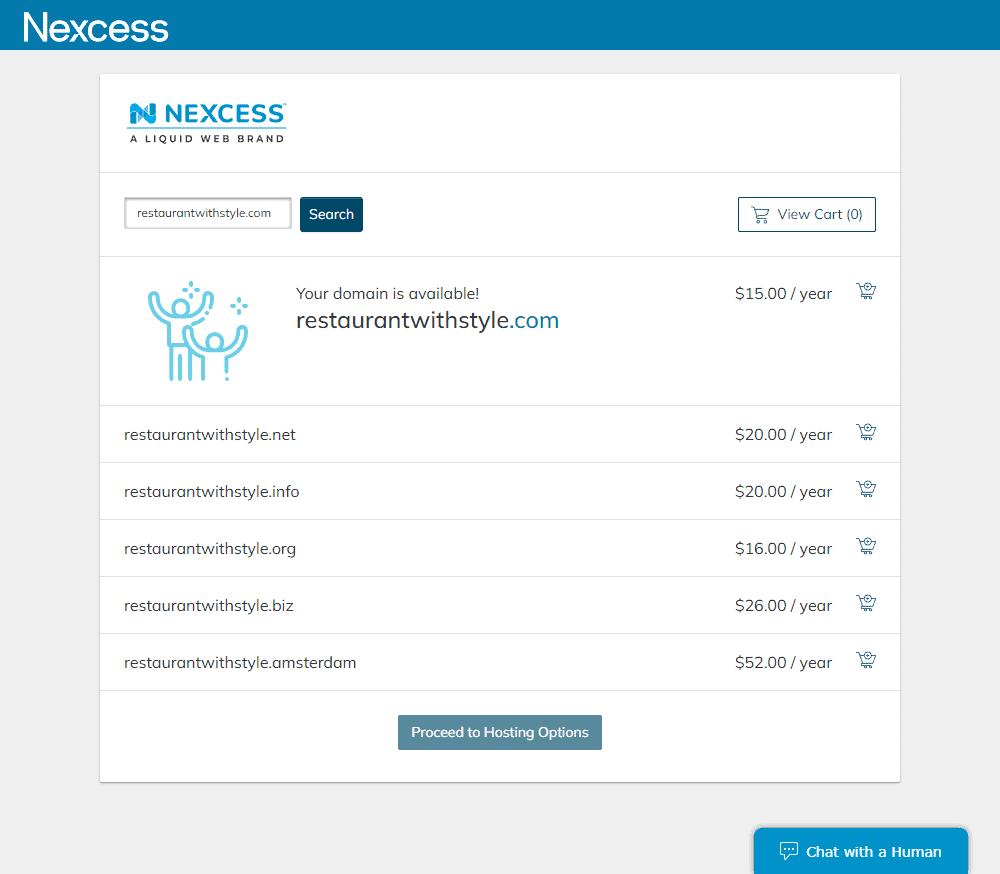
- Next, click the Proceed to hosting options button at the bottom of the page.
The next step is to select our hosting plan with Nexcess. The good news is, they’ve made this step nice and easy.
Want to learn more about managed WordPress hosting and why it’s a great option for new website owners? Read Nexcess’ managed hosting guide.
Select your WordPress hosting
Nexcess has multiple managed WordPress/WooCommerce hosting plans to ensure your WordPress website is secure and fast.
Note: WooCommerce is a WordPress plugin that allows you to take payment for your restaurant dishes/menu items on your website. We’ll talk more about this later.
So let’s set it up and use it to host your restaurant website.
- On the next page, in the Select a Plan dropdown, pick WooCommerce, and a selection of hosting plans will appear.
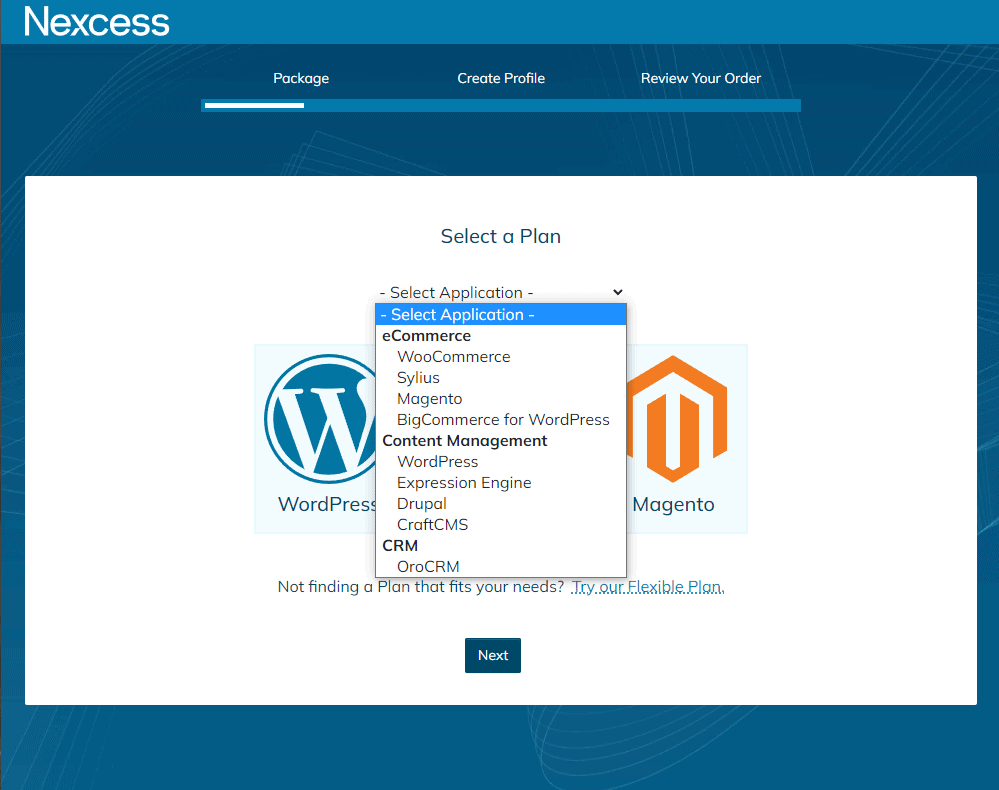
- For a new website, the Starter plan should work fine. We can always upgrade later if we need to. Click the Select button at the bottom of the Starter column. Then click the Next button.
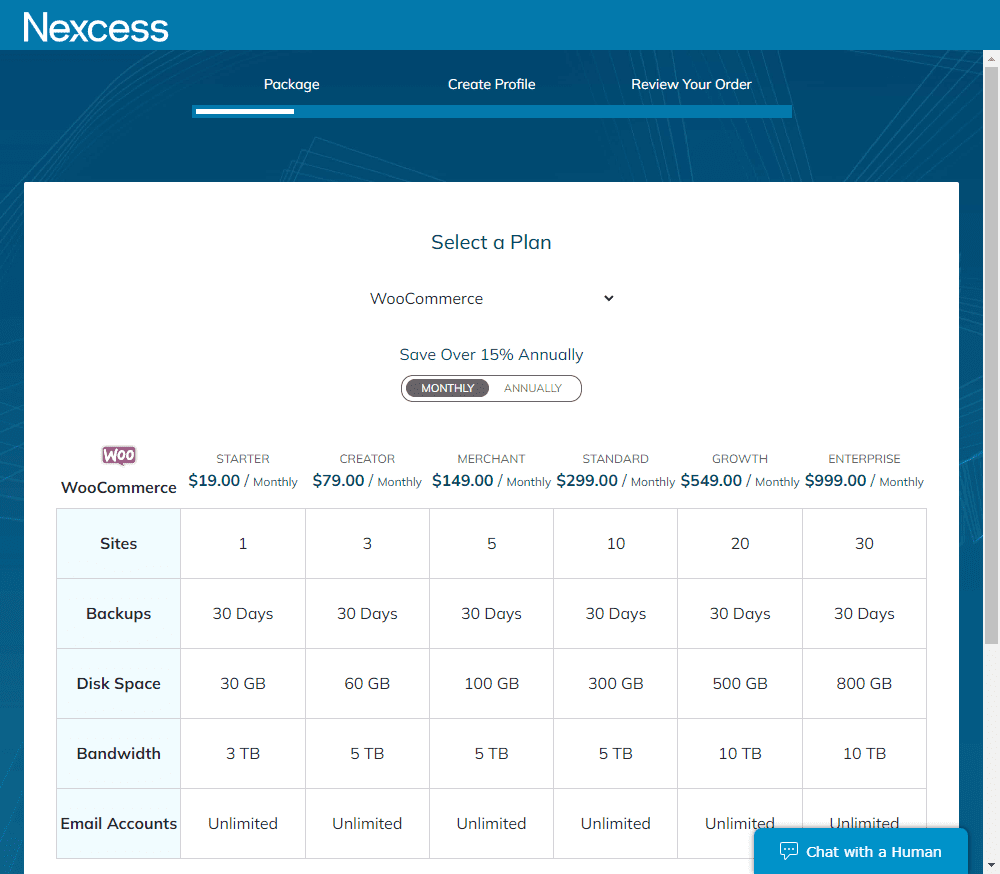
- You’ll then be diverted to the checkout, where you can pay either monthly or yearly for your hosting package.
Your domain name and hosting plan are ready. Now we can create your WordPress website.
Step 2: Create your WordPress website
Everything you do on your website happens on WordPress. With a WordPress website, you can create an online ordering system that allows your customers to place orders online and view menus but also enables your chefs to manage their inventory and easily update the online menu.
WordPress is an open-source platform that makes it easy for anyone, even non-technical people, to create websites. You can set up your own site in just a few minutes without any required technical knowledge or coding skills.
This section will walk you through the steps necessary to set up your WordPress website. You’ll then be able to add products, customize pages, and set up shipping methods.
Log in to WordPress via Nexcess
Because you’ve selected the managed hosting plan with Nexcess, WordPress and WooCommerce will already be set up for you. So all you’ll need to do is log into your Nexcess account and get your WordPress website’s login details.
Note: If you want detailed step-by-step instructions on how to do this, you can read the Nexcess WordPress login guide.
You’ll notice we didn’t choose a theme or template for our WordPress website. It’s not initially required to create your website but will determine your site’s general appearance. Let’s set it up in the next section.
Step 3: Choose a restaurant website theme for your WordPress site
A site’s theme determines the general appearance or web design of your WordPress website. This includes the layout, typography, color scheme, and so on. With a WordPress theme, you won’t have to build your site’s pages from scratch.
Of course, you can use a restaurant website builder/page builder such as Elementor to build your new website from scratch, but we recommend opting for a pre-made theme for beginners.
Getting a theme for your restaurant website on WordPress is straightforward. All you have to do is go to Appearance > Themes on your WordPress dashboard and search for your preferred theme. There are tons of themes out there, but we highly recommend using KadenceWP. Kadence is one of the most popular WordPress themes thanks to its speed, accessibility, simplicity, and extensibility, with Kadence Blocks, the most innovative tool for building highly effective sites with WordPress blocks.
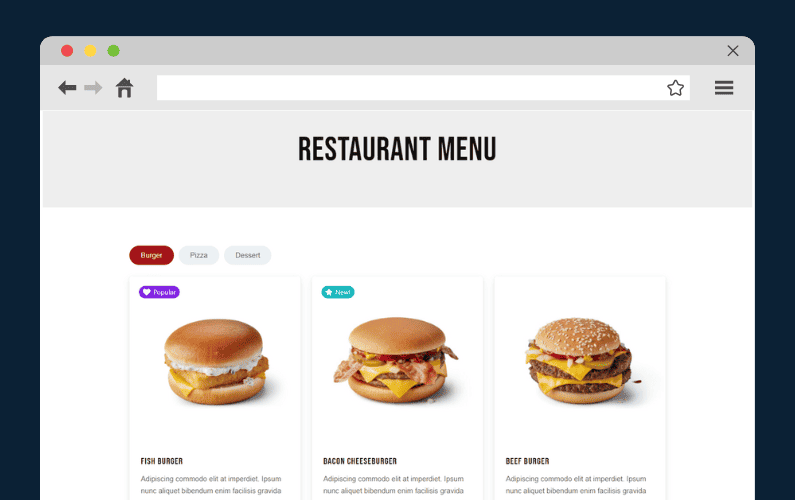
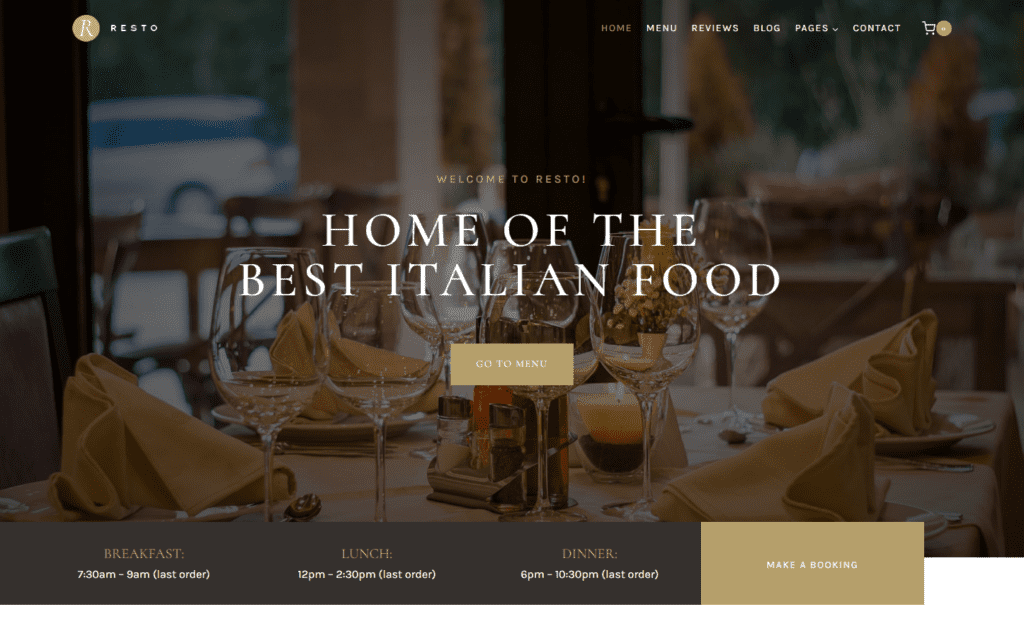
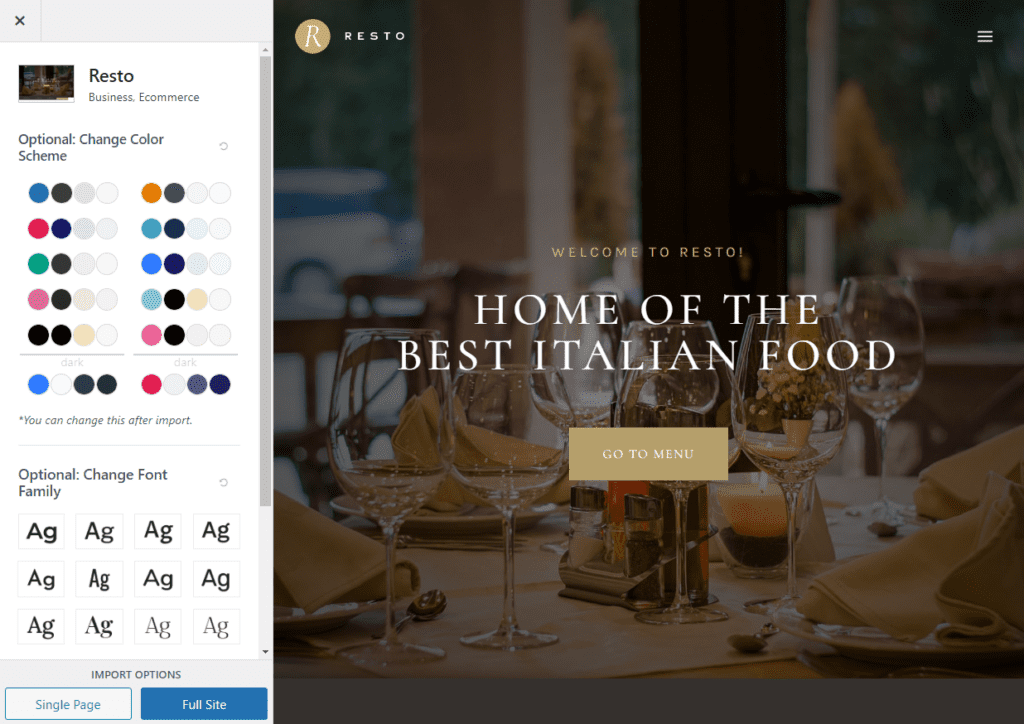
As well, Kadence offers numerous starter site templates that allow you to get your restaurant website up and running quickly. We highly suggest trying out the Kadence Resto starter template.
Resto by KadenceWP comes with all your restaurant website’s needs, including a reviews and menus section with specialty dishes, recommended dishes, and the day’s deals. Resto also works well with Orderable, the online ordering system we’ll add later.
KadenceWP also has other restaurant website templates, such as Gourmet Burger, which also works well with Orderable.
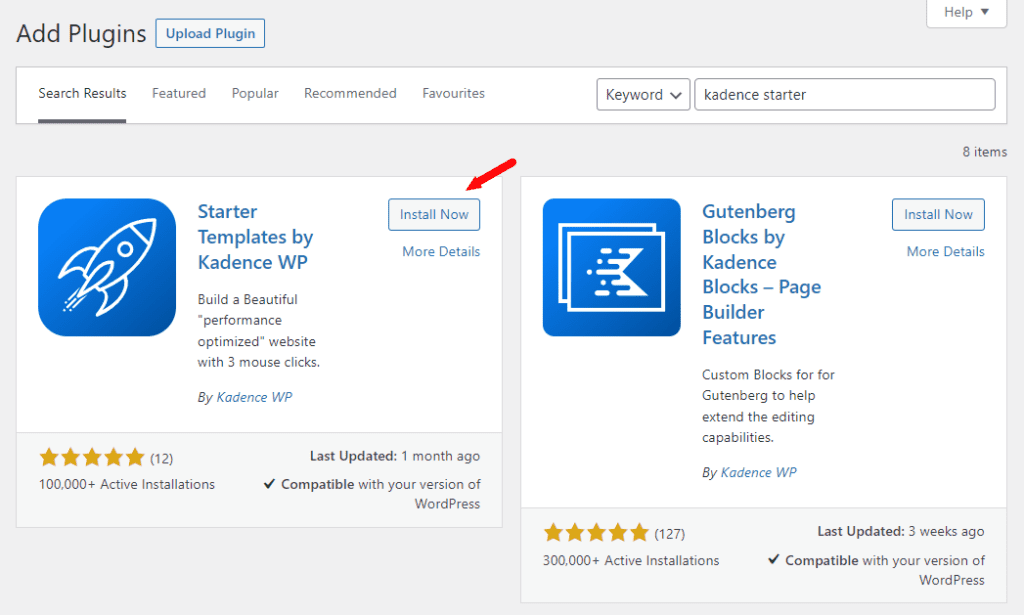
You can install Resto on your WordPress website for free. To do this, follow these steps:
- Login to your WordPress dashboard, go to Plugins > Add New and search for Kadence. Then, click Install Starter templates by Kadence WP and Activate.
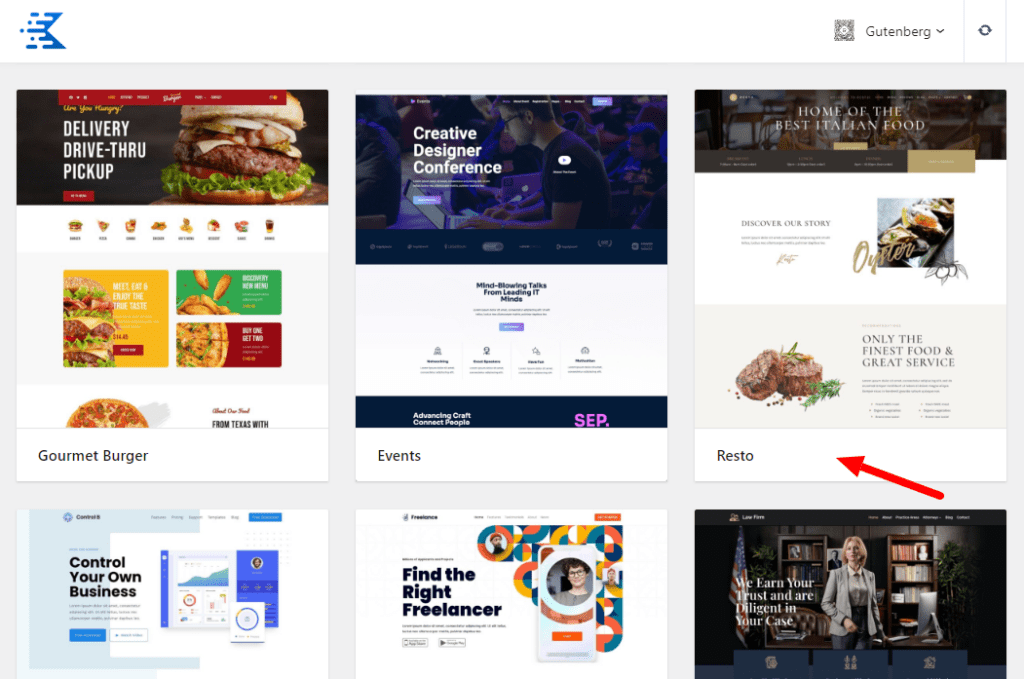
- While still on your WordPress dashboard, Go to Appearance > Starter templates and filter to only display only the free KadenceWP templates.
- Scroll down and select Resto.
- Choose the color scheme you want to apply to your site and click Import and Start importing to confirm. When you’re finished, click view site to see how your new look for your website.
- You can find all the KandeceWP theme settings in the Kandence theme Customizer.
- Go to Appearance > Customize if you want to customize your website in the backend.
- Or, while you’re on your new site, you can click Customize in the admin bar at the top of the website’s page. Here you can get specific with your design, change individual template elements, and enable useful features such as customer testimonials, contact forms, and so on.
Now that your website is created let’s add and customize your restaurant’s dinner menu.
Step 4: Add and customize your dinner menu using Orderable
As a restaurant owner, your menu is more than just a product catalog. It is an integral part of a restaurant’s daily operations, allowing you to project your restaurant’s personality, market to the right customers, and establish your budget. This is why careful consideration should be placed when creating your menus.
To actively compete with restaurants like you, you need to create menus that make it easy for customers to order online and have their orders delivered or ready for local pickup. This can be achieved with the help of a plugin.
Introducing the online ordering system plugin, Orderable
Orderable is a WooCommerce plugin built to support your online restaurant needs efficiently. With Orderable, you can set up an online ordering system and create and display menus, allowing customers to select between deliveries and local pickup. It makes these processes extremely simple for you.
Orderable also allows you to:
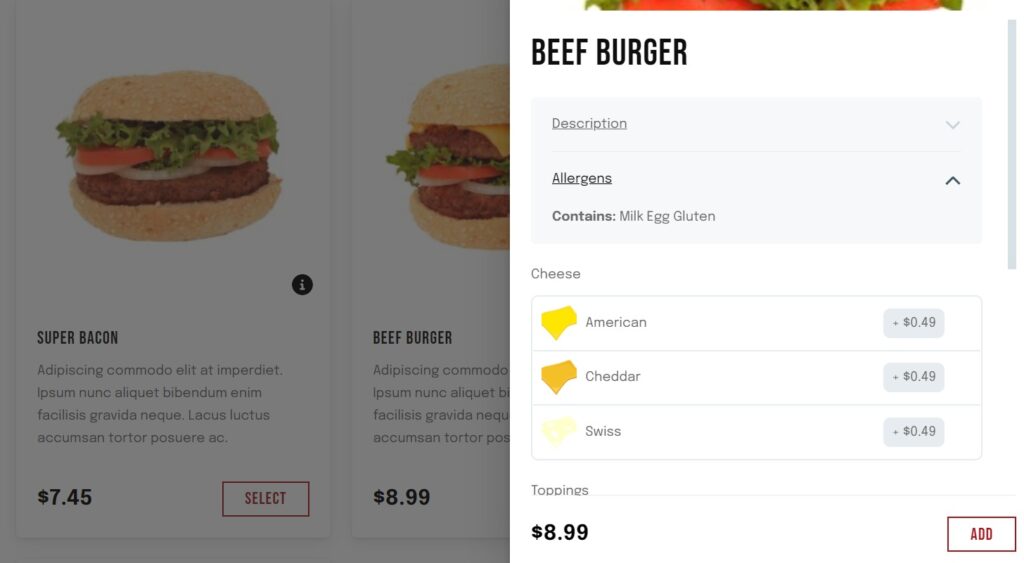
Set up and customize online dinner menus
Orderable makes creating menu layouts quick and simple. In a few clicks, you’ll be able to create a restaurant menu with menu items that customers can order from if they want to.
This makes creating online dinner menus simple because after creating your menu layout, Orderable lets you choose the meal course to be displayed at a specific time.
Allow customers to order directly from their tables
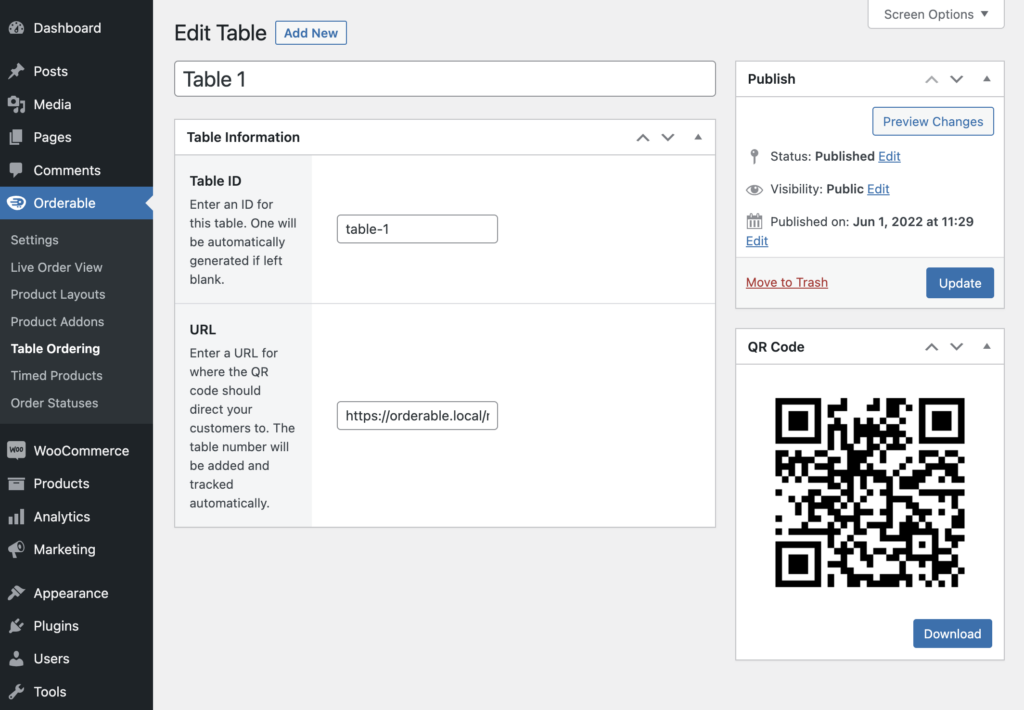
Orderable has the ability for you to use QR codes for table ordering. You’ll be able to create a QR code within Orderable for each table, and when a customer orders via your website, their table number will be assigned.
Allow customers to select time slots for delivery
With time slots for delivery and local pickup, you get to take control of your delivery schedule while allowing customers to select the most convenient times according to your schedule.
That’s not all. With Orderable, you can also:
- Upsell via product add-ons and order bumps – allow customers to add additional sauces or promote dessert items or sides.
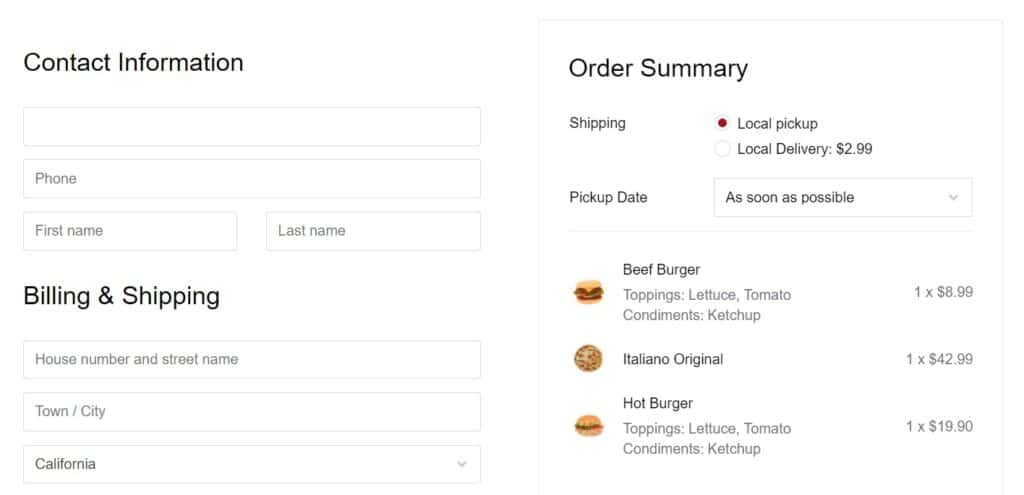
- Improve the checkout experience for your customers – Orderable comes with its own checkout specifically designed for restaurants. Including separate takeout/pickup/delivery options, tipping, and more.
- Schedule holidays where you won’t take new orders or make deliveries/allow local pickups.
Orderable charges zero fees per transaction, so you can keep your hard-earned profits to yourself.
Create your online ordering system with Orderable
Now we know the benefits of using Orderable to create an online ordering system for your restaurant, let’s set it up on your WordPress website.
Get Your Restaurant Business Online With Orderable
Orderable is a user-friendly WordPress plugin that adds online ordering to your restaurant website.
Add your dishes, create your online ordering menu, customize your delivery schedule, and manage orders with ease.
Step 1: Install Orderable (Pro)
You can purchase Orderable from: Orderable.com and follow these steps to install it:
- Go to Plugins > Add New on your WordPress dashboard and click the Upload Plugin button at the top of the page.
- Choose the .zip file you were sent containing Orderable files from your computer and then click Install Now.
- Finally, click the Activate button on the next page to use the plugin.
Note: At this point, Orderable should have installed WooCommerce for you. WooCommerce is a plugin for WordPress which allows you to create and add products to your WordPress website and take payment for those products.
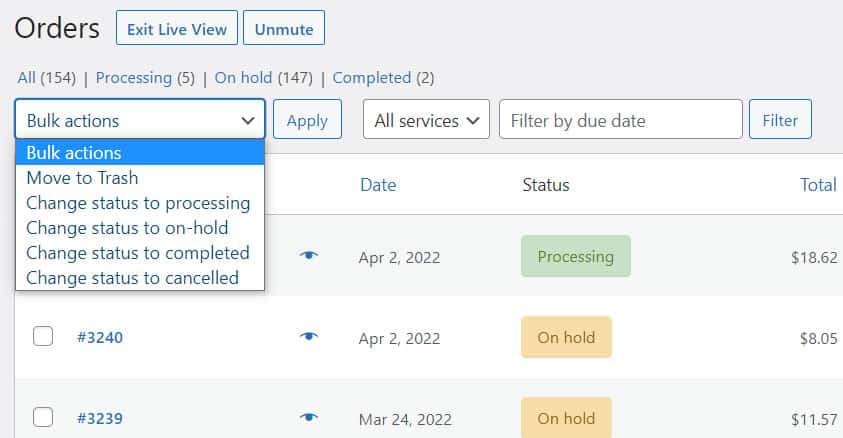
Step 2: Set your restaurant settings
Once Orderable is installed, it will direct you to the plugin settings page, where you can change your restaurant’s settings. The first thing you’ll want to do is set the hours of operation for your WooCommerce restaurant.
To do this, take the following steps:
- Go to Orderable > Settings to access your store settings.
- Click on the Store Settings tab and select the times in which your restaurant will be operating. Other choices, such as delivery/pickup, lead time, service hours, and holidays, can also be set here.

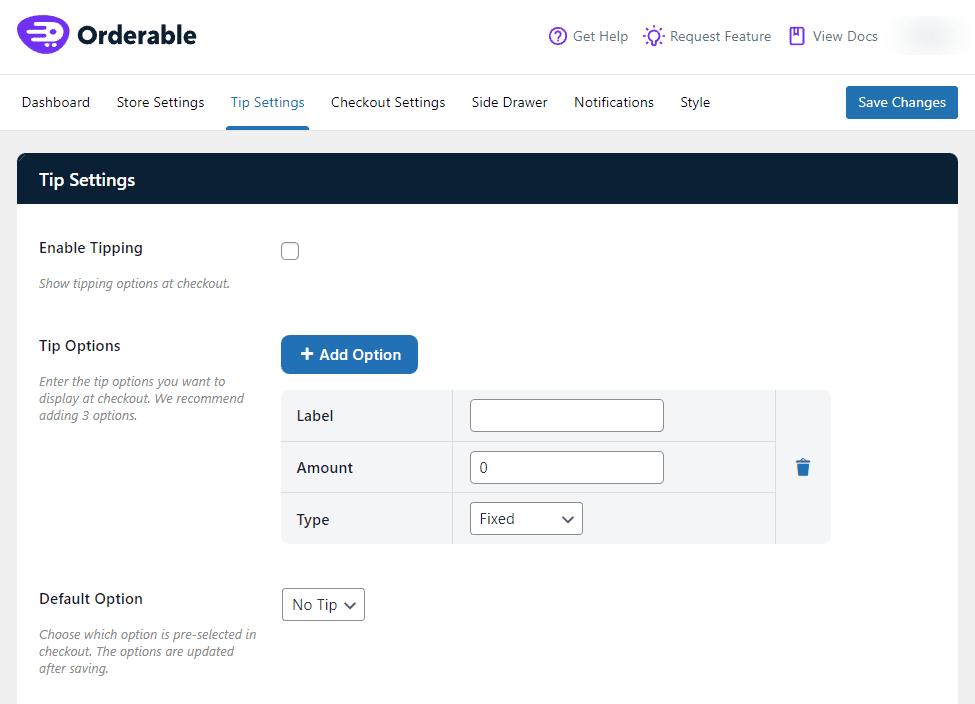
- In this section, you’ll also find more settings on tipping, checkout, and notifications which you can handle later.
- When you’re done, click on the Save Changes button.
Step 3: Design online menus for your restaurant
Creating your restaurant website’s food menu should be a straightforward task. Luckily with Orderable, you can create your restaurant menu and allow customers to order from it, all in one go.
To do this, we’ll first need to create your restaurant dishes as products in WooCommerce. If you have experience with WooCommerce already, this is done in the same way you would add any product to your WooCommerce store.
Regardless, we’ll walk you through the steps:
- From your WordPress admin area, go to Products > Add New.
- On this page, you’ll be able to give your dish a title, a description, create and assign categories to it, add images, and more.
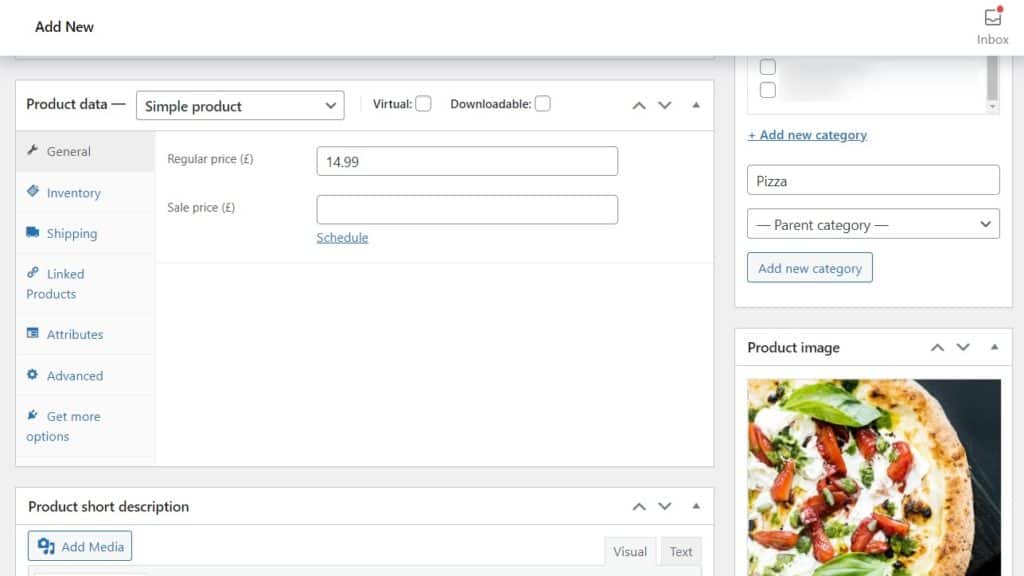
- Take your time getting used to this page. WordPress has a slight learning curve, but once you’ve used it a few times, it becomes second nature.
- Scroll to the top of the page and click the Publish button when you’re happy with your dish.
- Repeat this process for all the dishes on your menu.
Now you’ve created your dishes. Next, we’ll need to assign them to a menu and display it on your website.
To do this, take the following steps:
- Go to Orderable > Layout builder > Add New.
- Add a title and select the display type (Grid/List), and select if you want to show images and if you want the whole menu to be clickable.
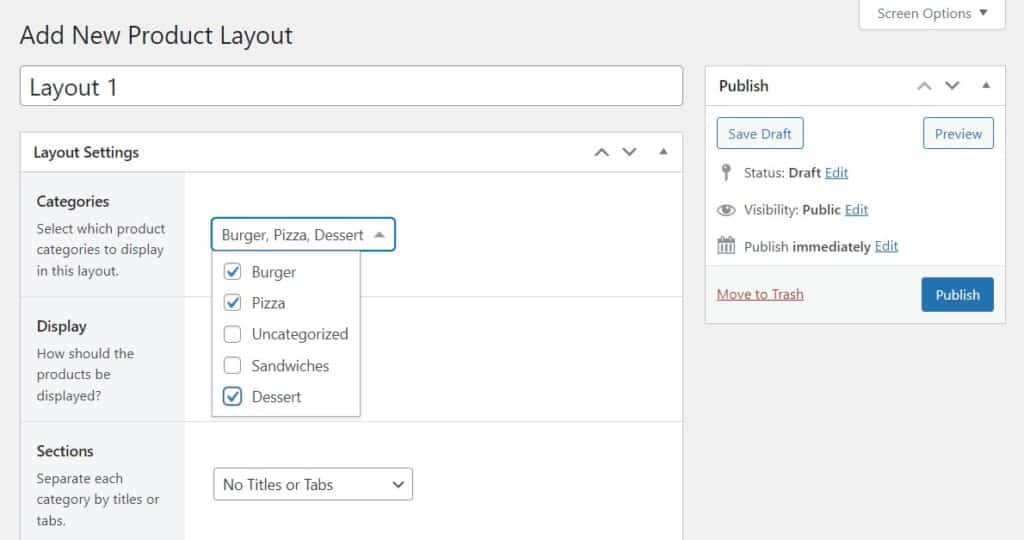
- When you’re done, click Publish.
Up to this point, you’ve simply created the menu layout. Now we need to add this layout to a new page to display your menu.
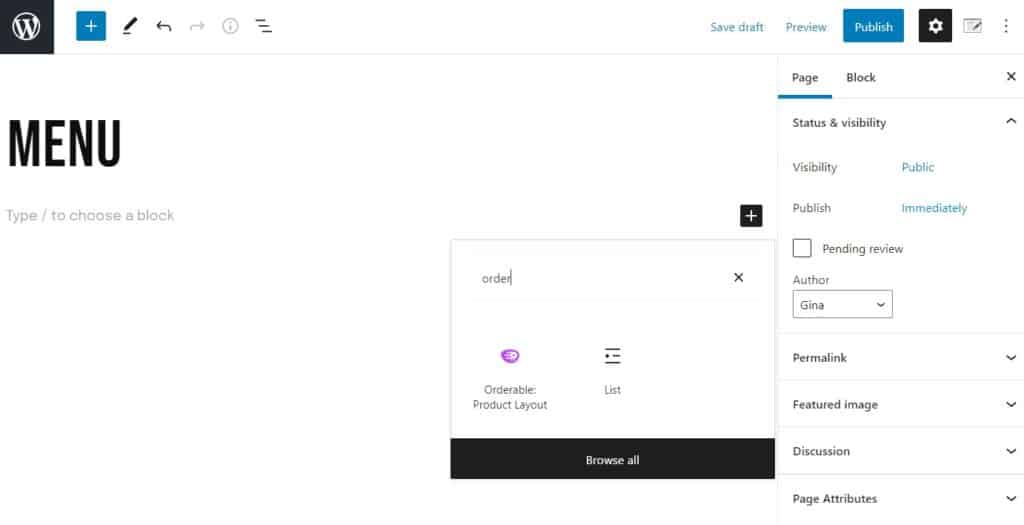
- So, create a new page by going to Pages > Add New from your WordPress dashboard.
- Name this page ‘Menu’ and click the plus(+) sign to add a new block.
- Search for the Orderable: Product Layout block and select it when it appears. This will cause a generic product menu to appear on the page.
- Click on the generic product menu, then select the menu you’ve just created from the Blocks tab on your right.
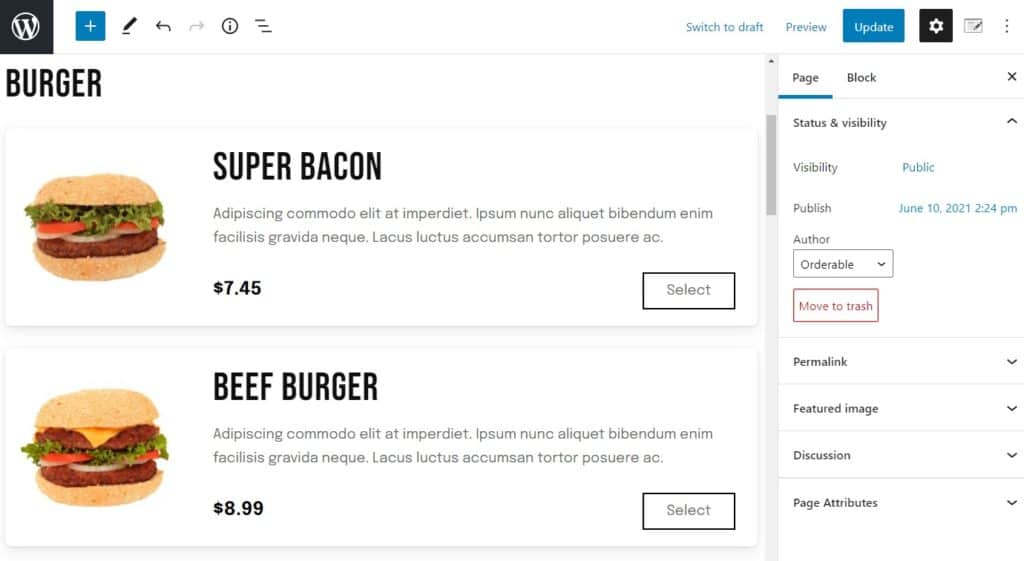
- Click Publish when you’re done.
Your online restaurant is up and running! You’ve set up an online ordering system with a menu that customers can order from. Now let’s add a useful feature, QR code table ordering, to make life easier for your staff and customers.
Step 4: Set up table ordering
To set up table ordering, take the following steps:
- Go to Orderable > Table Ordering to create a table.
- Enter the number of the specific table you want to create a QR code for. Orderable will automatically generate a QR code for that table.
- Next, add a specific URL that the customer can access only after scanning the QR code on the table.
- Click Publish when you’re done and repeat these steps for all tables in your restaurant.
That’s it! You can now download the QR codes, print them, and place them on their respective tables. When customers scan them, they will be directed to a menu where they can place their orders. Your staff will see the specific table the order belongs to and deliver it to the right table.
Create your restaurant website today
Creating a restaurant website today is a lot more straightforward than it used to be, but there are still certain steps you need to take, to get it done. This article was designed to walk you through each of them.
With Liquid Web, you can register for a domain name and get web hosting for your restaurant website. To create your restaurant’s website, you’ll need to set up an online ordering system and create menus from which customers can order.
To do this, you’ll need to install Orderable: a complete ordering solution for WordPress that covers all you need for an efficient and effective restaurant website.
Get Your Restaurant Business Online With Orderable
Orderable is a user-friendly WordPress plugin that adds online ordering to your restaurant website.
Add your dishes, create your online ordering menu, customize your delivery schedule, and manage orders with ease.
Gina Lucia is our in-house Content Manager at Orderable. She writes articles, user guides, technical documentation, and creates videos on everything WooCommerce and Orderable.
Gina has been working in the WordPress/WooCommerce space since 2012 when she developed WordPress websites for clients large and small.
For the past 8 years, she’s been writing about everything WordPress and WooCommerce, becoming an expert in what makes a WooCommerce store succeed.
When not writing, Gina loves to tend to her vegetable garden, read, or travel to mainland Europe.
Don’t miss out on the latest Orderable news!
Sign up for our newsletter to receive the latest news from the blog, you’ll get pinged every week with a digest of the latest updates.
[fluentform id=”6″]

Related Articles

How to Calculate Food Cost Percentage in 2026

Restaurant Payment Processing Equipment Every Owner Must Understand

Why You Should Create a Limited Menu for Your Restaurant
Get Your Restaurant Online With Orderable
The WooCommerce plugin designed to help restaurants take orders online – with no added fees!
View Pricing
