WooCommerce for Restaurants: Create Your Store in 5 Easy Steps
WooCommerce for Restaurants: Create Your Store in 5 Easy Steps

Gina Lucia


If you’re looking to use WooCommerce for restaurants, this guide is for you.
In this guide, we’ll walk you through:
- The benefits of using WooCommerce for your restaurant website.
- What features you’ll need to add to your restaurant website.
- How to get this done with one tool.
When using WooCommerce for restaurants, you can either spend time finding multiple different plugins to give you all the features you need, or you can use one plugin to do all the heavy lifting for you.
In this article, we’re going to show you how to use WooCommerce for food ordering and set up your WooCommerce restaurant menu. Plus, we’re going to get it all done with one straightforward, easy-to-use plugin – Orderable.
Get Your Restaurant Business Online With Orderable
Orderable is a user-friendly WordPress plugin that adds online ordering to your restaurant website.
Add your dishes, create your online ordering menu, customize your delivery schedule, and manage orders with ease.

But first, let’s talk about the benefits of using WooCommerce for your restaurant website in the first place.
Why use WooCommerce for restaurants?
WooCommerce is a free and open-source plugin that turns your WordPress website into a powerful online store. It’s one of the most popular ecommerce platforms in the world, with over 5 million active users.
WooCommerce is a great choice for restaurants because it offers a wide range of features and benefits, including:
- Full control over your ecommerce store: including your products, pricing, delivery options, and payment options/payment gateways. This means you can create a system that’s perfectly tailored to your restaurant’s needs.
- Customizable look and feel: WooCommerce is highly customizable, so you can make your online store look and feel exactly the way you want. There are thousands of free and premium WordPress themes and plugins available to help you create the perfect online store for your restaurant.
- Scalability: WooCommerce is scalable, so it can grow with your business. Whether you’re a small cafe or a large restaurant chain, WooCommerce can handle the volume of orders you receive.
Overall, WooCommerce is a great choice for restaurants of all sizes. It offers a wide range of features and benefits, including full control over your online ordering system, a customizable look and feel, scalability, affordability, and features that are specifically designed for restaurants.
So now we know the benefits of using WooCommerce with your WordPress restaurant website. Let’s take a look at what features/functionality you might need to add to WooCommerce to really make WooCommerce work for your restaurant.
What features you’ll need to add to your restaurant website
In addition to the core WooCommerce features, there are a number of additional features that you may want to add to your restaurant website. These features turn WooCommerce into a food ordering system rather than just a WooCommerce store.
Online food menu management
This allows you to easily create and manage your online menu, including adding and removing WooCommerce products/menu items, changing prices, and adding images, descriptions, and more.

Order tracking and notifications
This allows customers to track their orders in real time and receive notifications when their order is ready.
This helps to build trust and confidence, and it can also help to reduce the number of phone calls that you receive from customers inquiring about their order status.
Dietary restrictions and allergen information
This allows customers to filter your menu by dietary restrictions and allergen information. This is especially important for customers with food allergies or intolerances.
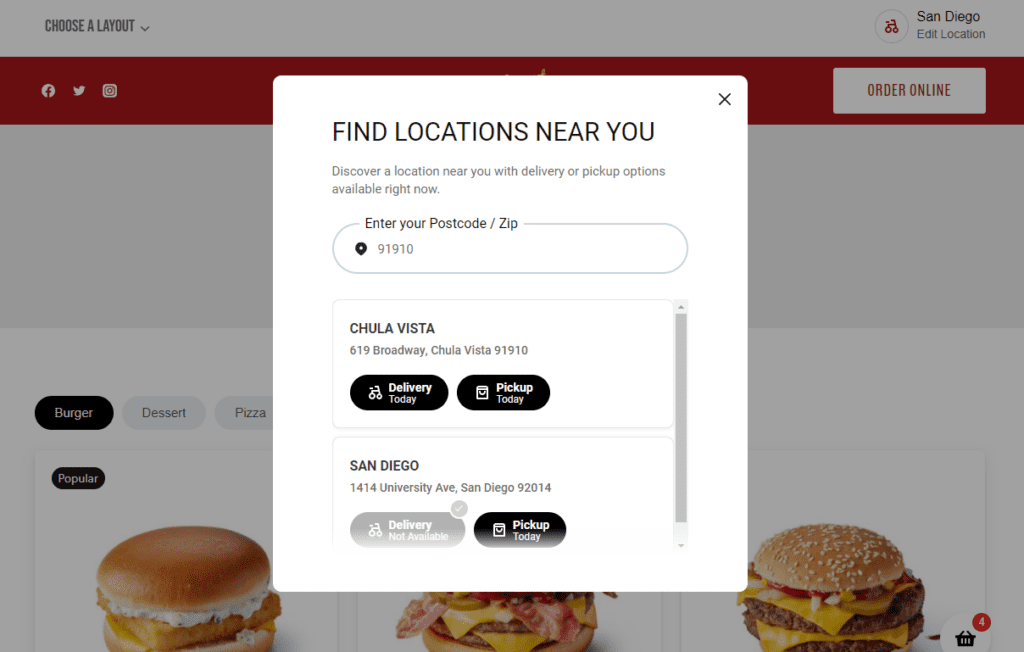
QR code table ordering
This allows customers to scan a QR code at their table to order and pay for their food directly from their phone. This can help to reduce wait times and improve the overall dining experience.
Food delivery and pickup time slots at checkout
This allows customers to select a delivery or pickup time slot when they are checking out. This can help you to manage your capacity and ensure that orders are ready on time.
It also benefits customers because they’ll know exactly when their order will arrive. Either that, or they can pick ASAP delivery and get their order as soon as you can delivery it.
Product customization
This allows customers to customize their food items with toppings, sauces, and other options. This can help to increase customer satisfaction and encourage repeat business.
By choosing the right features, you can create a restaurant website that is both informative and user-friendly, and that helps you to attract and retain customers.
So now we know what to look out for, let’s use a WooCommerce restaurant ordering plugin to add these features to your WooCommerce store.
What is the WooCommerce plugin Orderable?
Orderable is an all-in-one plugin that’s designed to help restaurants take orders online. It takes care of pretty much everything.
So all you have to do is add your menu items, process orders, and deliver them. It even installs WooCommerce for you.
This includes everything from:
- A modern and app-like menu/food ordering design – that you can customize.
- Product add-ons/customization options. So you can add sides, toppings, and dietary choices.
- Revenue-boosting order bumps. So you can suggest added extras.
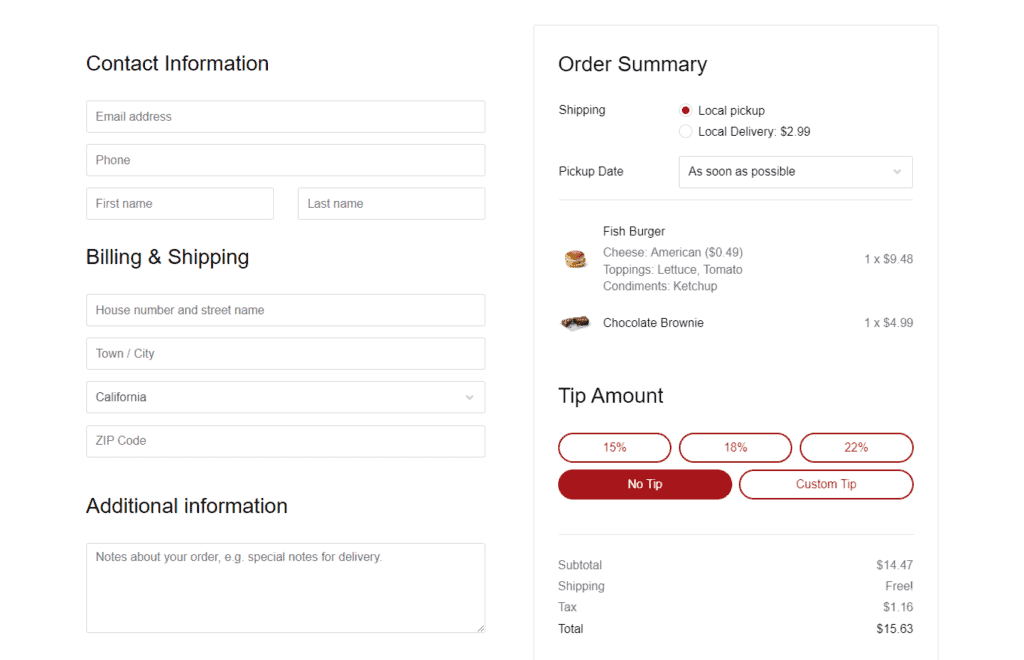
- Customizable checkout page pickup and delivery time slots. So you can set your own delivery/pickup schedule.
- Full control over the checkout – including payment methods, tipping, and more.
- Easy order management. So you can process orders, no matter if they’re for takeaway or delivery, without fuss.
- Multiple location integration. So you can have multiple stores in one easy-to-use website.
- and lots more.
Plus, Orderable has one more huge benefit – there are no additional fees! This means you won’t have to pay a 3rd-party provider 30-40% on each order.
So now that we know what Orderable is, let’s take a look at why it’s so beneficial to use Orderable. Especially if you’re looking to use WooCommerce for restaurants.
Why use WooCommerce and Orderable for restaurants
If you’re looking to take food orders online, then you might be toying with the idea of setting up your own website using WooCommerce vs a 3rd-party provider.
If that’s the case, here’s why Orderable (and WooCommerce) is a smart choice for your restaurant:
- You’ll pay no additional fees. By setting up your restaurant with Orderable, you won’t have to pay a hefty commission on each transaction. Depending on the business you’re running and your margins, these fees just may not be feasible.
- You’ll have control over the ordering experience. By doing food ordering in-house, you’ll be able to control the whole experience. Everything from how your website looks, to promotions, and even the checkout process.
- You’ll be able to boost your sales. By setting up your own website with Orderable, you’ll be able to add and customize your own offers and order bumps – increasing your sales.
- You will have control over the delivery experience. By handling your own delivery, you’ll have greater control over what the customer experiences and how your drivers are trained.
- Making updates is quicker – Because you control everything, making menu adjustments, adding new items, changing delivery slots, holidays and more is so much quicker. This is because you don’t need outside approval from a 3rd-party platform.
Get Your Restaurant Business Online With Orderable
Orderable is a user-friendly WordPress plugin that adds online ordering to your restaurant website.
Add your dishes, create your online ordering menu, customize your delivery schedule, and manage orders with ease.
So now we know the benefits of using Orderable and WooCommerce for your restaurant. Next, we’ll walk you through how easy it is to get your restaurant set up and running.
How to create your food ordering website using WooCommerce
Ready to get your restaurant up and running with Orderable? Below, we’ve outlined step-by-step instructions so you can get going quickly.
Note: The following steps presume you have a WordPress website up and running.
Step one: Install Orderable
The first thing you’ll need to do is install the Orderable plugin on your website.
For the purposes of this guide, we’ll be using the Pro version of Orderable. This is so we can add product addons, revenue-boosting features, tips, and more.
To get Orderable Pro, you can purchase it from the Orderable website.
Get Your Restaurant Business Online With Orderable
Orderable is a user-friendly WordPress plugin that adds online ordering to your restaurant website.
Add your dishes, create your online ordering menu, customize your delivery schedule, and manage orders with ease.
Once you’ve purchased Orderable Pro, you’ll be sent two plugins. The free version of Orderable and Orderable Pro. Let’s get them added to your site.
To add Orderable to your WordPress website, take the following steps:
- From your WordPress dashboard, go to Plugins > Add new.
- Click the Upload Plugin button at the top of the page.
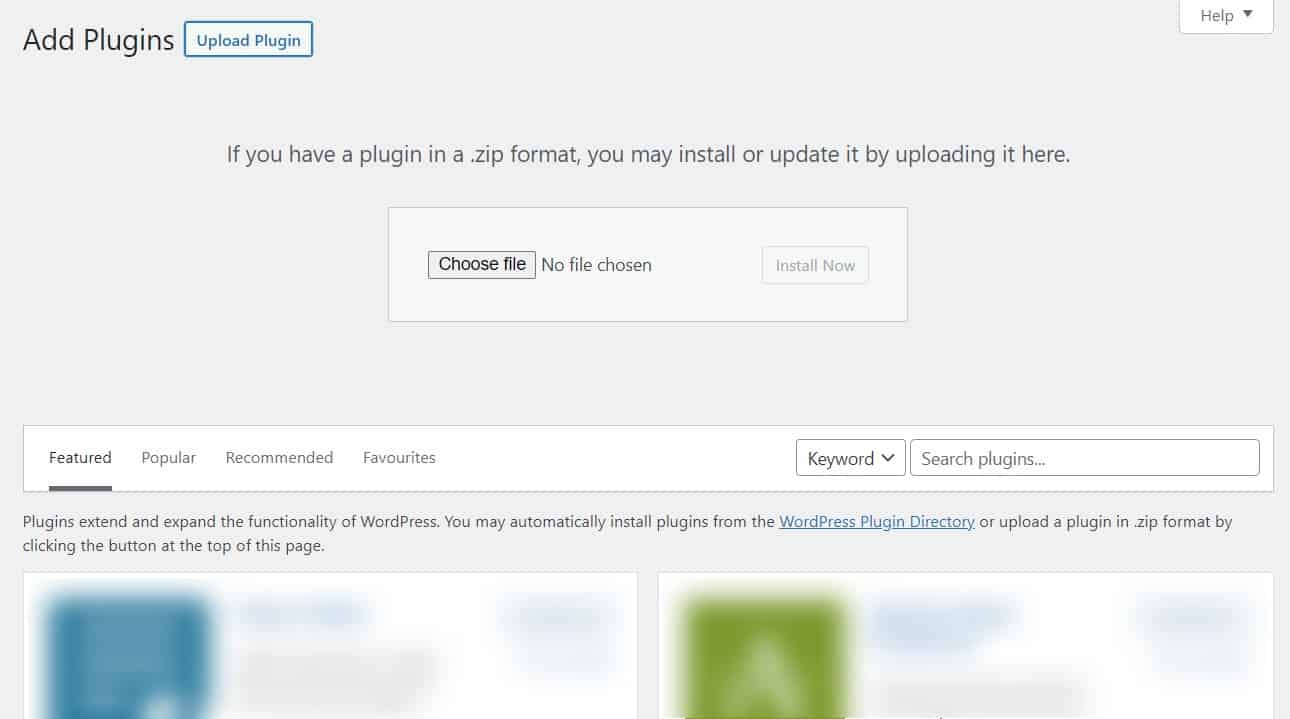
- Then upload the .zip file you were sent containing Orderable. Click Install Now. Then click Activate Plugin on the next page.
- Repeat the steps for Orderable Pro.
Once you’ve done this, click on Orderable in your WordPress menu and you’ll be shown a handy setup screen that will help you get started.
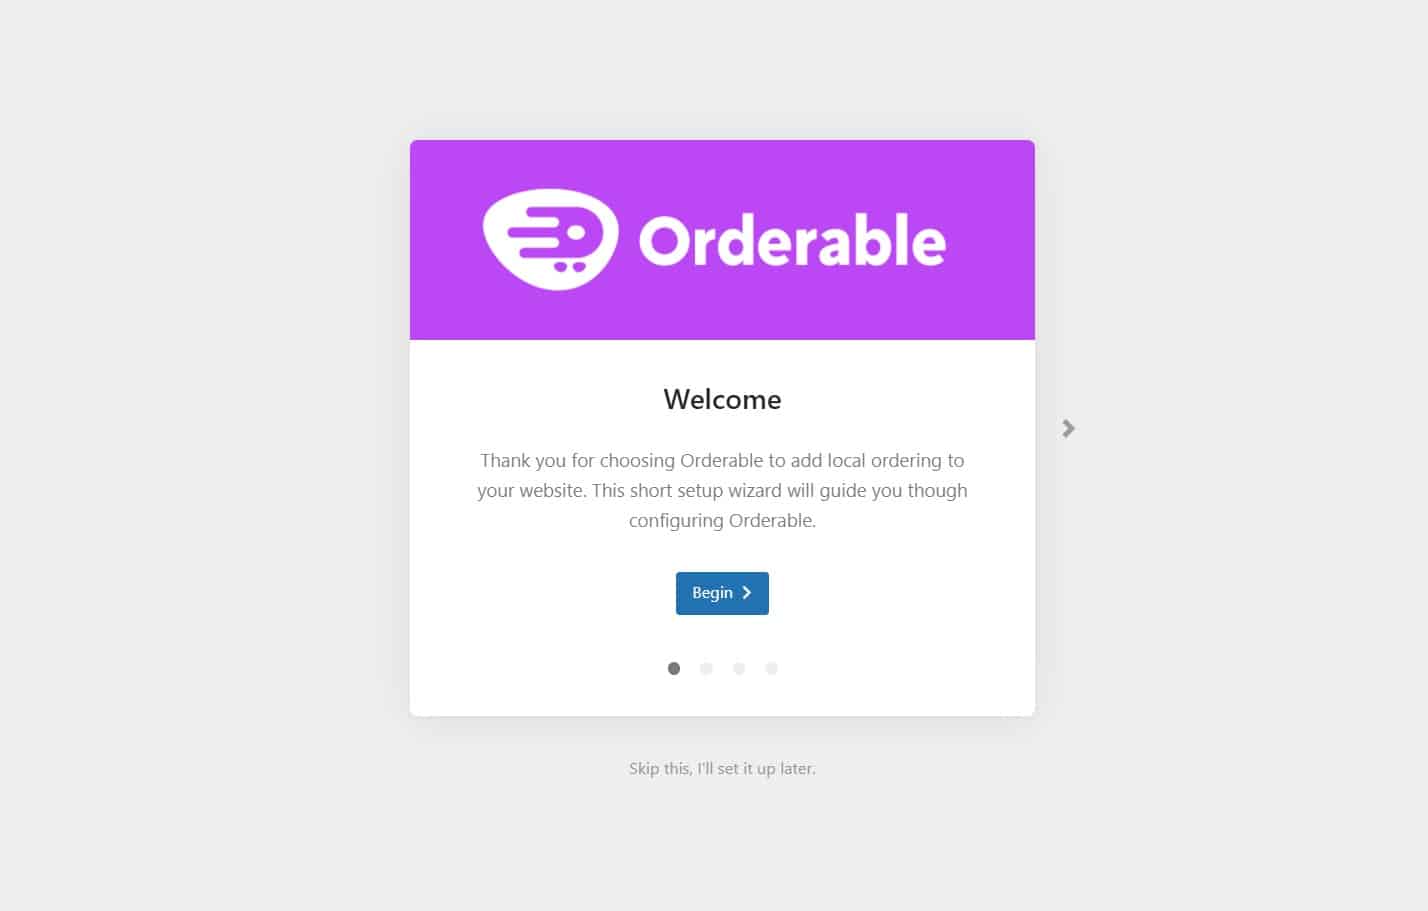
Click the blue Begin button and the first thing Orderable will do (if you don’t already have it installed), is install WooCommerce for you. This saves you an additional step and does the heavy lifting for you.
Next, we’ll need to add our business information, opening times, and more.
Step two: Enter your restaurant information
The next step in the setup screen asks you to input your business information. This includes your business name, address, postcode or ZIP, and email.
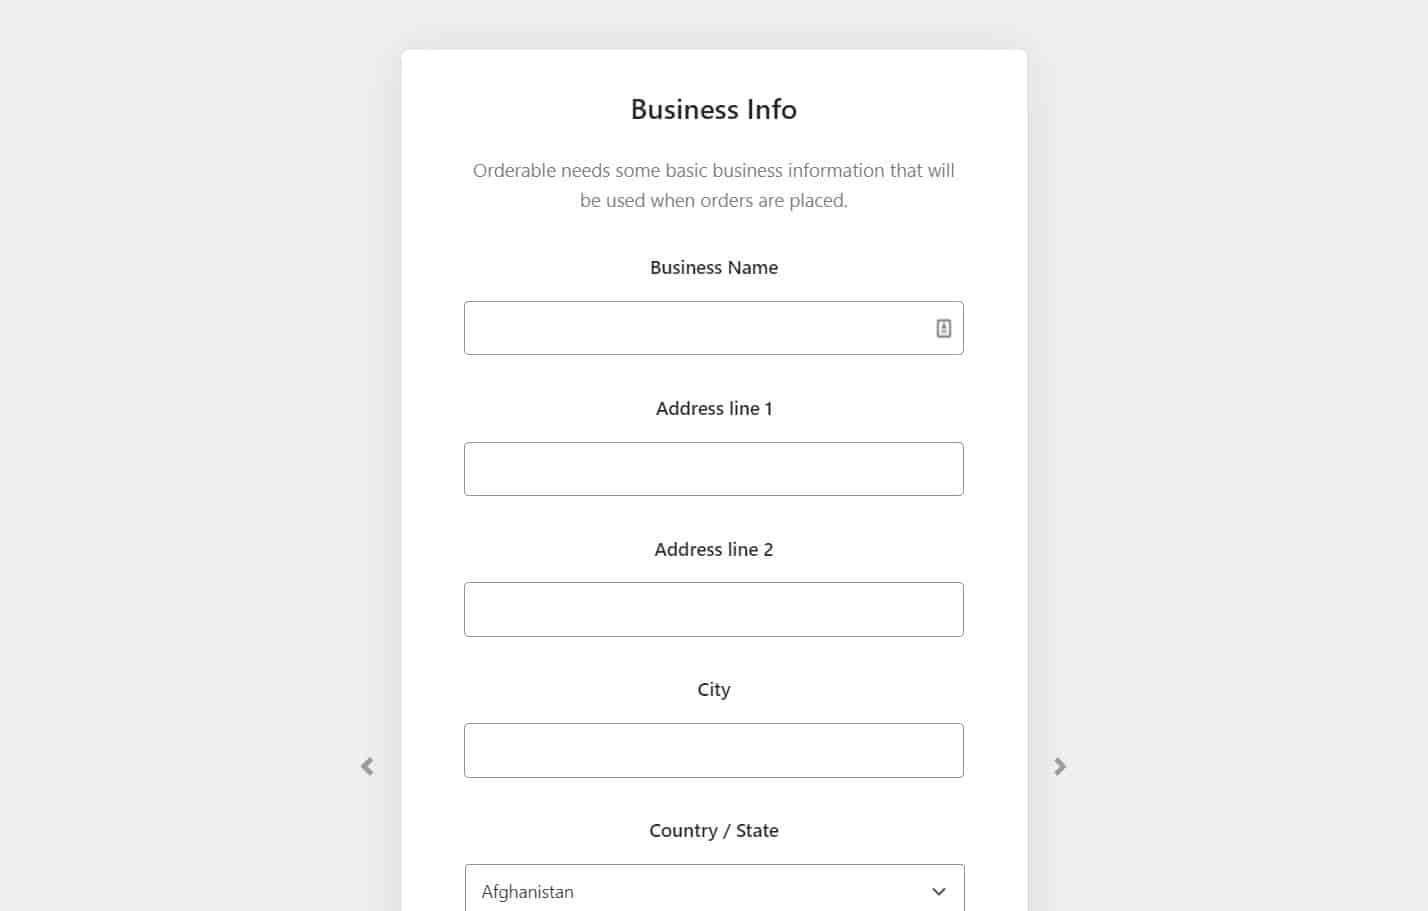
Then you’ll be asked to determine if you do delivery, or pickup (or both). It also allows you to add your open days and times. Of course, you can change all of this later if you need to.

Once you’ve filled this out (which should take just a few minutes), you’ll be able to close the setup and get to adding your food items.
Step three: Add your food items
Okay, now we have the basics set up, we need to add our ‘products’ or food items we’d like to sell.
To do this, take the following steps:
- From the WordPress dashboard, go to Products > Add New.
- You’ll then be taken to a page where you can add all the information you’d like for your food item or dish.
- Give it a title in the title area.
- Scroll down to the Product data section and give it a price.
- Click the Set product image link in the Product image section on the right to add a photograph of your dish.
- At this point, you can also create product categories (Starters, Mains, Desserts, etc).
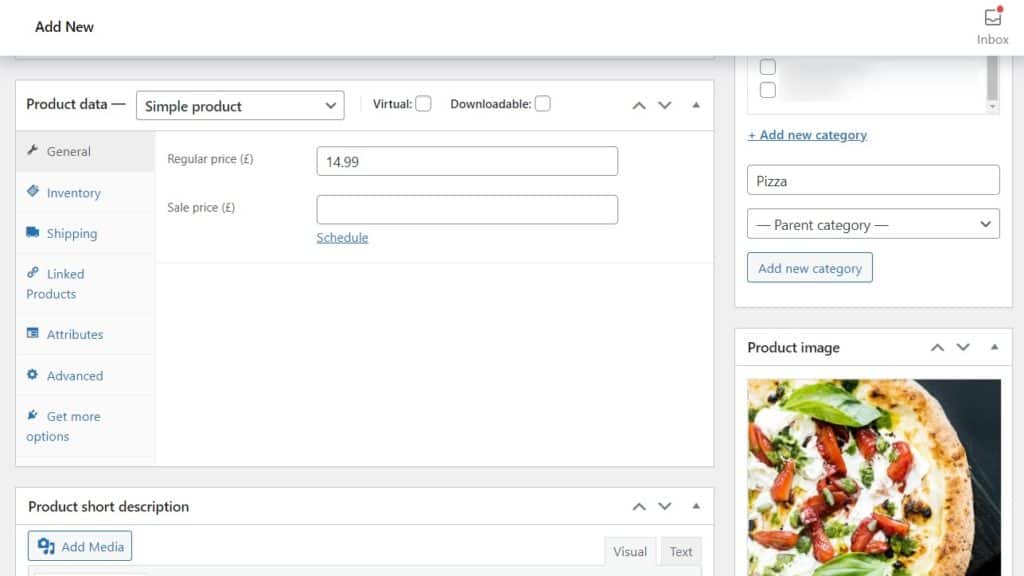
Once you’re happy with your product, click Publish.
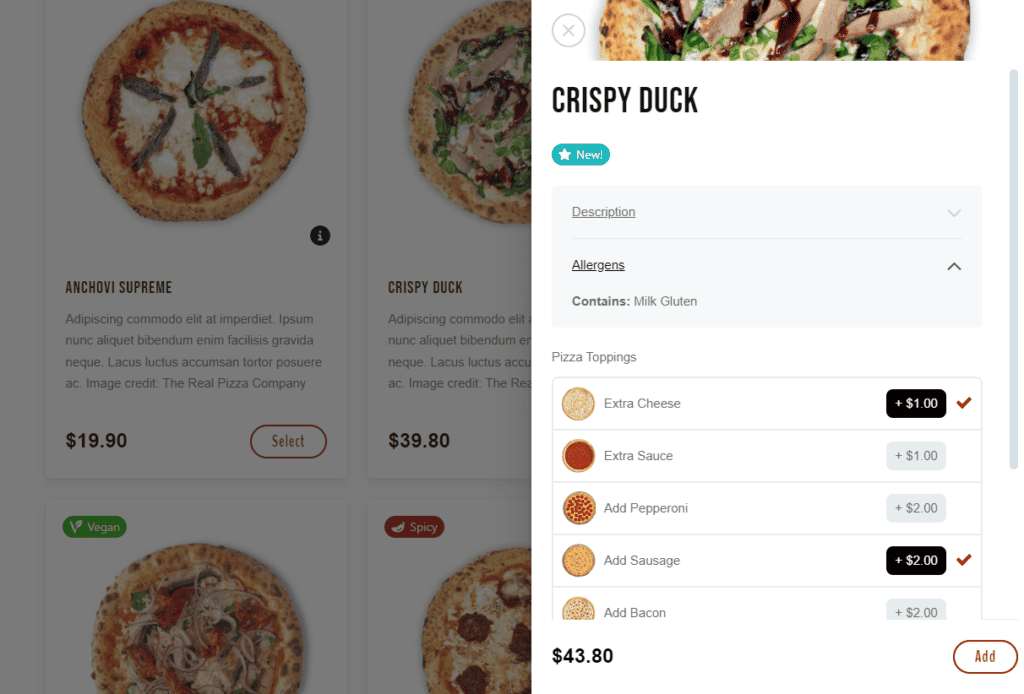
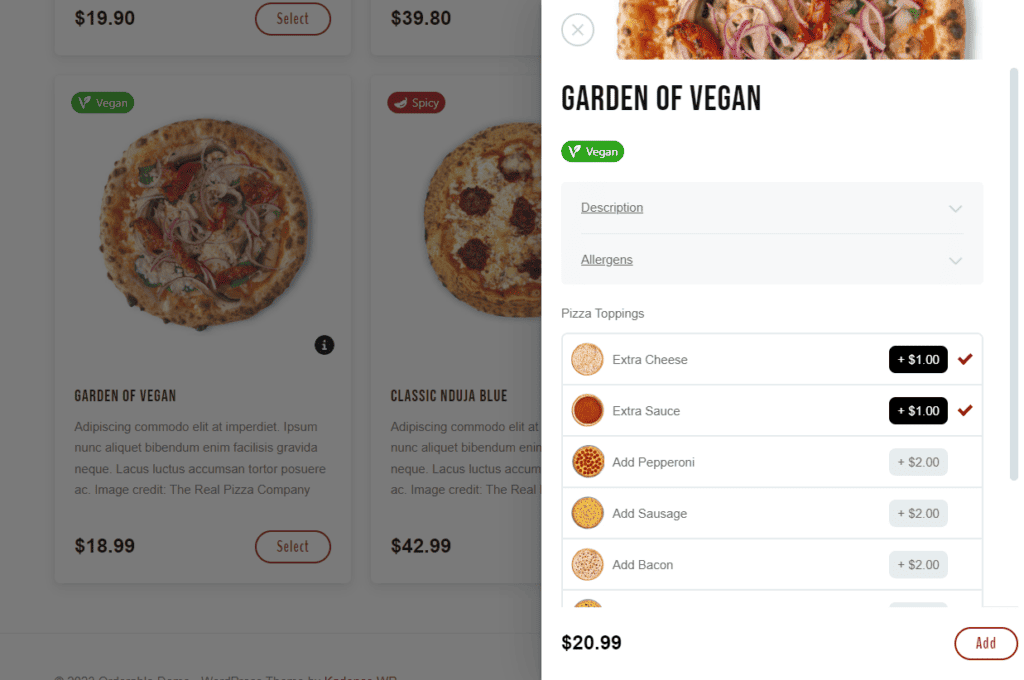
If you then need to create product addons, we’ll go through those next. These could be anything from toppings to additional sauces, dietary requirements, and more.
To create your product addons, take the following steps:
- Hover over Orderable in your WordPress menu and click Product Addons.
- Then click the Add New button at the top of the page.
- Next, you’ll be able to name your group of addons. For this example, we’ll create a group of addons to be included with all pizzas. So we’ll call it, Pizza Addons.
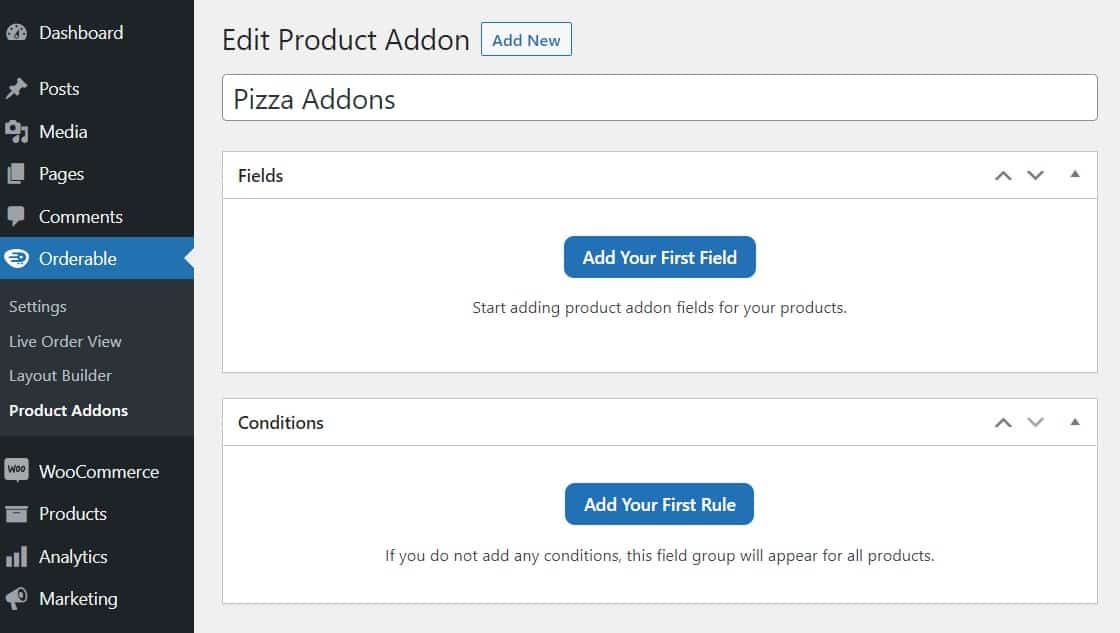
- Click the blue Add Your First Field button to create an addon, then click it to open it up.
- Once done, you’ll be able to enter all the addon information. You can change its type (text, checkbox, image, etc), its description, if it’s required, and more.
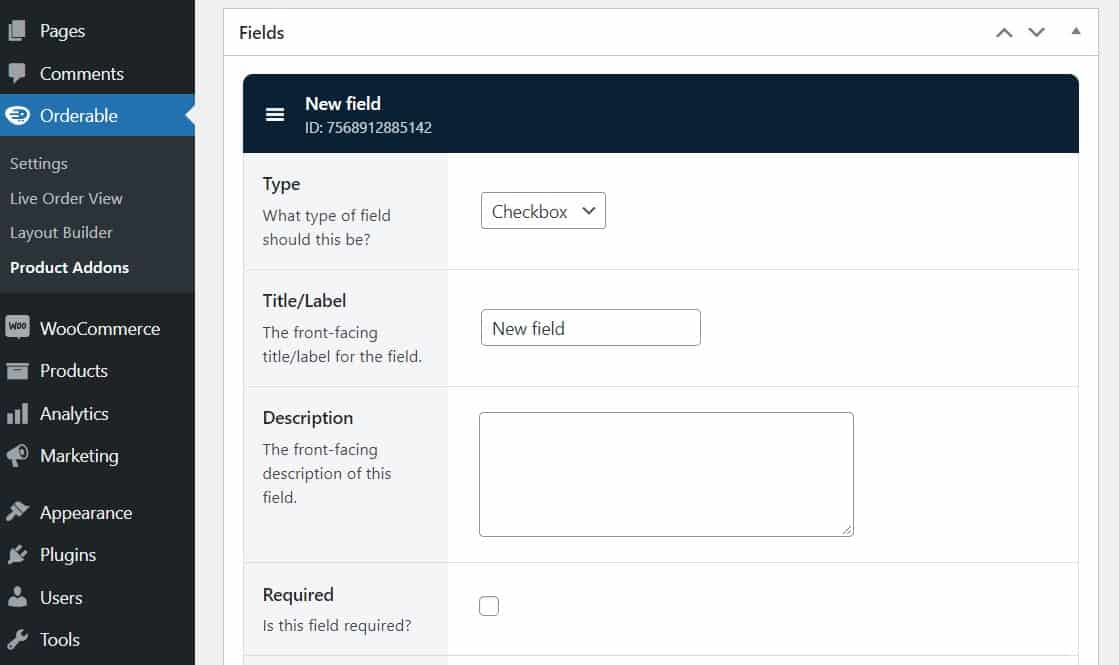
- Next, you’ll need to add your options. In this case, we’re adding some sauce options to our pizza.
- Click the blue Add Option button.
- Then give your sauce a name and price. You can add an optional image or color visual here if you’d like.
- Repeat these two steps to keep adding more options.

- Then we’ll need to select which products or categories we want to add these options to.
- Click Add Your First Rule in the Conditions section.
- Here you’ll be able to select if you want your product addons to show on individual products by searching for them by name, or by a set category.
- You can set as many rules as you like.
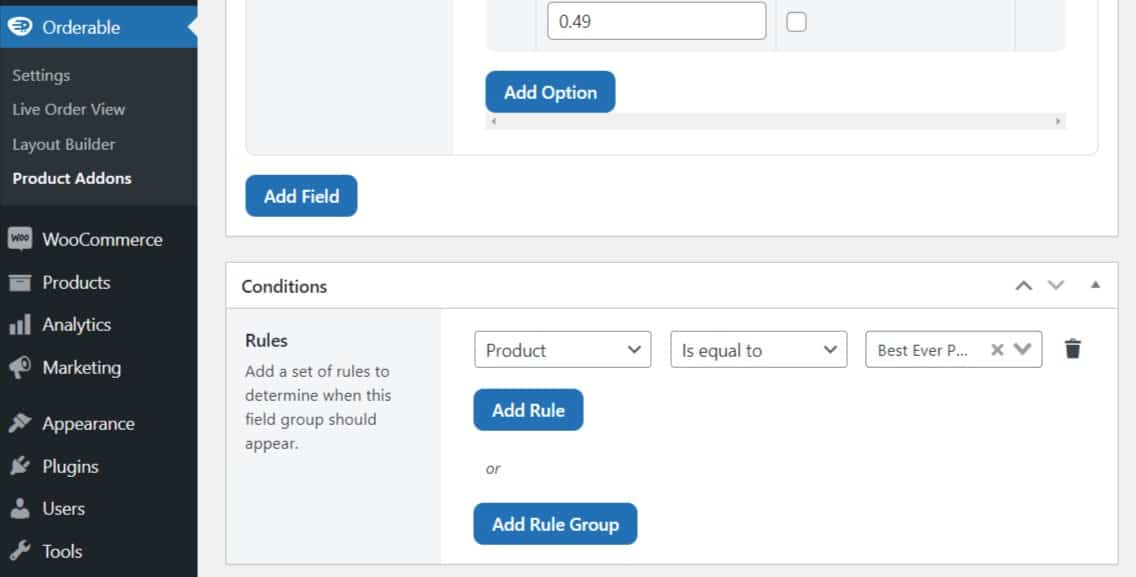
- Once you’re happy with all of these settings, click Publish.
Now we’ve added our products, next we’ll create our restaurant menu so customers can order.
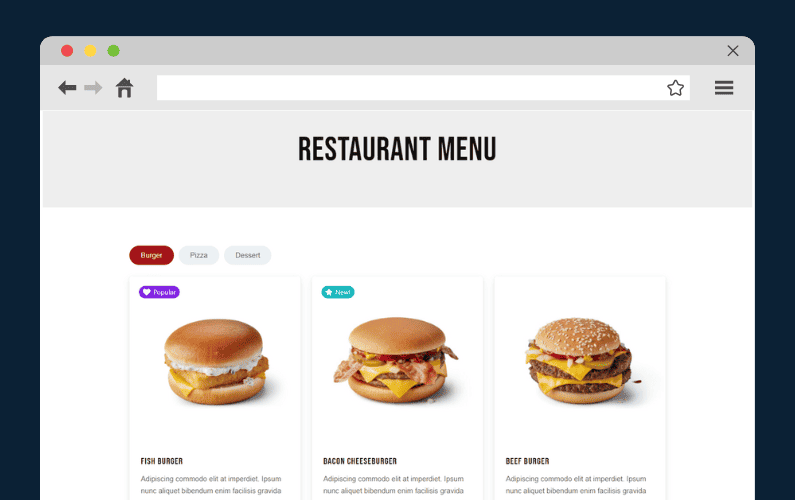
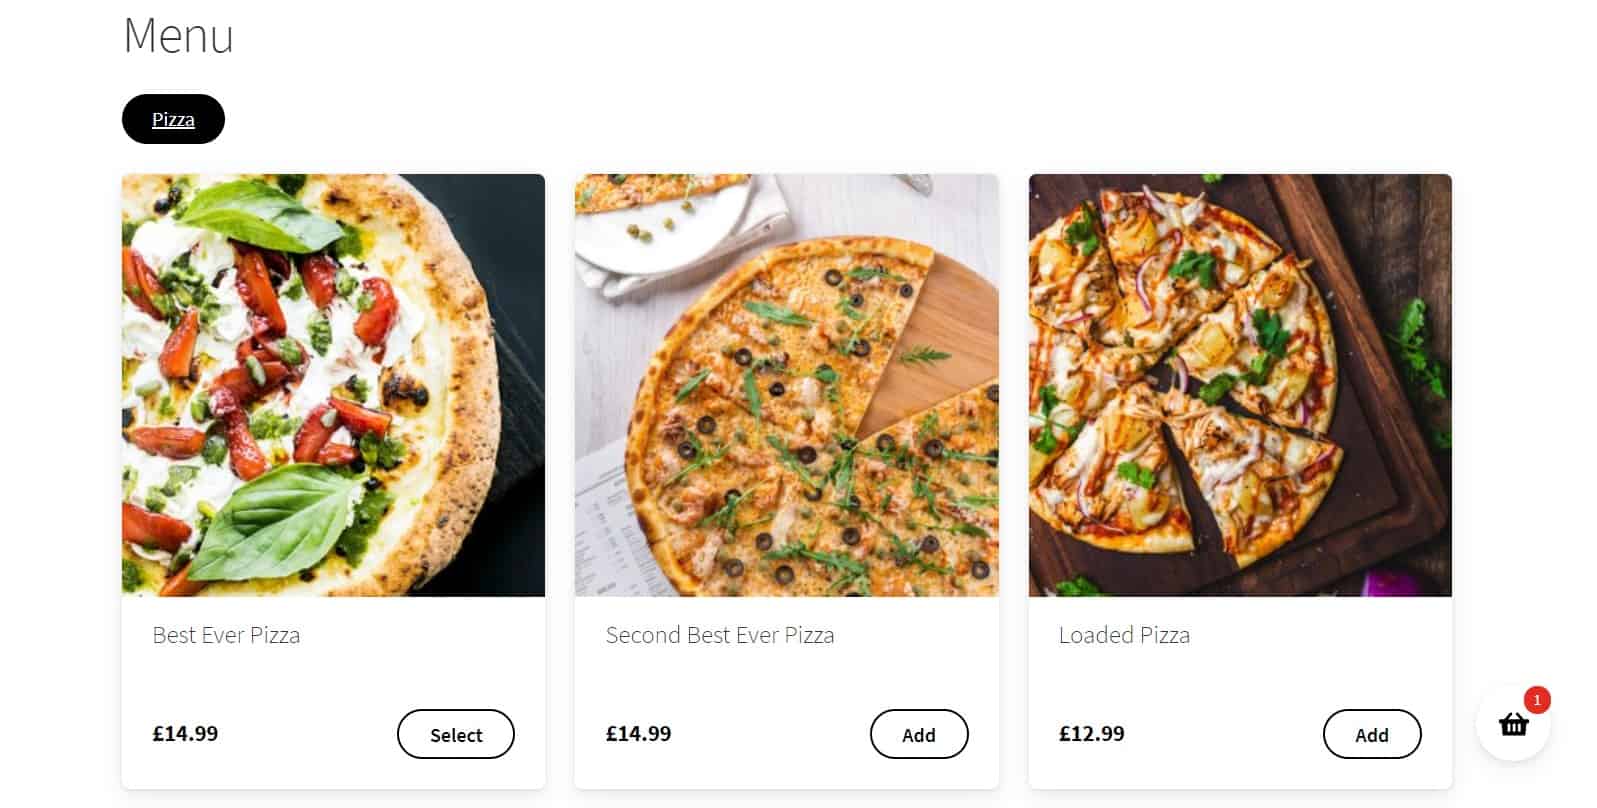
Step four: Create your WooCommerce restaurant menu page
In this step, we’re going to put together a product grid that will display on the front end of your website and allow customers to order from you.
This makes online food ordering and online payment super easy, no matter if you sell fast food, or fine dining.
To do this, take the following steps:
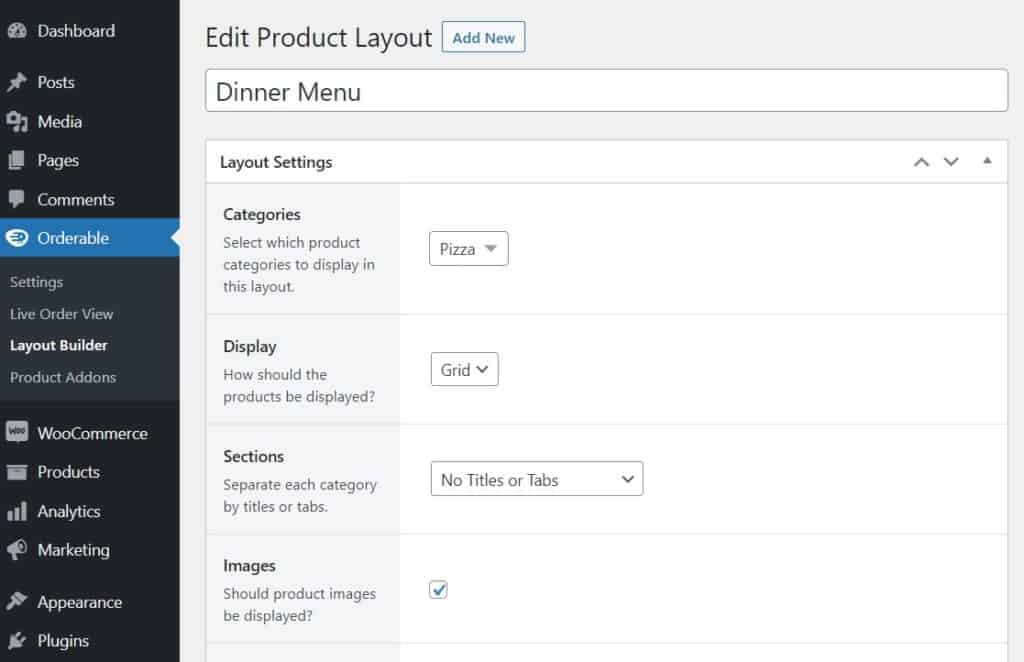
- From your WordPress dashboard, go to Orderable > Layout Builder and click the Add New button at the top of the page.
- Give this layout a title and select which categories you’d like it to include. You’ll be able to see a live preview of what this will look like at the bottom of the page.
- Then select if you want your layout to display in a Grid or List.
- If you’ve created categories for your food items, you’ll be able to determine what these look like by changing the Sections drop down.
- Decide if you want images to show and if you want the whole menu item to be clickable or just the button.
- Once happy, click Publish.
You’ve created your layout, now we’ll need to add it to a page on your site. This takes no time at all.
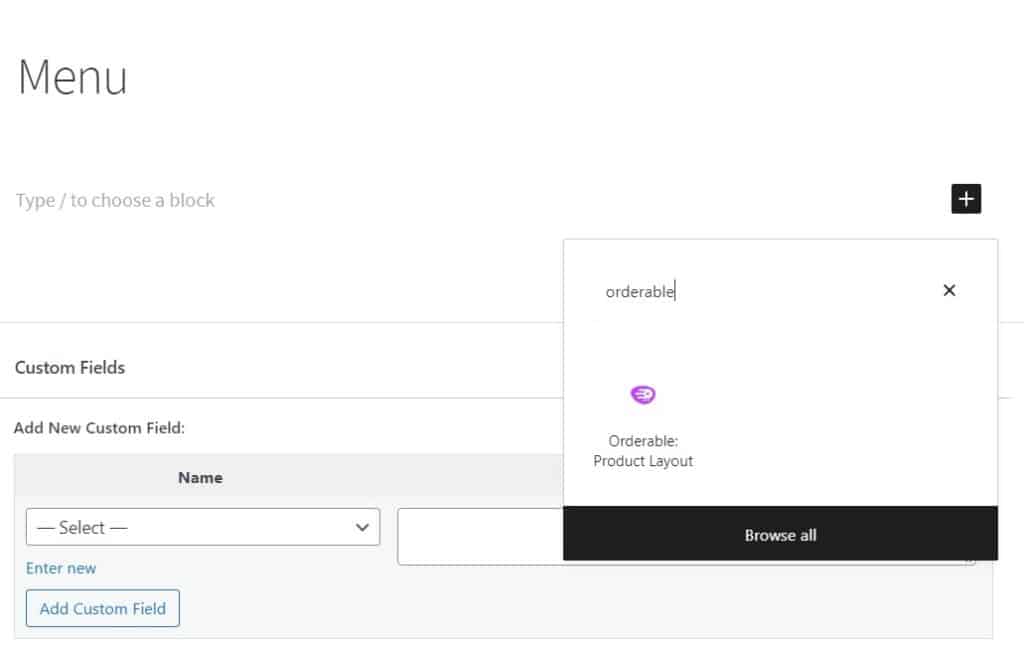
- From your WordPress dashboard, hover over Pages and click Add New.
- This new page will be your restaurant’s online menu. Give it a name (usually Menu) and then click the black plus sign to add a block.

- Once clicked, search ‘Orderable’ in the search area and click the Orderable: Product Layout block.
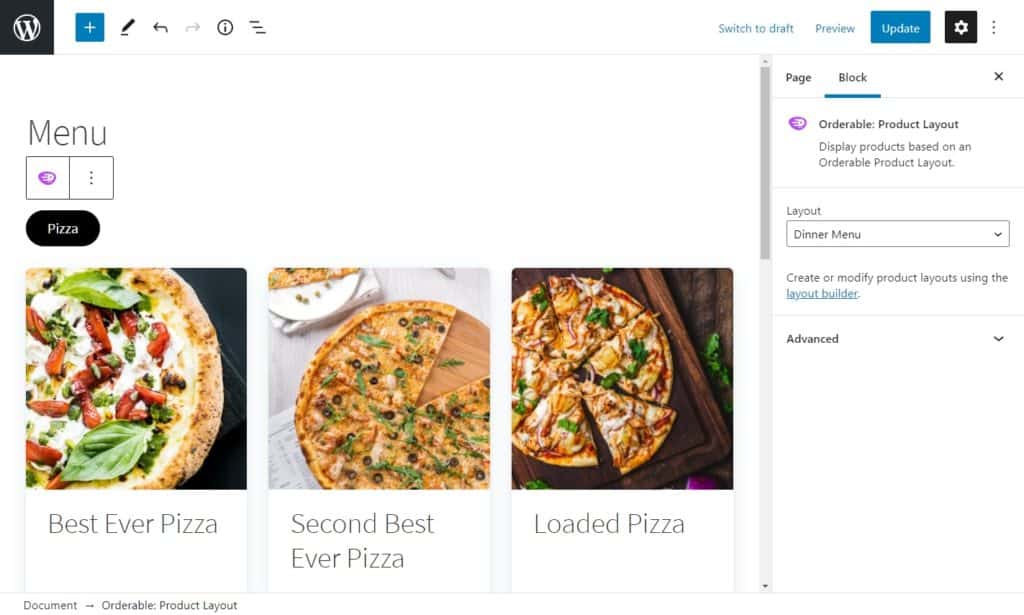
- A generic product grid will then be added to your page. Make sure to select your layout from the right-hand Layout dropdown and then click Publish.
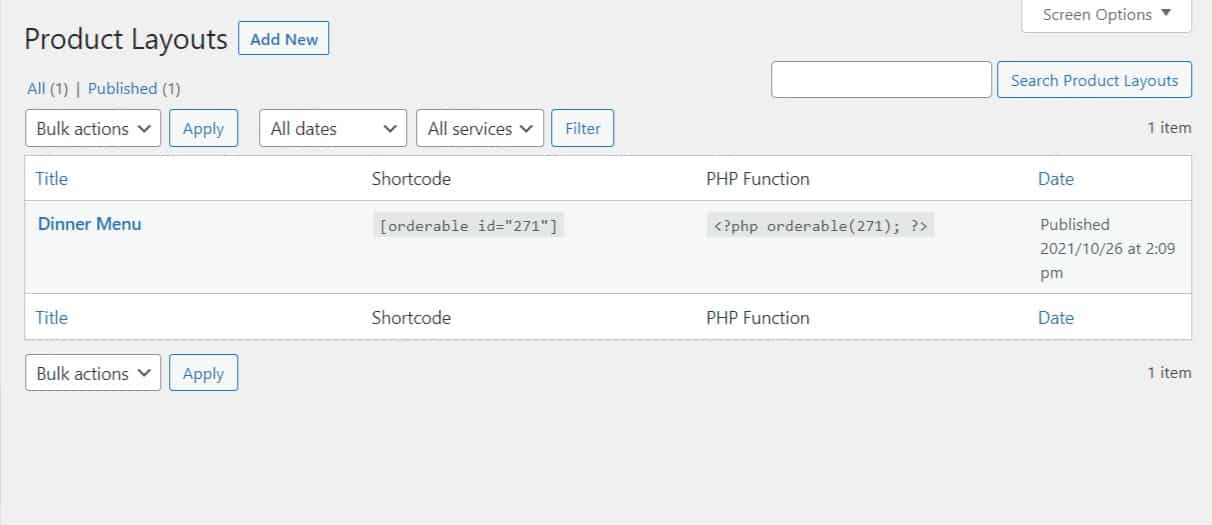
- Alternatively, you can add your layout with a shortcode. To do this, hover over Orderable in the WordPress sidebar and click Layout Builder.
- Here you’ll see the layout you just created and a column called Shortcode. Copy the shortcode you see in this section.
- Then hover over Pages in the WordPress sidebar and click Add New.
- Then paste the shortcode you copied earlier in the Type / to choose a block section.
- Click Publish.
View your page on the front-end of your site and you’ll see all your menu items ready to order.
Your WooCommerce restaurant menu is up and running, but let’s take advantage of everything Orderable has to offer.
Next, we’ll walk you through adding some sales-boosting features.
Step five: Add sales-boosting order bumps
The order bumps you can add to your restaurant website appear when a customer adds an item to their order and when they view their order list – like this:
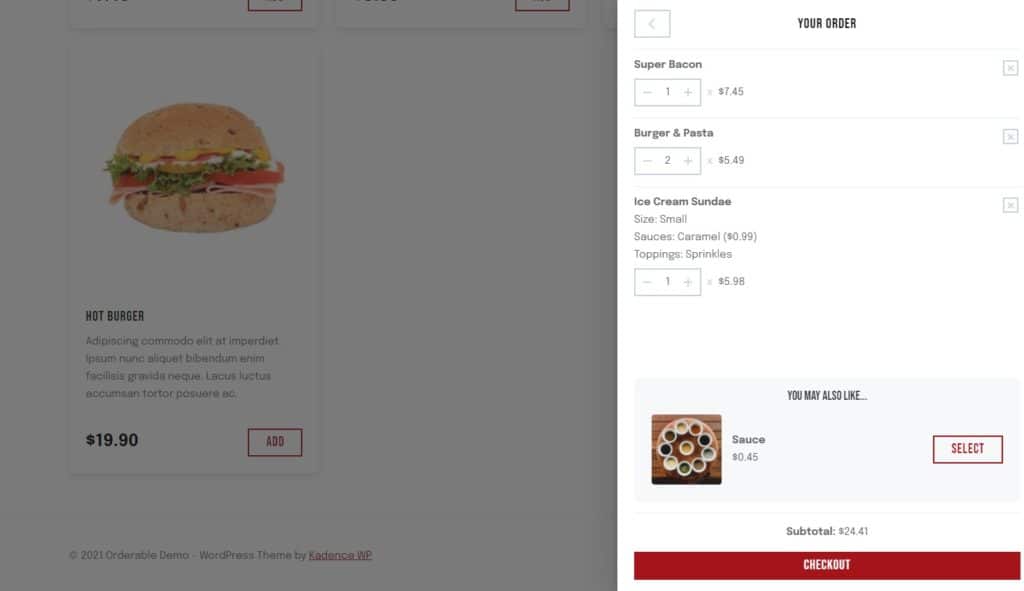
As the restaurant owner, you have full control over these offers and can add them to individual products to boost your revenue.
This can be done by simply editing a product, scrolling down to the Product data section, and adding Cross-sells in the Linked Products tab.
For a more detailed tutorial on how to set this up, you can watch our How to Add Order Bumps video tutorial.
WooCommerce for restaurants – set yours up today
That’s it! You’ve now set up online ordering for your restaurant using Orderable and WooCommerce.
Using WooCommerce for restaurants has never been simpler to get started. If you’d like to give Orderable a try, you can download the free light version of Orderable, or purchase the full version right here on Orderable.com.
Get Your Restaurant Business Online With Orderable
Orderable is a user-friendly WordPress plugin that adds online ordering to your restaurant website.
Add your dishes, create your online ordering menu, customize your delivery schedule, and manage orders with ease.
Gina Lucia is our in-house Content Manager at Orderable. She writes articles, user guides, technical documentation, and creates videos on everything WooCommerce and Orderable.
Gina has been working in the WordPress/WooCommerce space since 2012 when she developed WordPress websites for clients large and small.
For the past 8 years, she’s been writing about everything WordPress and WooCommerce, becoming an expert in what makes a WooCommerce store succeed.
When not writing, Gina loves to tend to her vegetable garden, read, or travel to mainland Europe.
Don’t miss out on the latest Orderable news!
Sign up for our newsletter to receive the latest news from the blog, you’ll get pinged every week with a digest of the latest updates.
[fluentform id=”6″]

Related Articles
5 Steps to Add WooCommerce Local Pickup
New to Orderable: Updates for September 2022

8 Best Restaurant Ordering Systems Compared (2026)
Get Your Restaurant Online With Orderable
The WooCommerce plugin designed to help restaurants take orders online – with no added fees!
View Pricing
